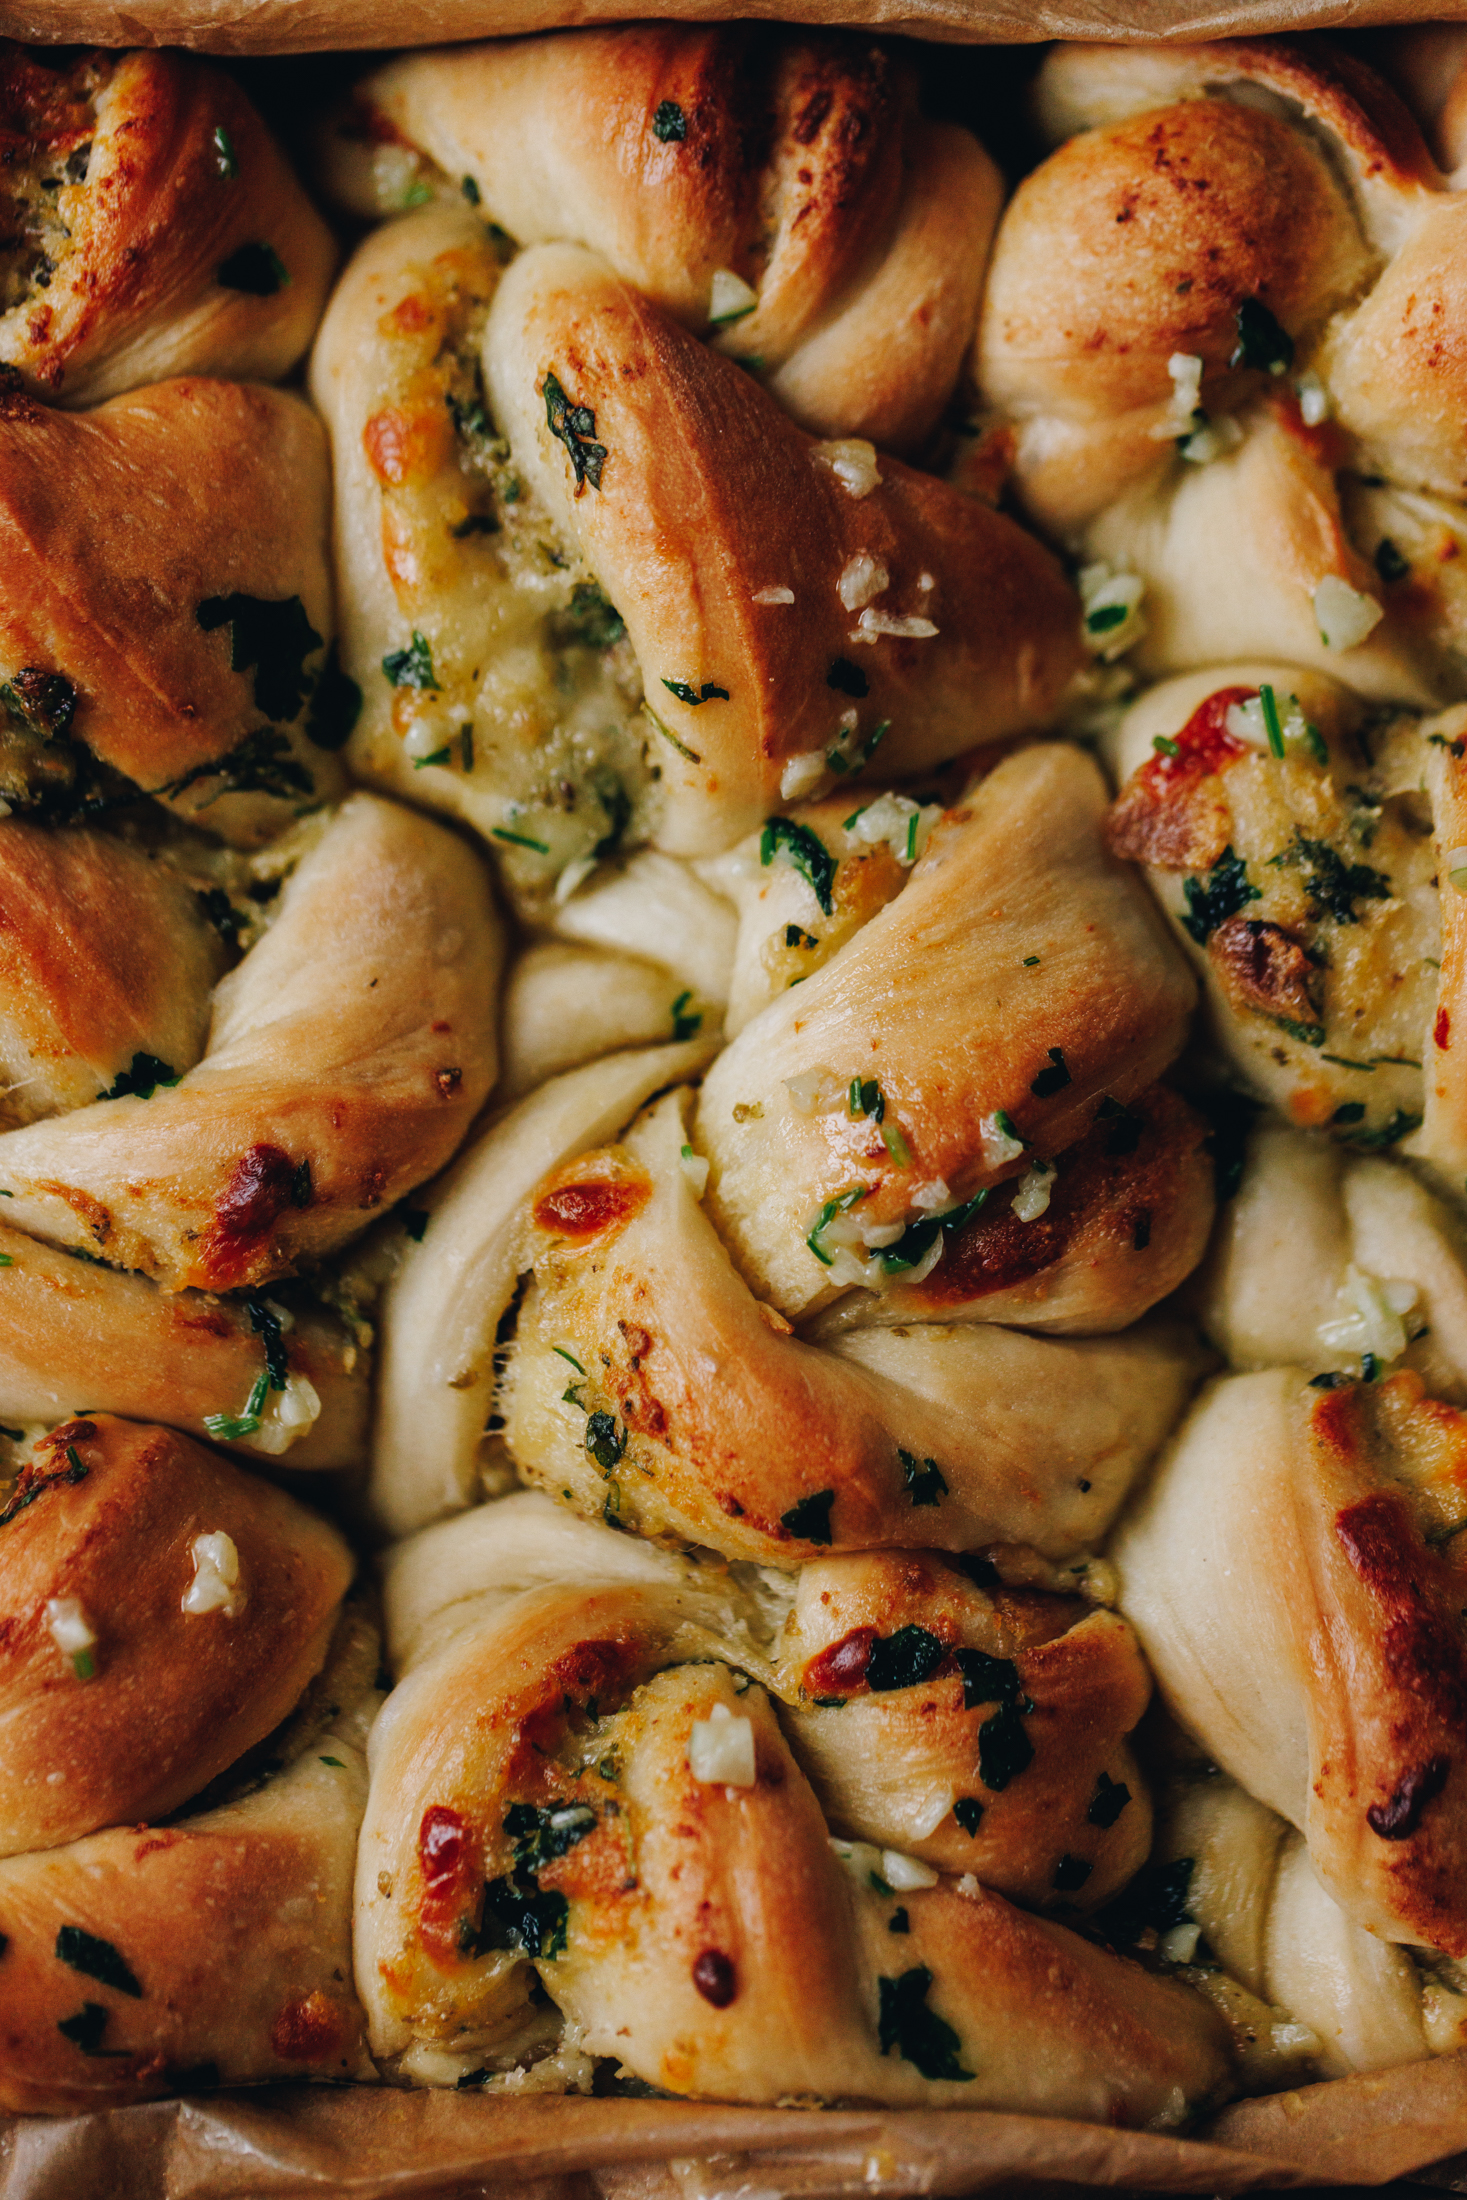
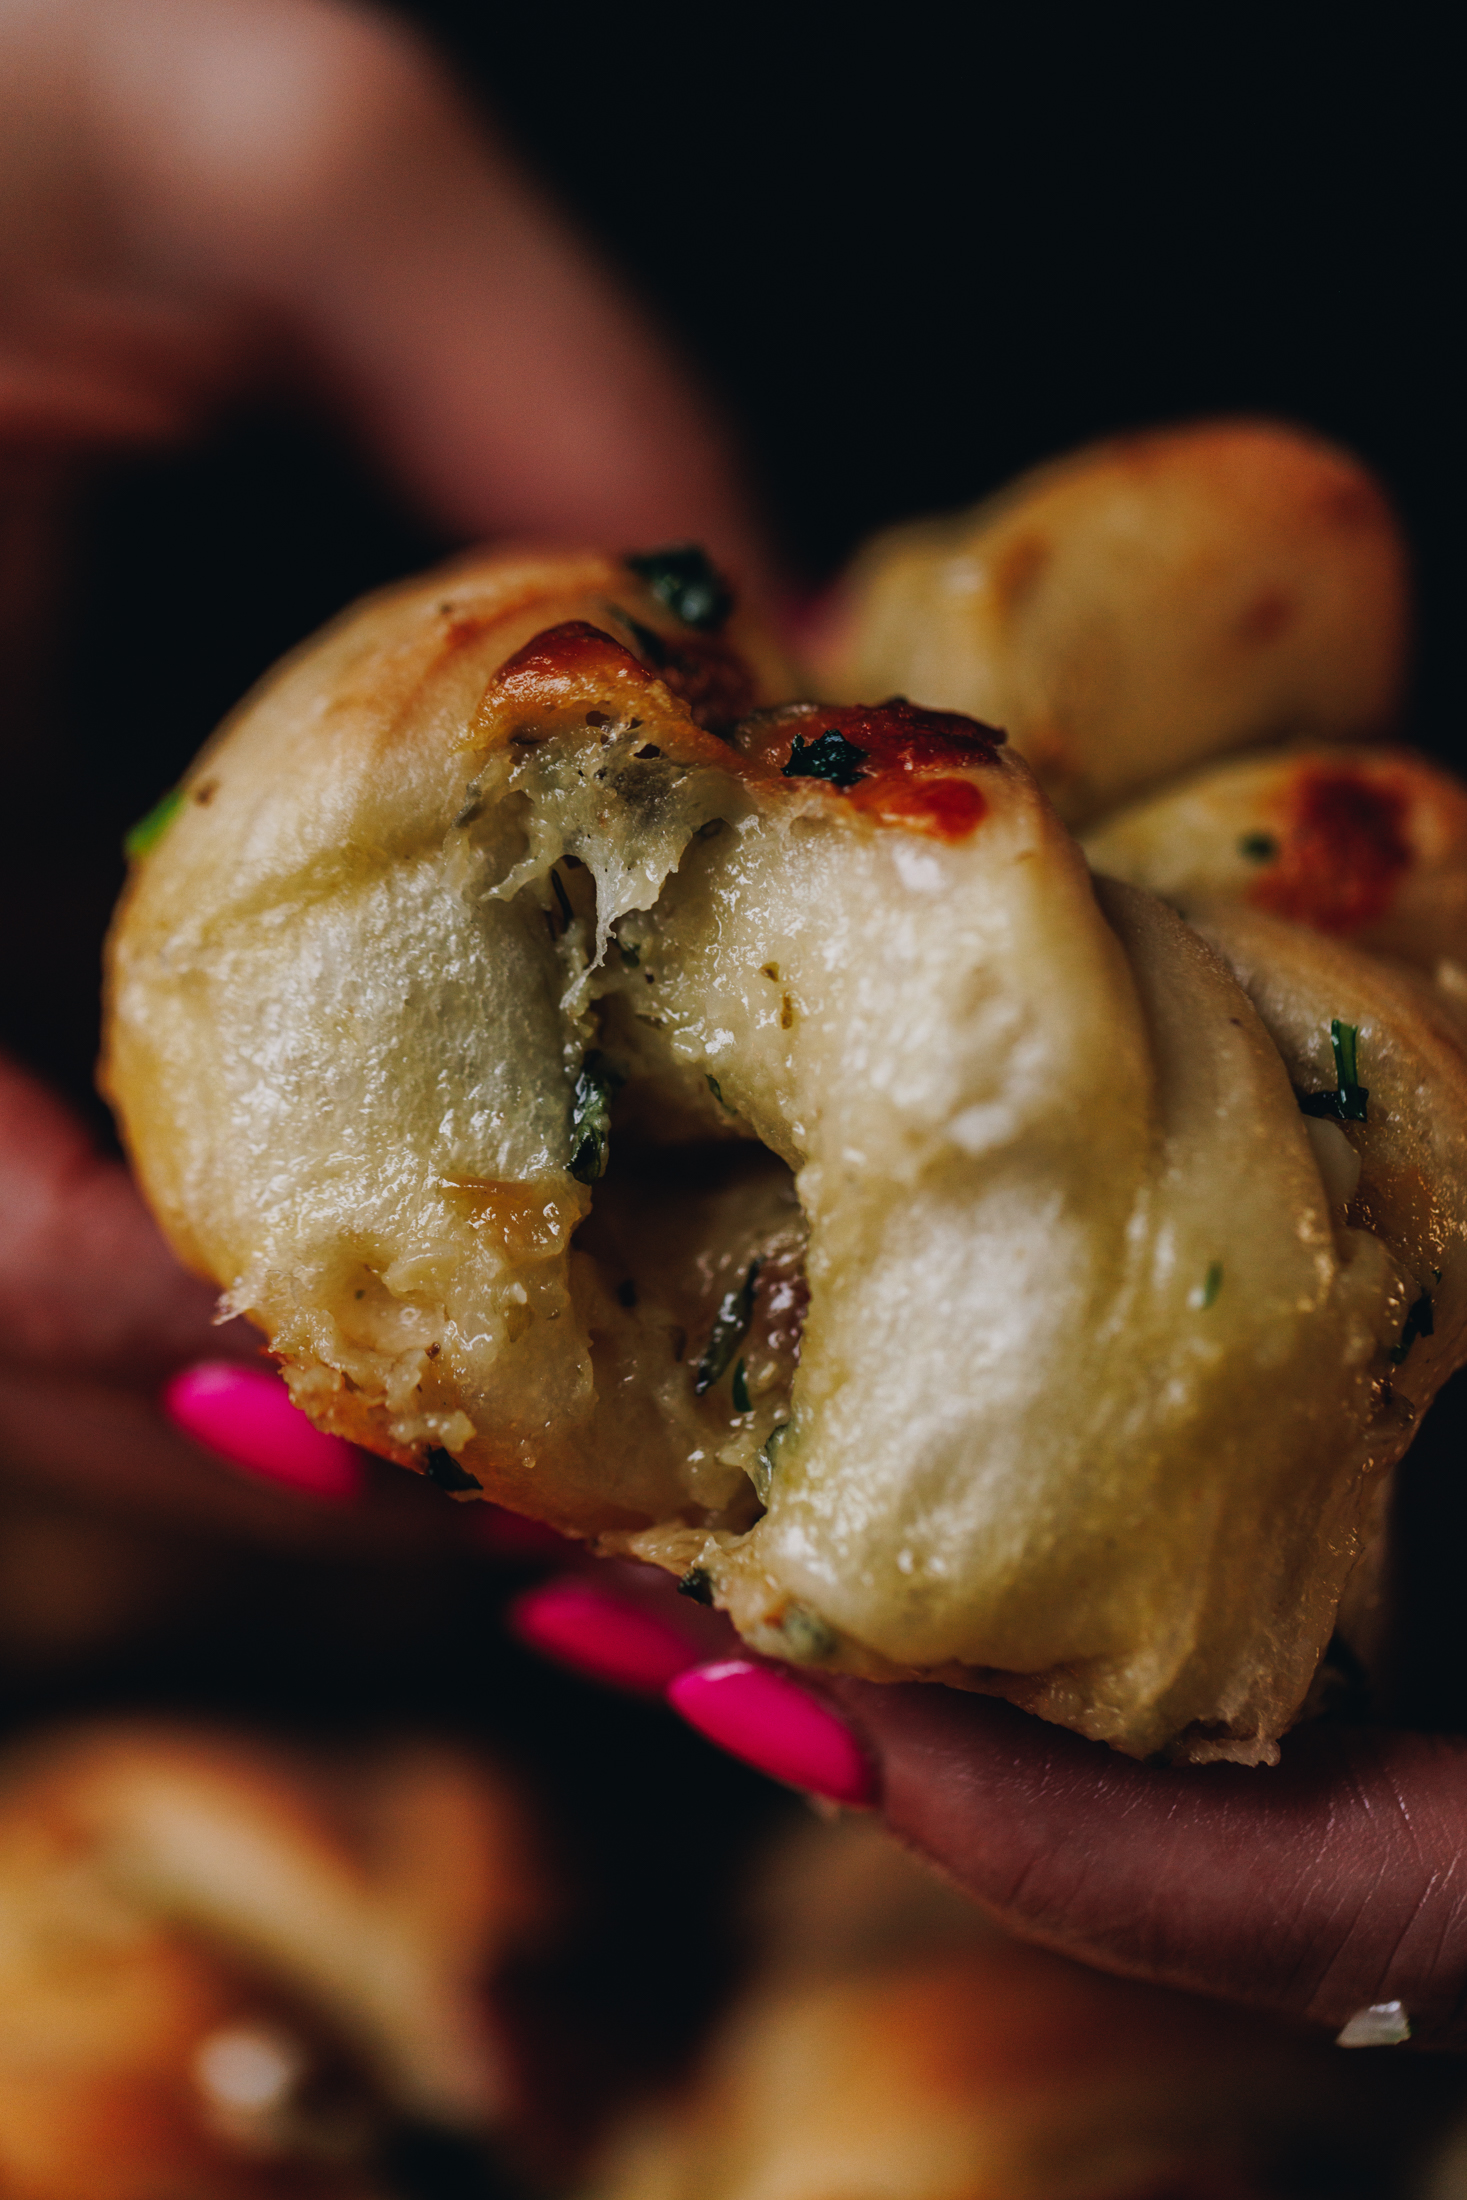
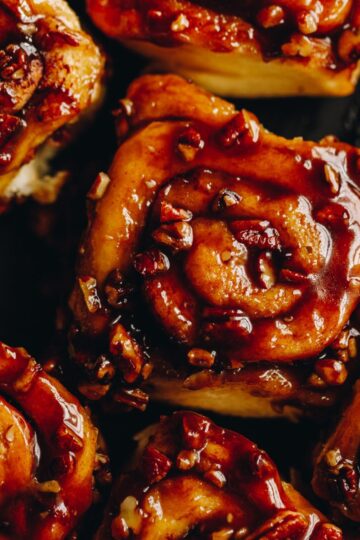
These Roasted Garlic Knots are soft, fluffy bread knots infused with both roasted and fresh garlic, herbs, and a touch of cheese, then tied into golden little bundles of goodness.
They’re buttery, aromatic, and melt-in-your-mouth delicious—hard to stop at just one. Enjoy them warm on their own or serve them alongside your favourite winter soups or fresh summer salads.
Why you will love these Roasted Garlic Knots;
These Pona Kāriki Tunu (Roasted Garlic Knots) bring together the sweetness of roasted garlic and the punch of fresh garlic, all wrapped in soft, buttery dough. Finished with pata (butter) and melted tīhi (cheese), they’re warm, savoury, and completely moreish.
They’re the kind of bake that quickly becomes a favourite in your whare (home)—perfect for sharing around the table or serving alongside your favourite meals. And if you need more, simply adjust the servings in the recipe to make a bigger batch. Kia tunu parāoa tātou – let’s bake some bread.
More savoury bread recipes:
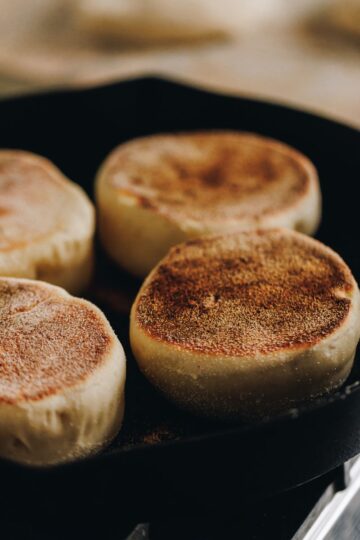
Planning a brunch with your whānau (family) or friends? Try my Bacon and Egg Brunch Buns, give these Maple Bacon Cheese Toasties a go, or make my English Muffins for something soft, simple, and satisfying.
All of these are packed with flavour and are perfect for hosting.
Videography and photography by Sarah Henderson.
Ingredients:
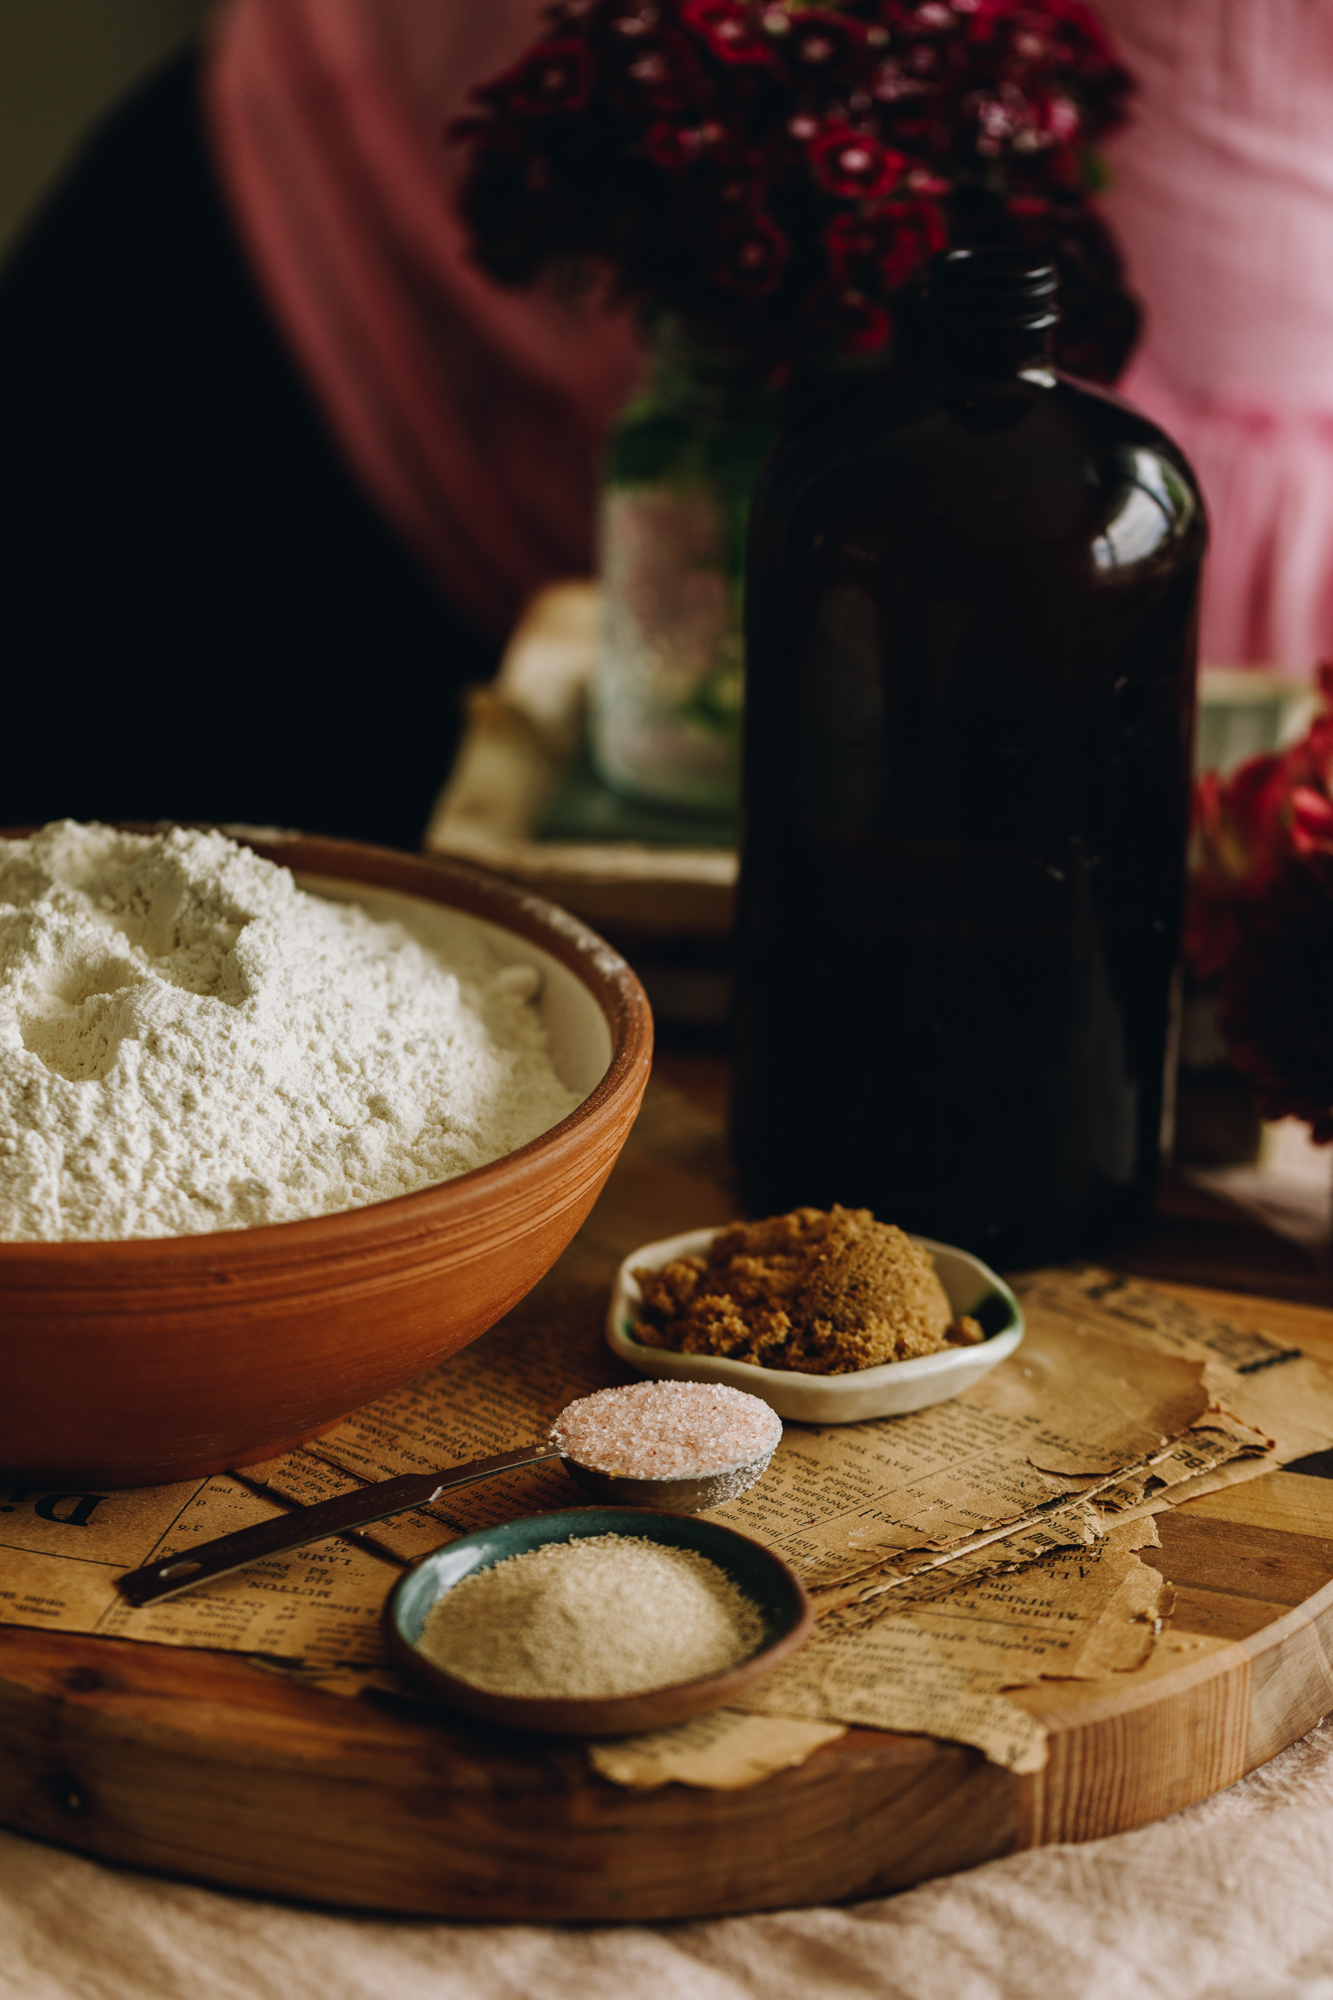
- Sugar: Use huka hāura (brown sugar), huka mā (white sugar), marahihi māpere (maple syrup) or mīere (honey) in the dough.
- Instant yeast: Use īhi horo (instant yeast) in this recipe for efficient rising. If you are using Surebake or breadmakers yeast, double the amount.
- High grade flour: Always use puehu parāoa kounga (high grade flour) in bread recipes for the fluffiest result.
- Oil: Use any noni (oil) you have for the pokenga (dough).
- Garlic: We use the kāriki (garlic) in two ways in this recipe. We roast the majority and crush some fresh for a flavour explosion.
- Fresh herbs: I use fresh pāhiri Itariana (Italian parsley) but fresh basil or oregano would also work well. If you don't have any just leave it out and use 1 teaspoon of dried herbs.
- Onion powder: This adds a subtle onion flavour in the background and is so good in many recipes. If you don't have it though, no worries, leave it out.
- Dried Oregano: Any dried herbs like parsley or basil can work here.
- Cheese: I like to use mozzarella cheese for the pona (knots) but use what you have.
How to make these delicious knots:
Note: The full recipe card with the full list of ingredients, instructions and step by step video are found at the bottom of this page.
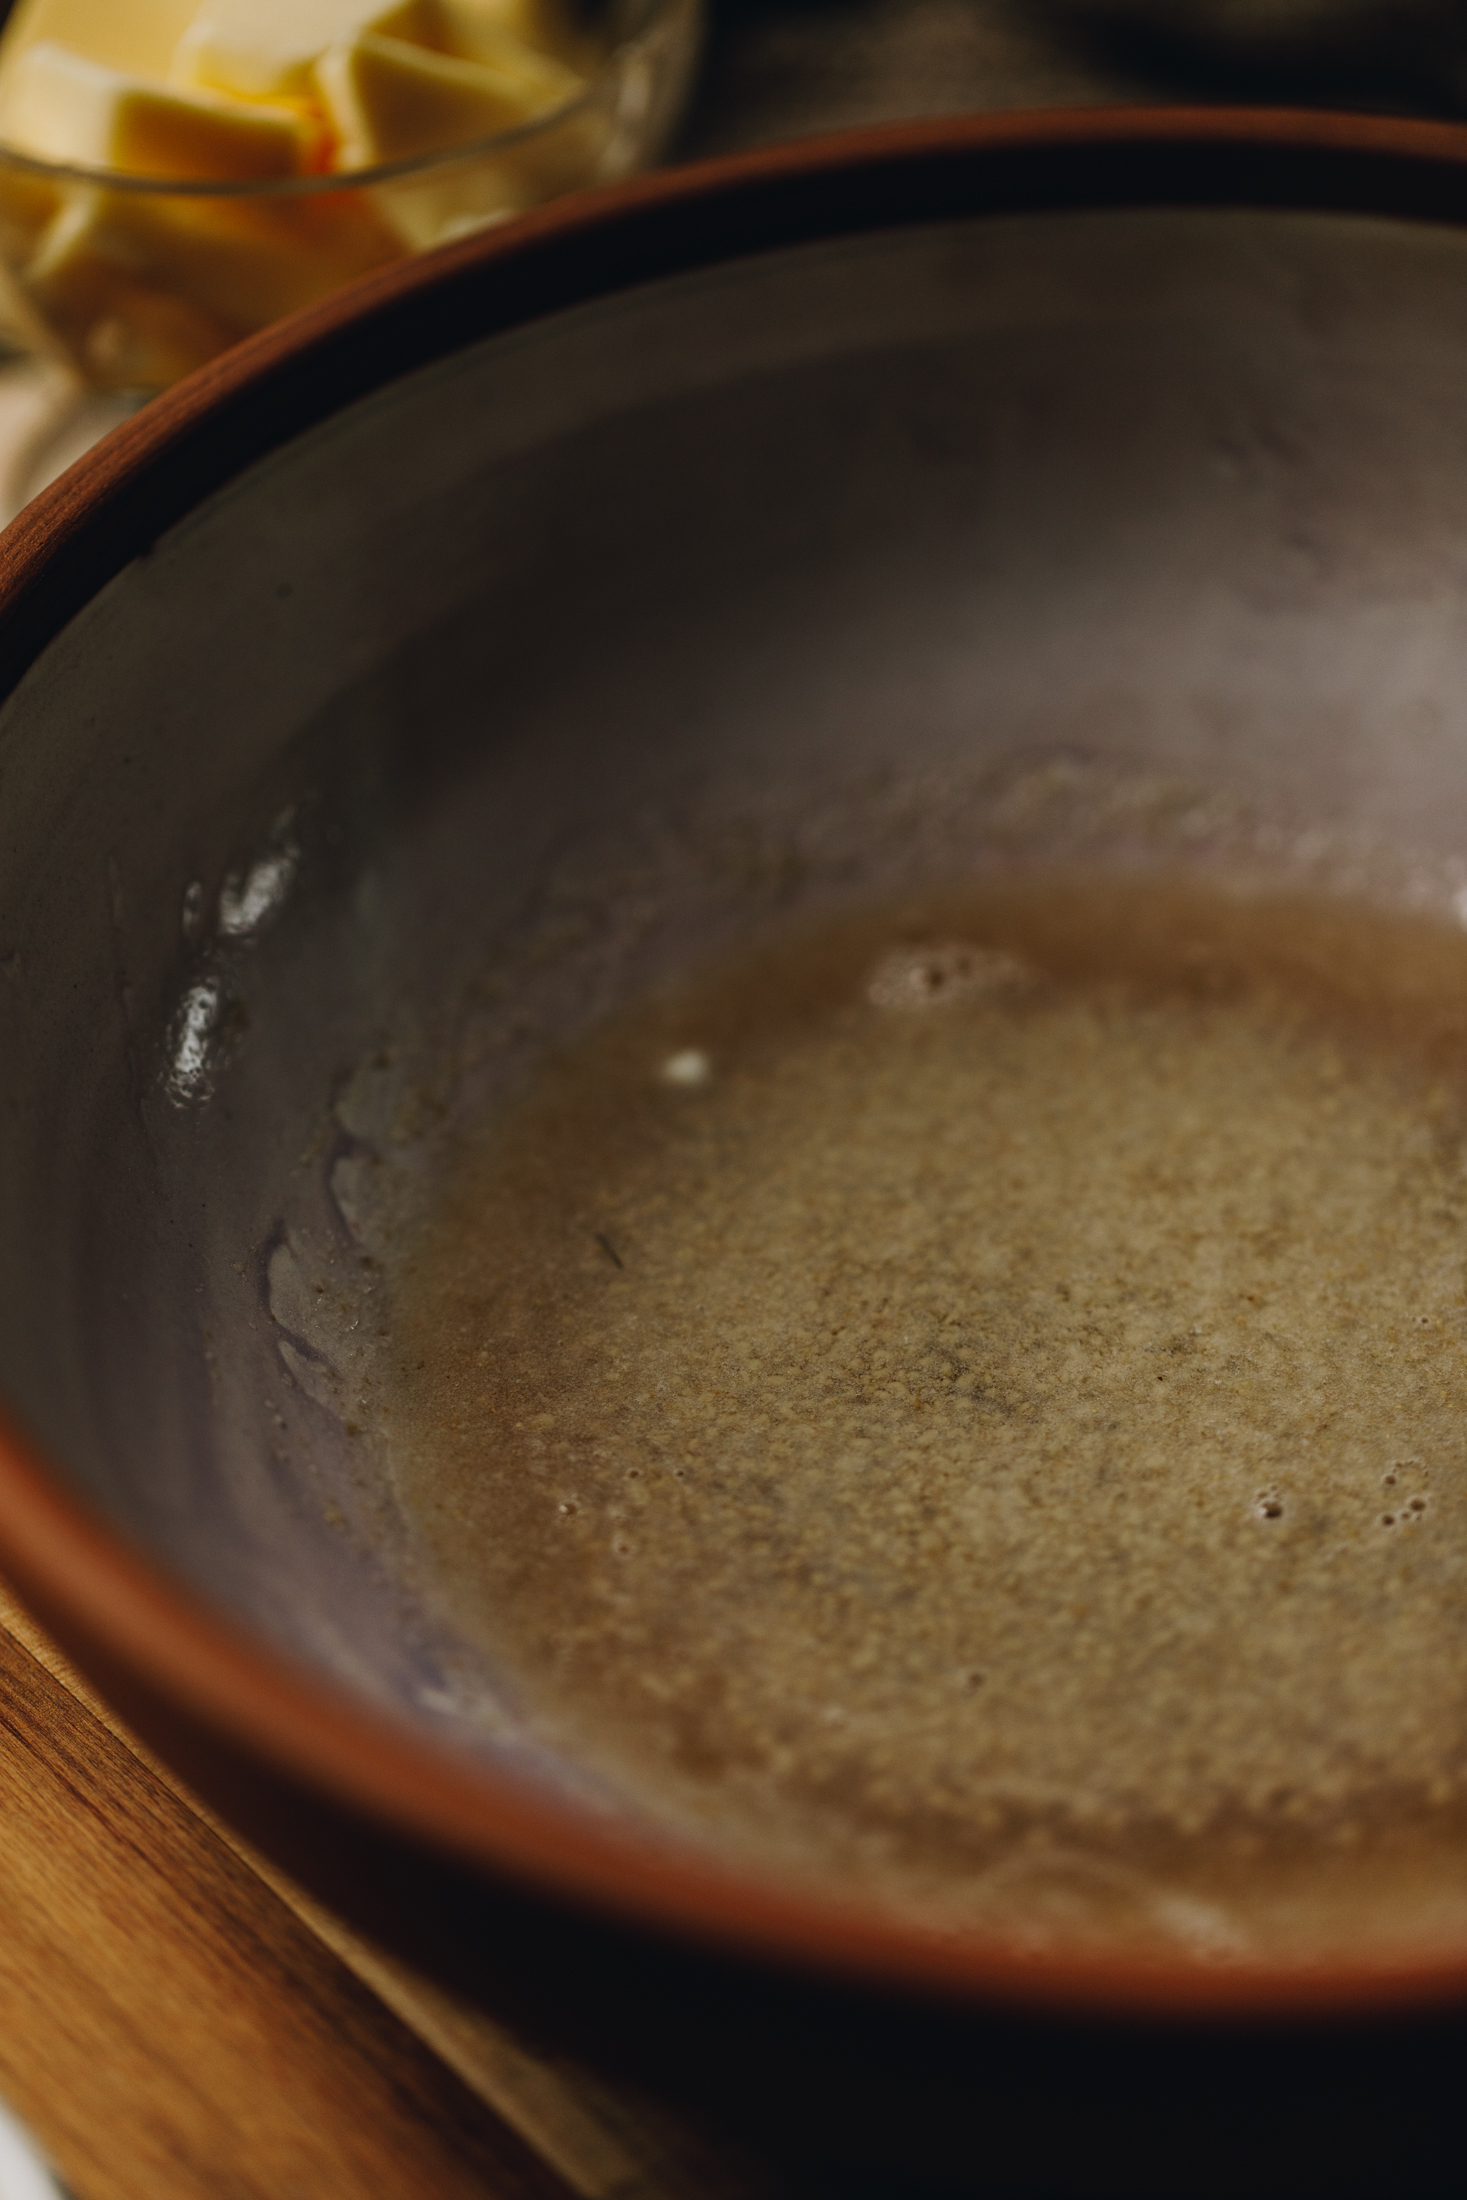
1. Activate the Yeast:
Add the wai aromahana (lukewarm water) and huka (sugar) into a bowl. Stir until the sugar has dissolved.
Sprinkle in the īhi (yeast) and stir.
If you are using instant yeast, leave it for 5 minutes until the yeast has floated to the top.
If you are using surebake yeast, leave for 10 minutes until the yeast has floated to the top and is foamy.
2. Add the Dry Ingredients:
Add the puehu parāoa kounga (high grade flour), tote (salt) and noni ōriwa (olive oil) to the activated yeast mixture.
Mix together with a bread and butter knife until a shaggy dough forms.
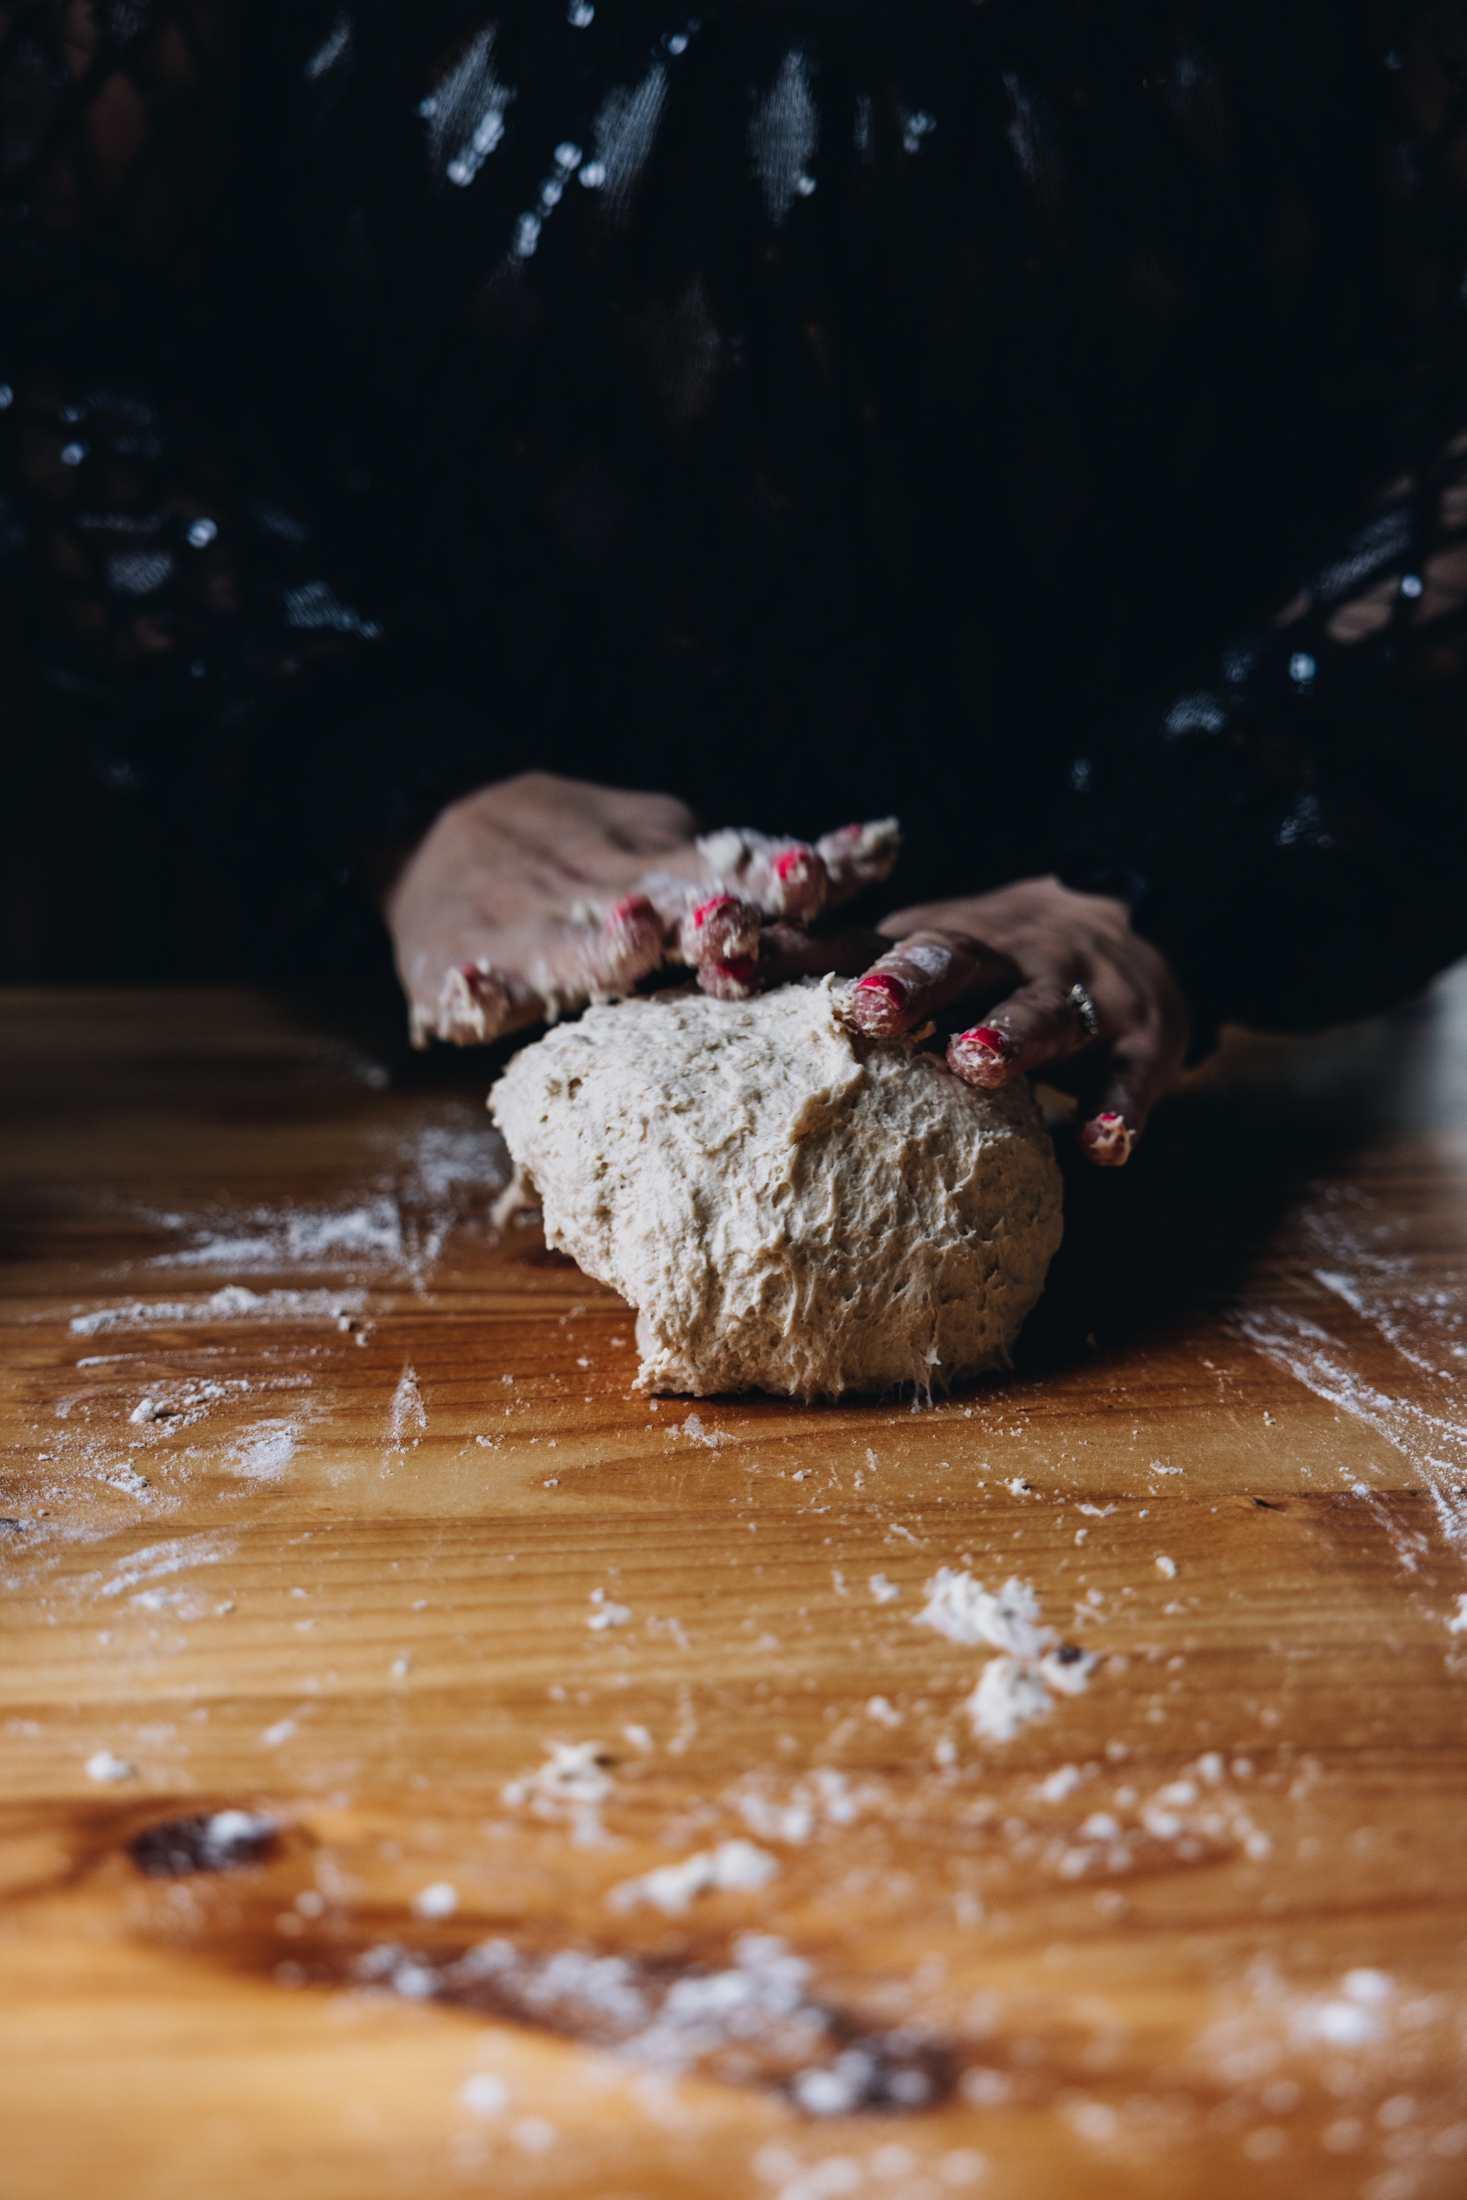
3. Knead the Dough:
Now it is time to knead the dough.
If you are using a stand mixer, place the dough in the mixing bowl. Using a dough hook, knead for 8 – 10 minutes on low-medium speed.
If you are kneading by hand, add the dough to a lightly floured bench or table. Knead the dough with the palms of your hands (not with your fingers), for 10 – 12 minutes.
4. First Rise:
Add the dough to a bowl, cover with a bowl cover or tea towel and leave for 1 ¼ - 1 ½ hours, until it has doubled in size.
As the dough rises, prepare the kāriki (garlic).
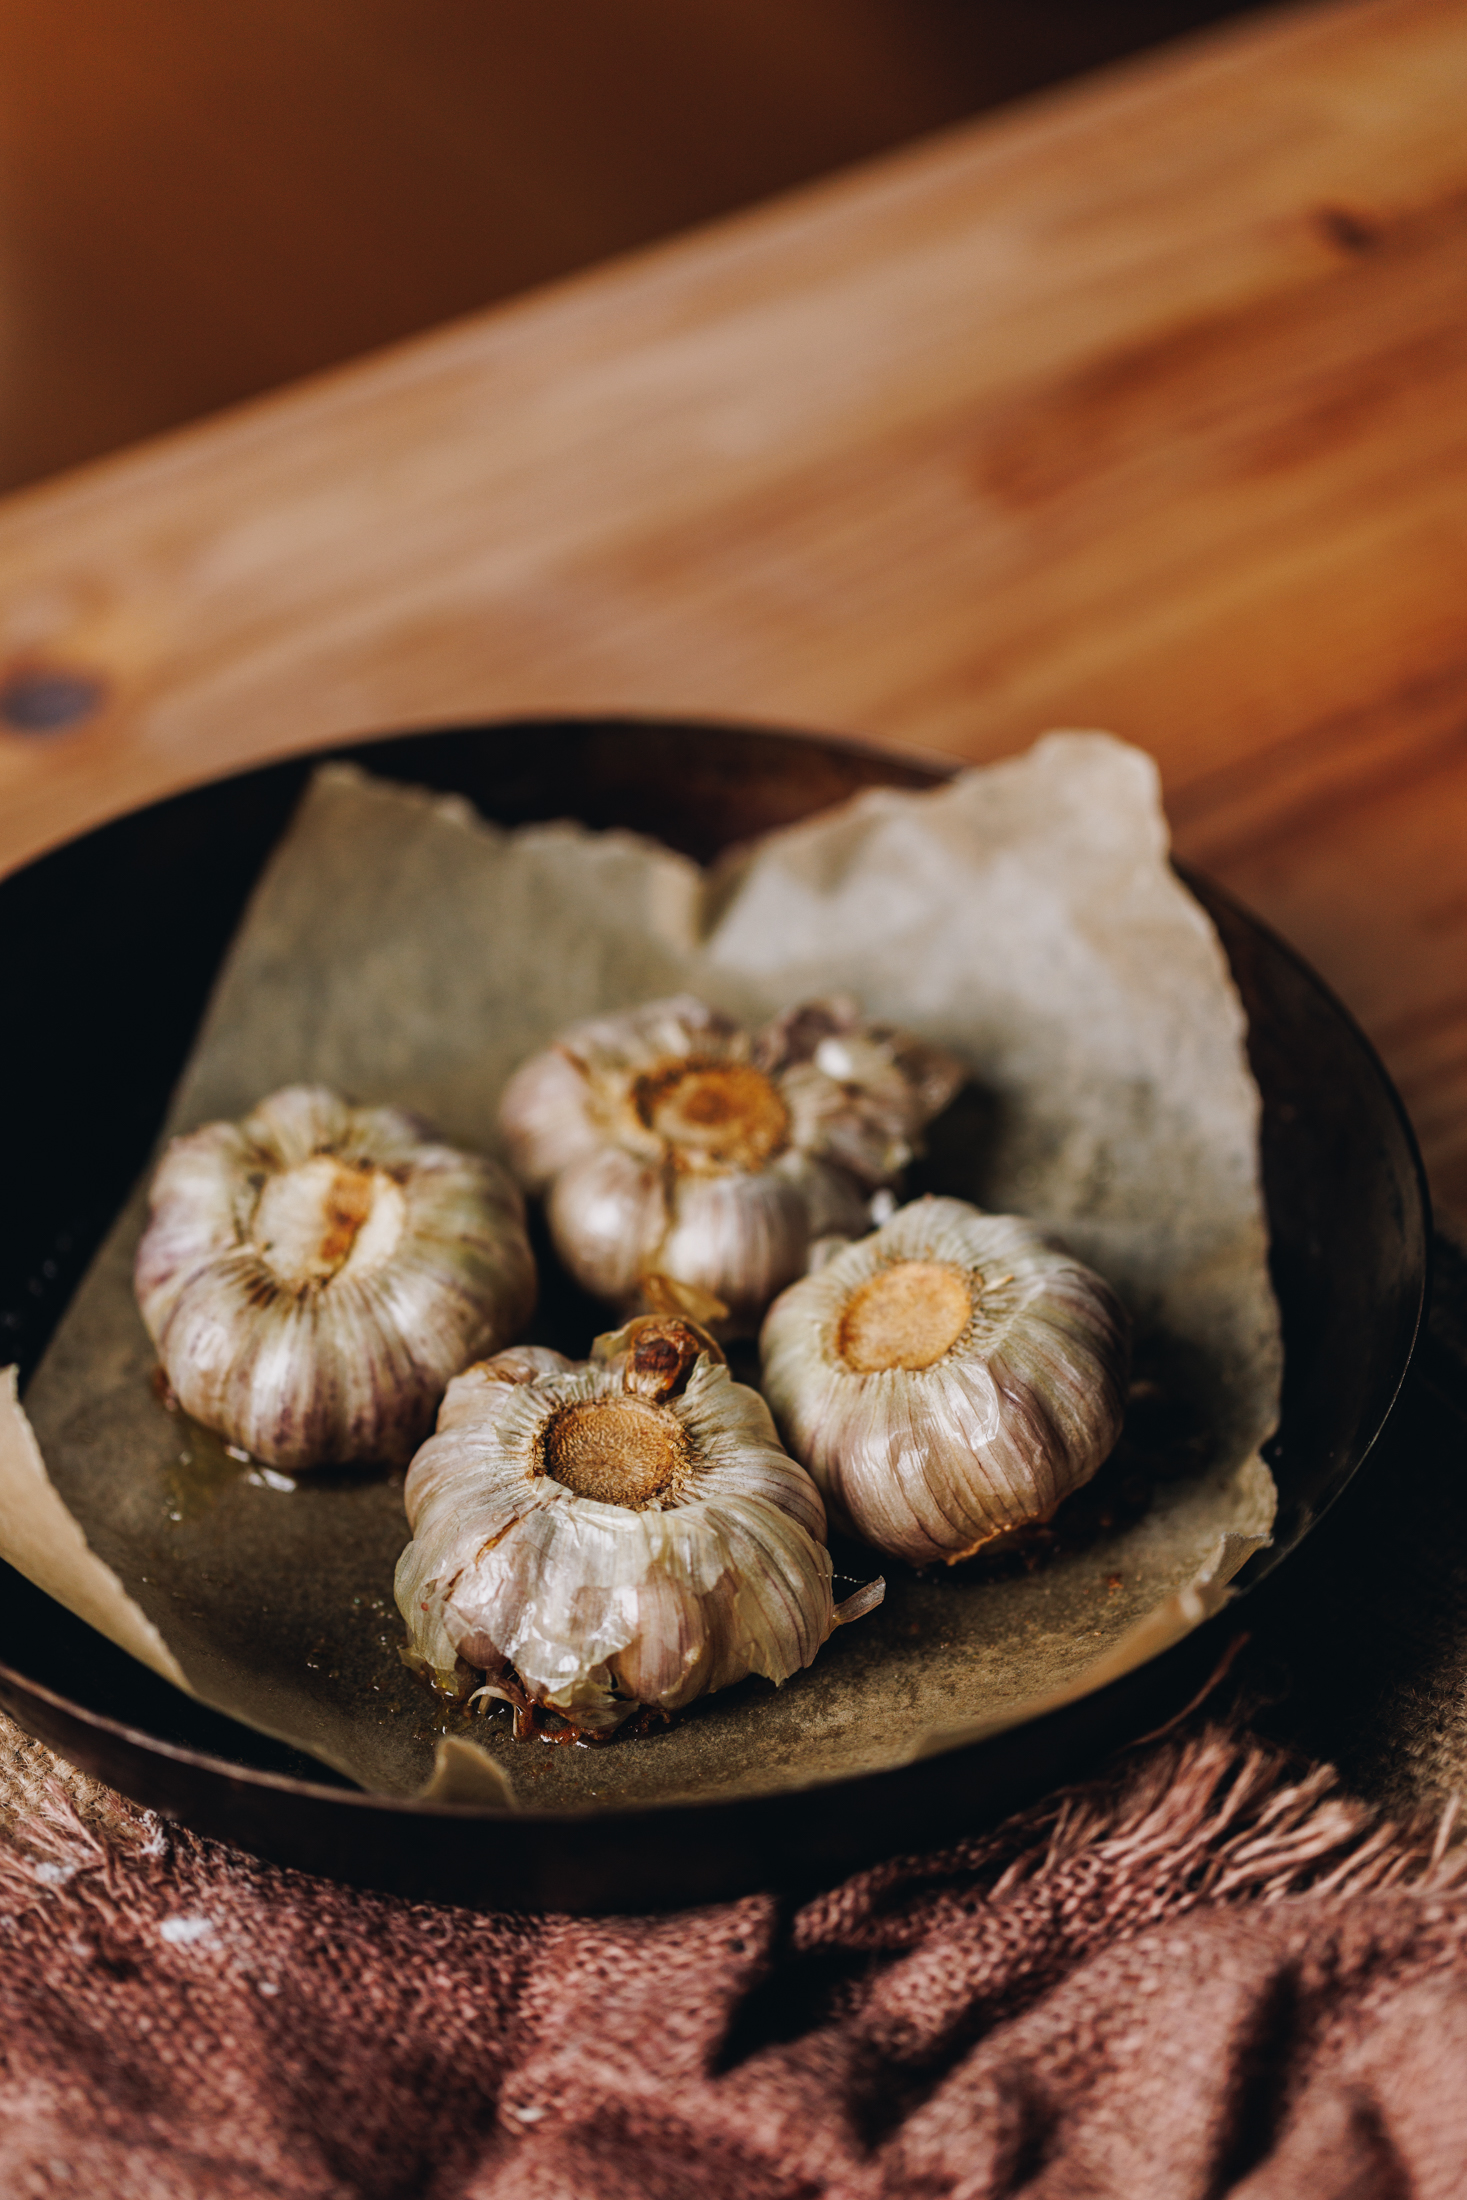
5. Roast the Garlic:
Preheat the oven to 160 °C on the bake setting.
Place the 4 tōpuku kāriki (garlic bulbs) on to a papa kotikoti (chopping board). Chop the top parts off and place them cut side up on a small baking tray or cast iron pan, lined with baking paper.
Sprinkle with tote (salt) and (pepa) pepper and drizzle with the noni ōriwa (olive oil) and then flip them over so they are cut side down.
Roast in the oven for 45 minutes until they are soft and rich in flavour. The kāriki (garlic) is done when it is super soft. If you squeeze it, the garlic should come out like a soft paste. If not, give it another ten minutes of roasting time.
Leave them aside to cool.

6. Crush the Fresh Garlic:
As the roasted garlic cools, add five fresh kāriki (garlic cloves) to the mortar and pestle. Penupenua kia māene (mash until soft and fine).
You can also finely chop the kāriki (garlic) on a papa kotikoti (chopping board) and smoosh it with the back of your knife.
7. Make the Herby Garlic Butter:
Combine the crushed kāriki (garlic), tote (salt), huka (sugar), paura aniana (onion powder) and orekano (oregano) in the mortar and pestle or in a bowl.
Chop the pāhiri Itariana (Italian parsley) in to fine-ish pieces. Add it to the garlic mixture.
Finally, add in the pata kūteretere (softened butter) and squeeze in all of the cooled kāriki parahunuhunu (roasted garlic). Whakawhenumia ngā kai katoa (combine all of the ingredients together).
8. Set aside some of the Garlic Butter:
Reserve ¼ cup of this pata kāriki (garlic butter) to baste onto the hot buns.
9. Prepare the Oven Tray:
Line a 25 cm by 30 cm tray with high-ish sides with baking paper.
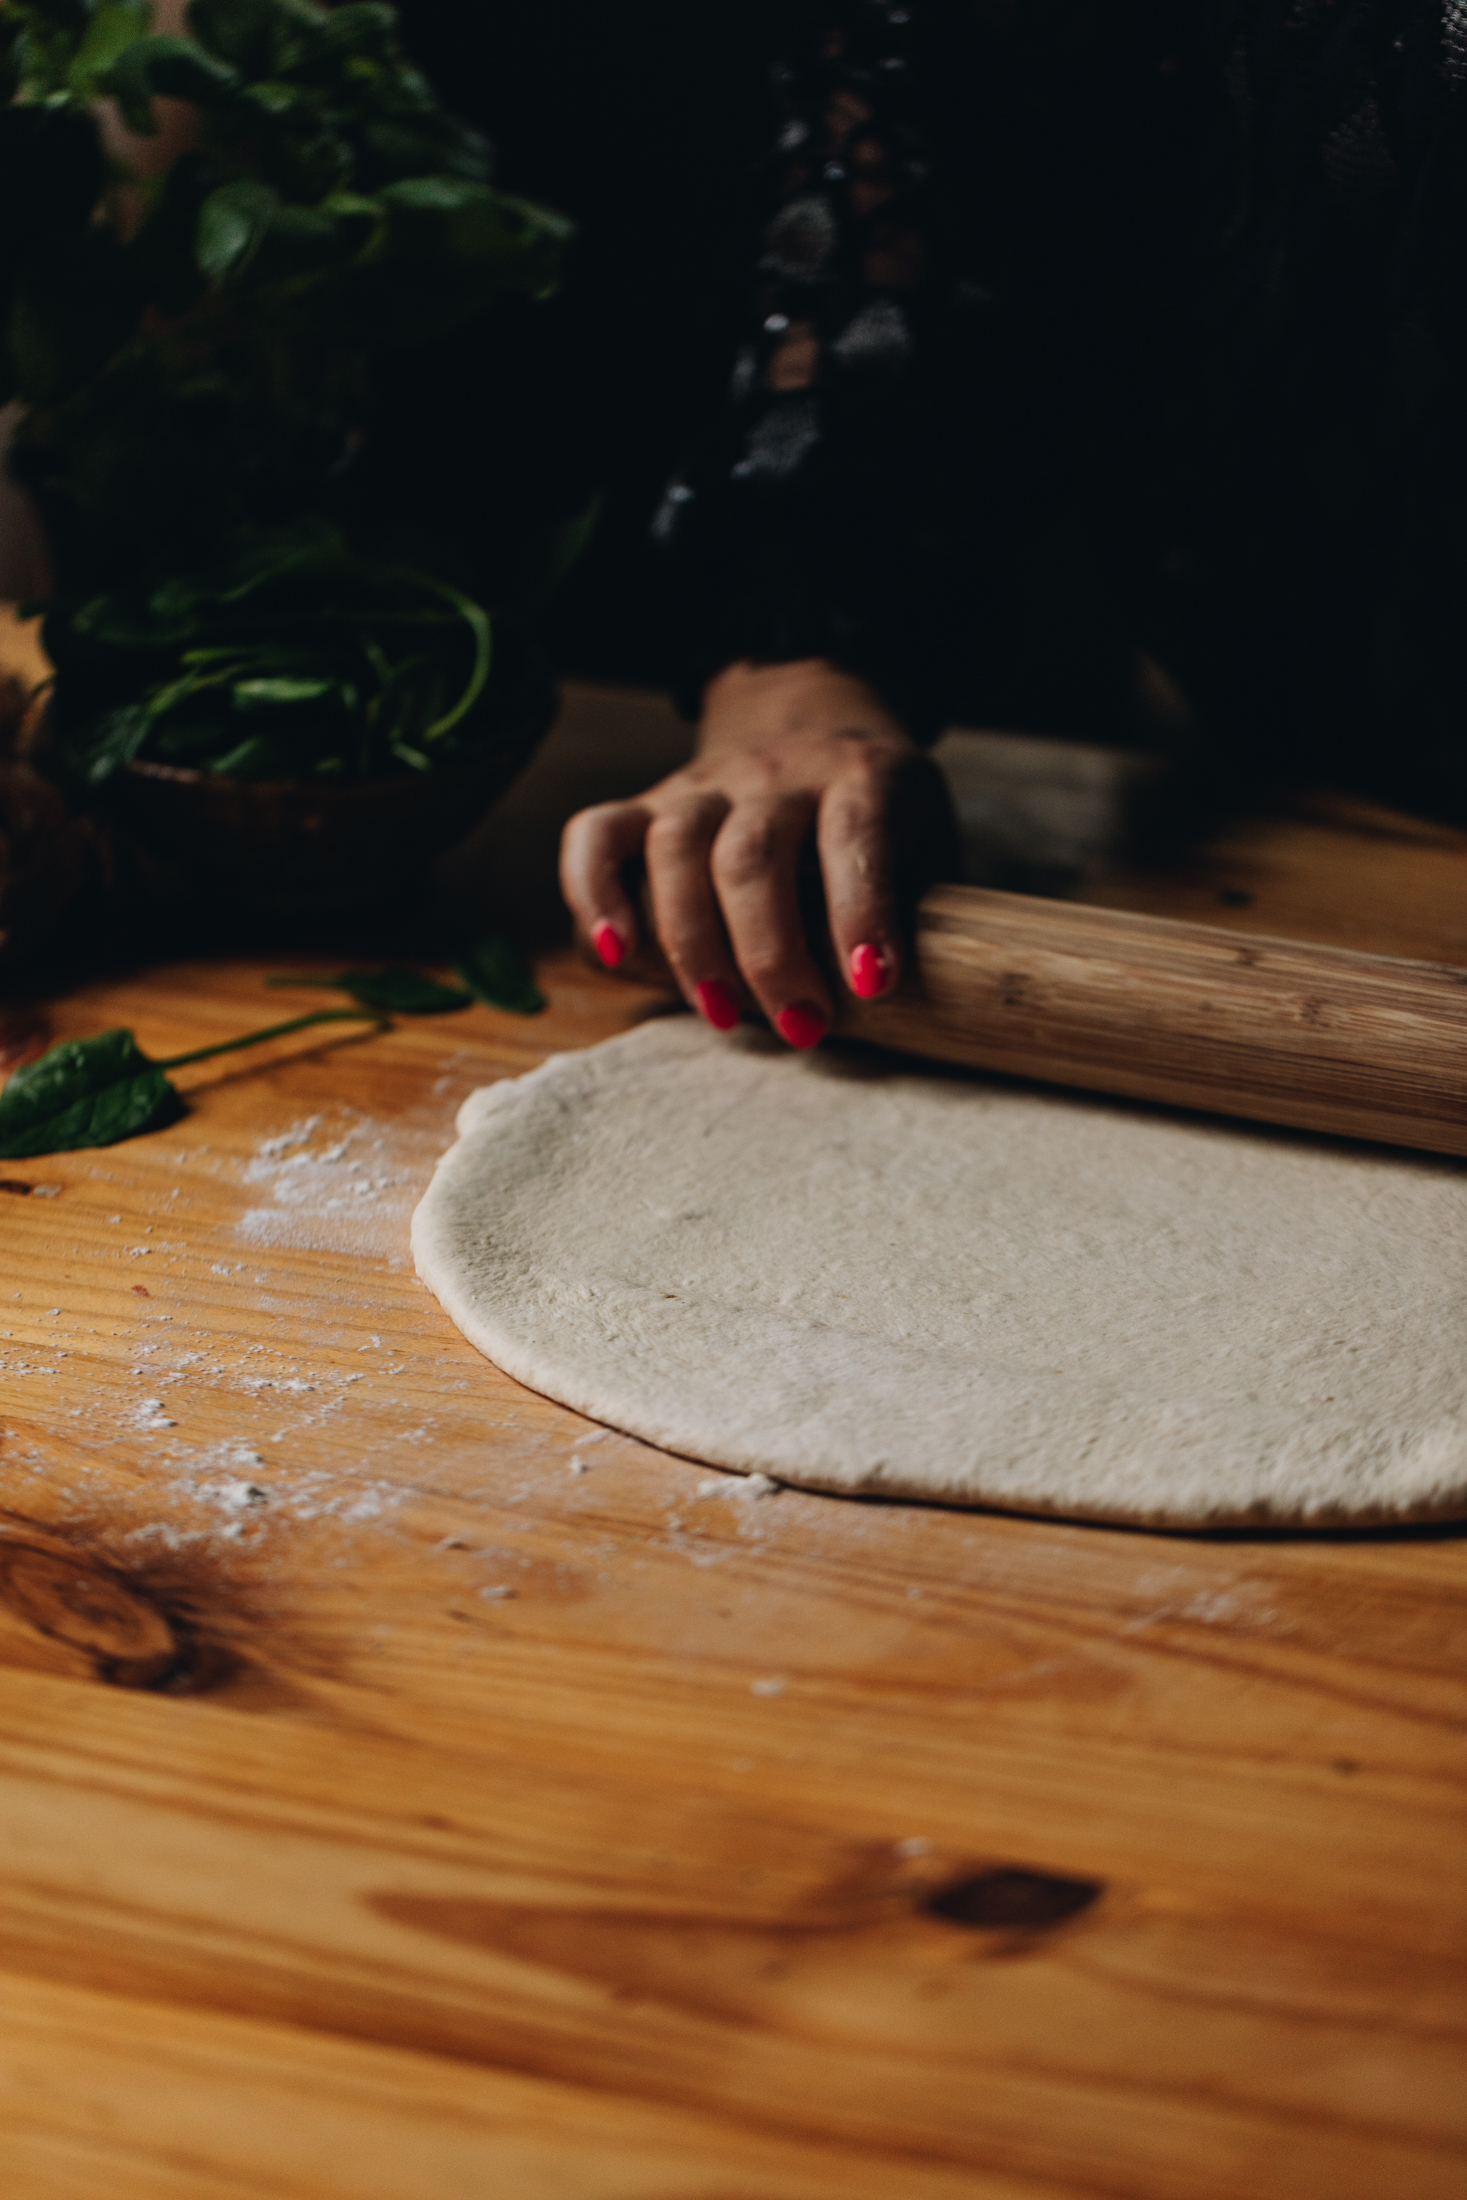
10. Roll out the Dough:
Once the pokenga (dough) has risen, add it to a lightly floured surface and roll it out to a 50 cm x 27 cm rectangle.
11. Fill it with Garlic and Cheese:
Add the pata kāriki (garlic butter) and spread it out to the edges. Sprinkle the tīhi kua waruwarutia (grated cheese) on to the top half of the dough. Then fold the bottom half of the dough up so that it is halved (check the video for reference).
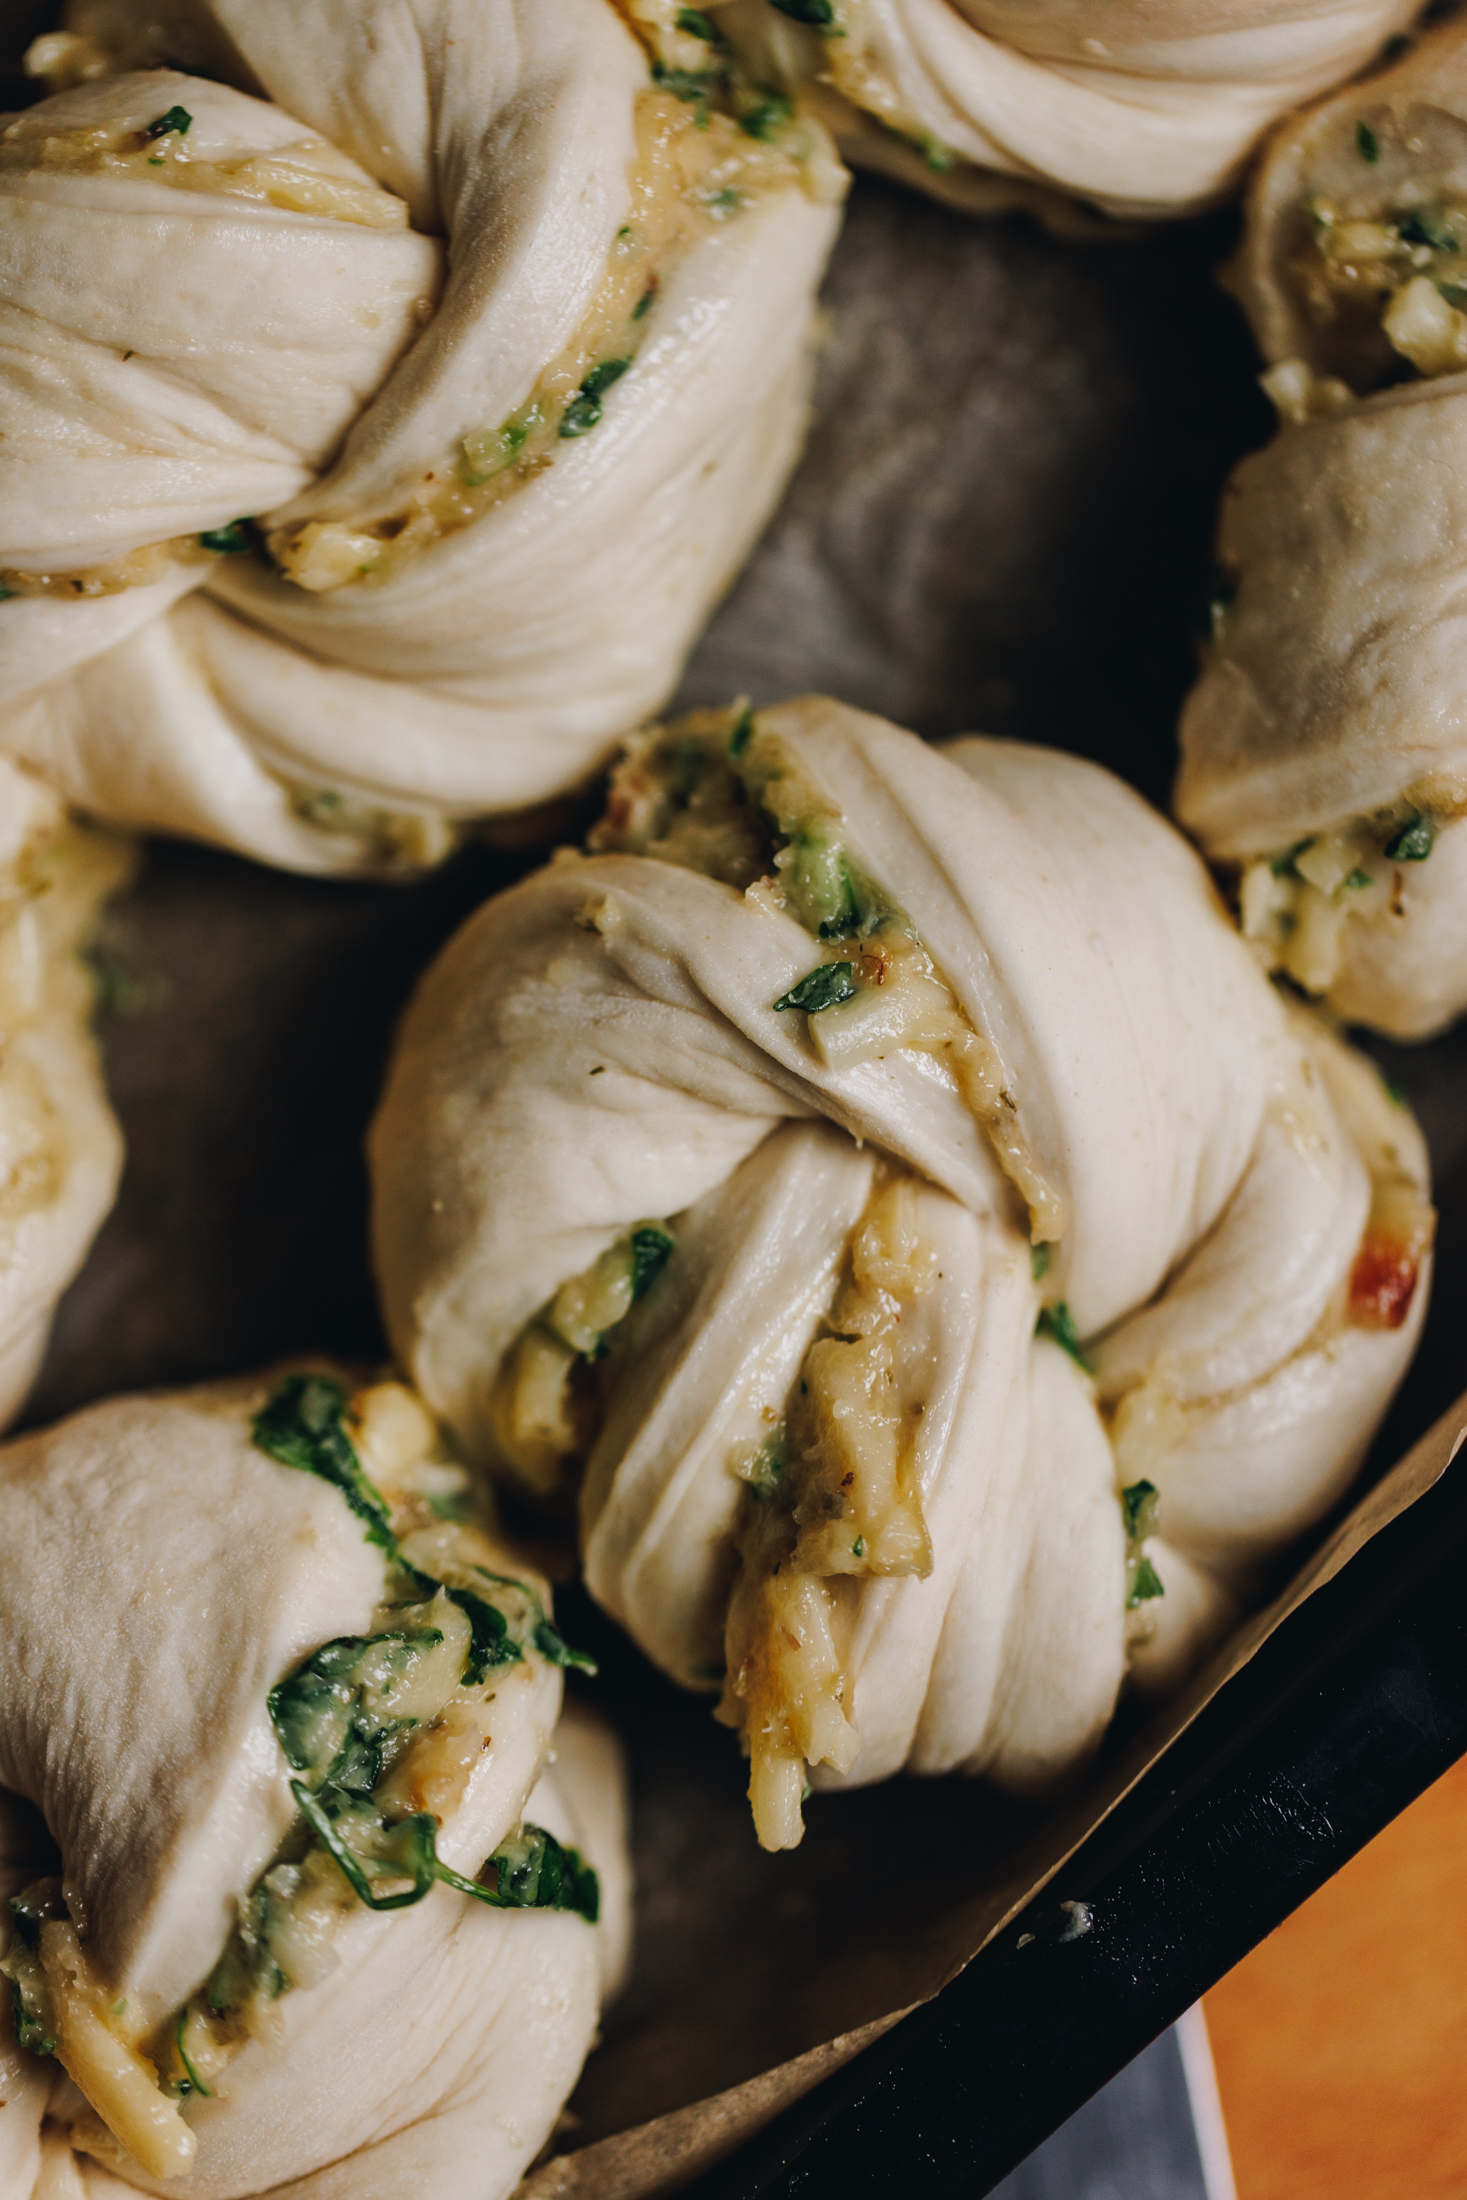
12. Create the Roasted Garlic Knots:
With the dough folded, mark out 12 equal strips and cut the strips with a sharp knife.
Hold each end of a strip and twist it two or three times. Then fold the two ends under each other. It is that simple, you have made a pona (knot).
Repeat this process with each of the 12 pieces, placing each pona (knot) in to the tray as you go. Space them out evenly.
13. Second Rise:
Cover the tray with a tea towel and rise for another 30 - 45 minutes on the bench, until they have puffed up and are close together in the tray.
14. Heat the Oven:
Preheat the oven to 170 °C as they rise.
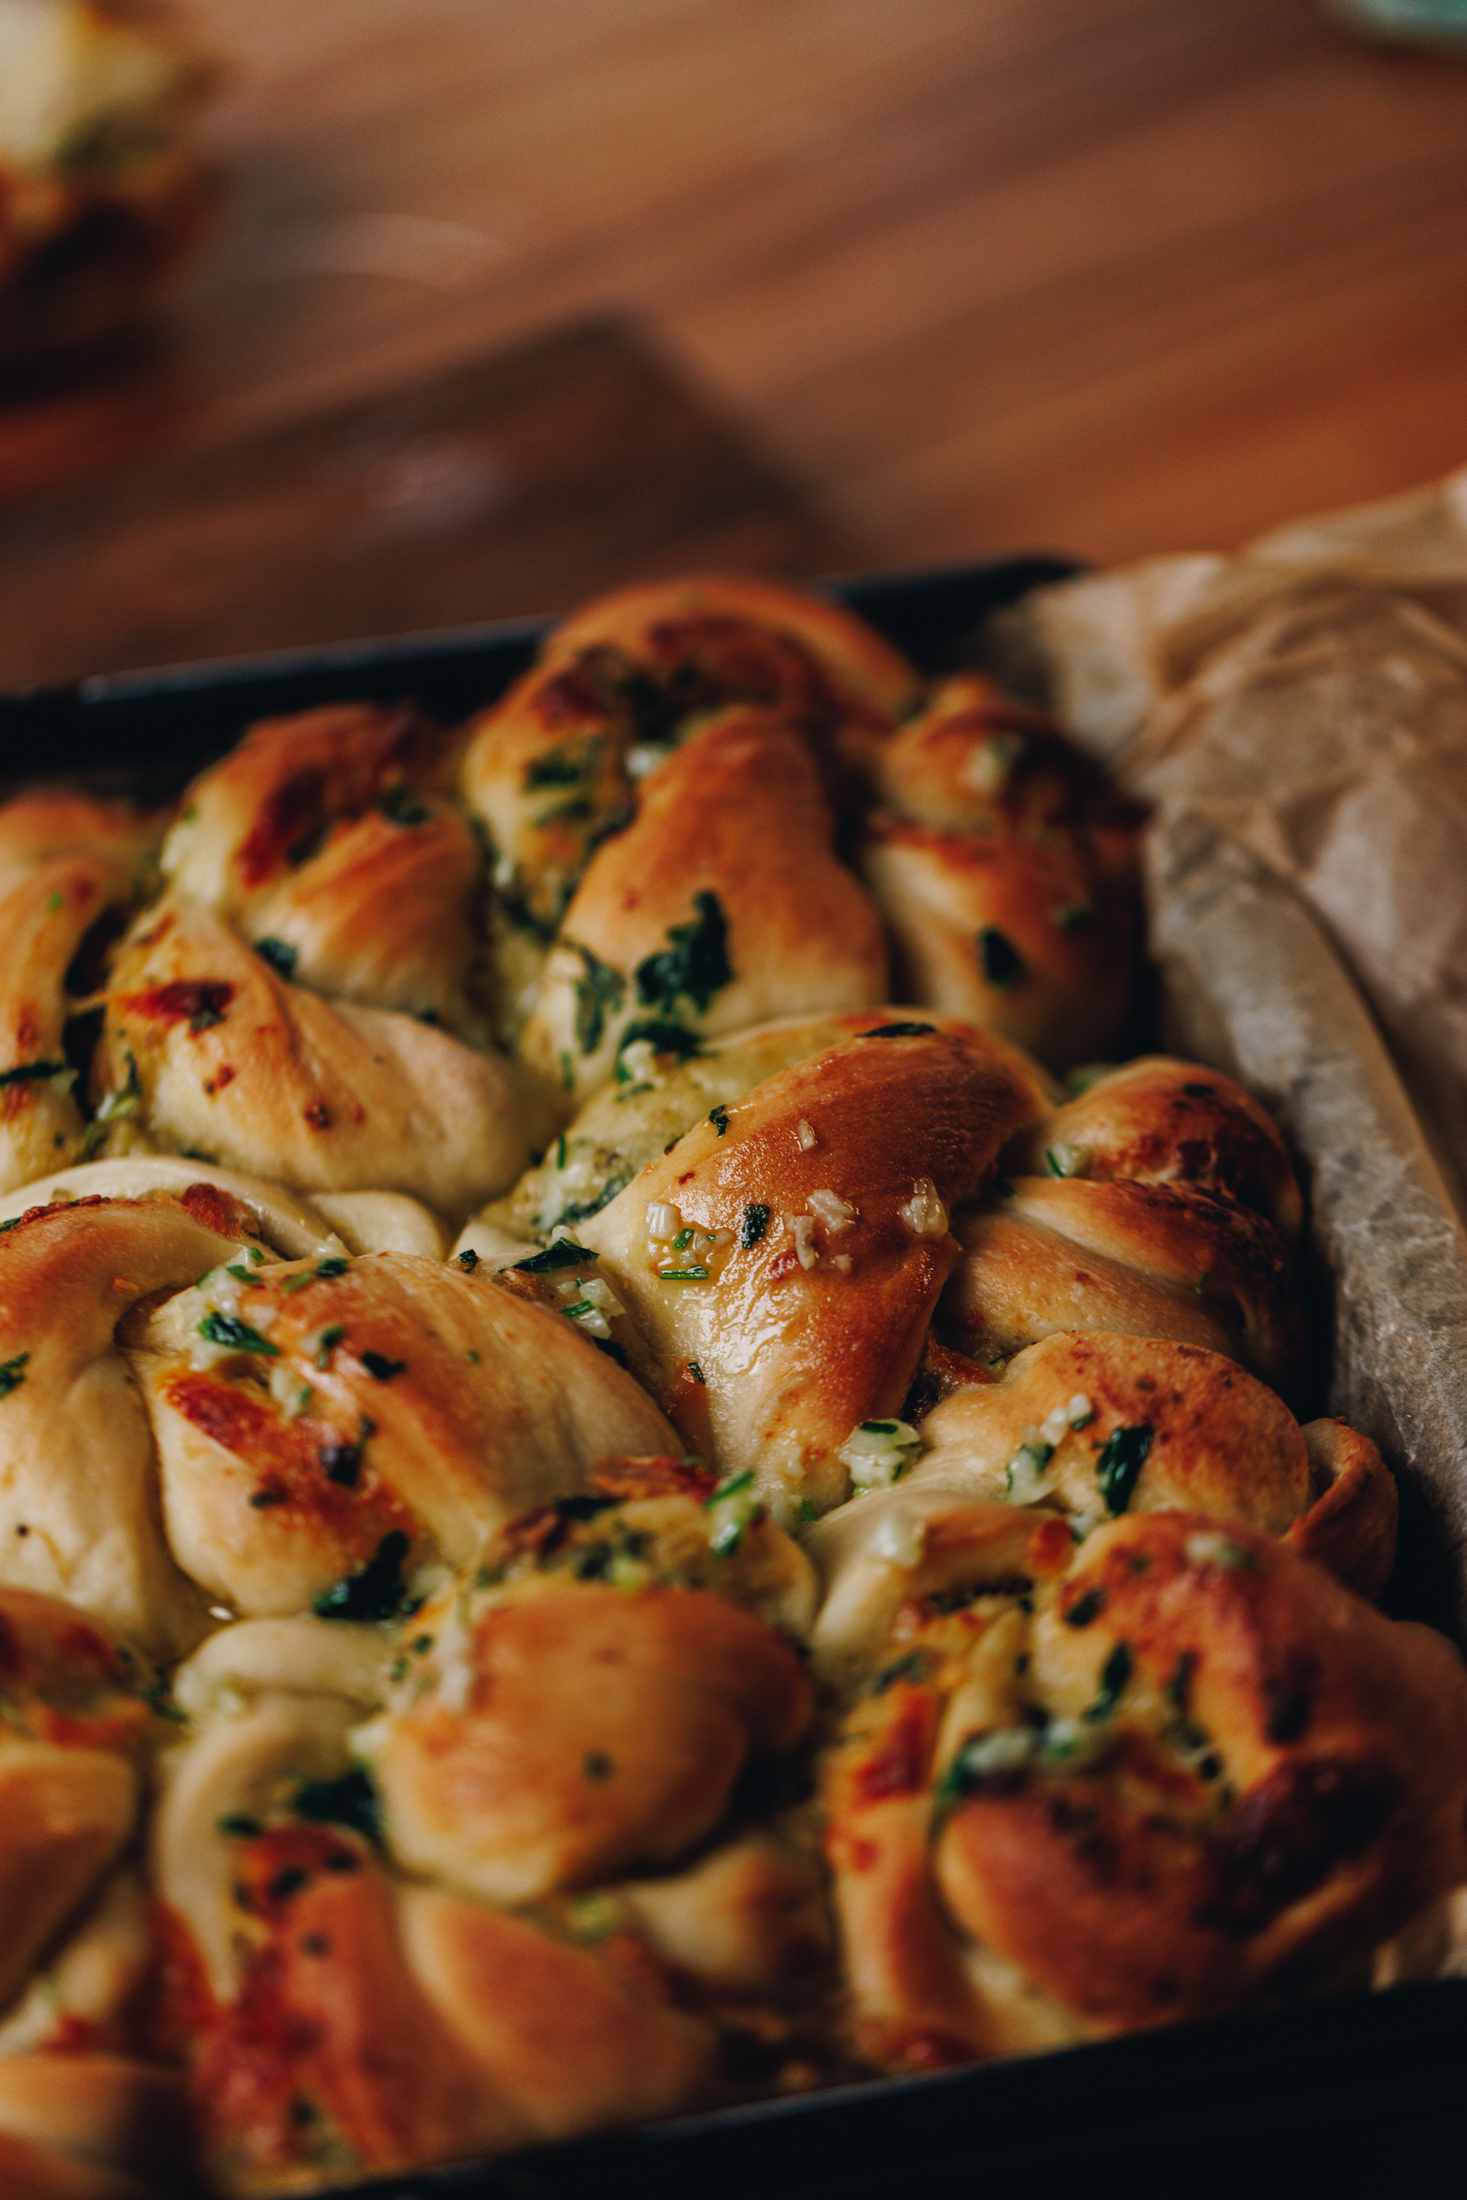
15. Bake the Roasted Garlic Knots:
Once they have risen, bake the garlic knots for 30 minutes.
As soon as they come out of the oven, brush them with the reserved pata kāriki (garlic butter)!
Serve them warm with your favourite soups, salads or summer barbecues.
Storing the Roasted Garlic Knots:
These are best served warm.
If you have any left over, store in a plastic bag or in a sealed container.
Toast them under the grill the next day to bring them back to life.
Delve a little deeper into these
Parāoa (Bread) Recipes
A sprinkle of flour and touch of kneading will bring about delicious creations.

DID YOU ENJOY THIS RECIPE?
It would be so awesome if you could please leave a review/comment by clicking the “leave a comment” section at the top of the page.
I love seeing you all make my creations, so send a whakaahua (photo) or kiriata (video) to my Instagram and show me what you made. Let me know if you have any pātai (questions) too, I would love to help.

Roasted Garlic Knots - Pona Kāriki Tunu
Ingredients
The Dough - Te Pokenga
- 1 ⅔ C (400 ml) wai aromahana (lukewarm water)
- 2 tablespoon huka (sugar, any sugar will work)
- 2 teaspoon (6 g) īhi horo (instant yeast) OR 1 ¾ tablespoon (16 g) Surebake/bread makers yeast.
- 4 ½ C (675 g) puehu parāoa kounga (high grade flour)
- 1 teaspoon tote (salt, fine)
- 2 tablespoon noni ōriwa (olive oil, or neutral oil)
Roasted Garlic - Te Kāriki Tunu
- 4 tōpuku kāraki (garlic bulbs)
- 2 tablespoon noni ōriwa (olive oil, or neutral oil)
Garlic Butter - Te Pata Kāriki
- 5 wāhi kāriki anō (garlic cloves)
- ½ teaspoon tote (salt)
- 1 tablespoon huka (sugar)
- 15 g pāhiri Itariana māota (fresh Italian parsley). This can be swapped for your favourite fresh herbs or 2 teaspoon of dried herbs like basil, thyme or rosemary.
- 1 teaspoon paura aniana (onion powder). Also optional but so delicious.
- 1 teaspoon orekano raki (dried oregano)
- 130 g pata kūteretere (softened butter)
- 200 - 250 g tīhi kua waruwarutia (grated cheese, a melty cheese like mozzarella is ideal)
Instructions
Activate the Yeast:
- Add the wai aromahana (lukewarm water) and huka (sugar) into a bowl. Stir until the sugar has dissolved.
- Sprinkle in the īhi (yeast) and stir.
- If you are using instant yeast, leave it for 5 minutes until the yeast has floated to the top. If you are using surebake yeast, leave for 10 minutes until the yeast has floated to the top and is foamy.
Add the Dry Ingredients:
- Add the puehu parāoa kounga (high grade flour), tote (salt) and noni ōriwa (olive oil) to the activated yeast mixture.
- Mix together with a bread and butter knife until a shaggy dough forms.
Knead the Dough:
- Now it is time to knead the dough.If you are using a stand mixer, place the dough in the mixing bowl. Using a dough hook, knead for 8 – 10 minutes on low-medium speed. If you are kneading by hand, add the dough to a lightly floured bench or table. Knead the dough with the palms of your hands (not with your fingers), for 10 – 12 minutes.
First Rise:
- Add the dough to a bowl, cover with a bowl cover or tea towel and leave for 1 ¼ - 1 ½ hours, until it has doubled in size.
- As the dough rises, prepare the kāriki (garlic).
Roast the Garlic:
- Preheat the oven to 160 °C on the bake setting.
- Place the 4 tōpuku kāriki (garlic bulbs) on to a papa kotikoti (chopping board).
- Chop the top parts off and place them cut side up on a small baking tray or cast iron pan, lined with baking paper.
- Sprinkle with tote (salt) and (pepa) pepper and drizzle with the noni ōriwa (olive oil) and then flip them over so they are cut side down.
- Roast in the oven for 45 minutes until they are soft and rich in flavour. The kāriki (garlic) is done when it is super soft. If you squeeze it, the garlic should come out like a soft paste. If not, give it another ten minutes of roasting time.
- Leave them aside to cool. Note: The roasted garlic can be done days in advance and kept in a sealed container in the fridge until needed.
Crush the Fresh Garlic:
- As the roasted garlic cools, add five fresh kāriki (garlic cloves) to the mortar and pestle. Penupenua kia māene (mash until soft and fine).
- You can also finely chop the kāriki (garlic) on a papa kotikoti (chopping board) and smoosh it with the back of your knife.
Make the Herby Garlic Butter:
- Combine the crushed kāriki (garlic), tote (salt), huka (sugar), paura aniana (onion powder) and orekano (oregano) in the mortar and pestle or in a bowl.
- Chop the pāhiri Itariana (Italian parsley) in to fine-ish pieces. Add it to the garlic mixture. Whakaranuhia (stir to combine).
- Finally, add in the pata kūteretere (softened butter) and squeeze in all of the cooled kāriki parahunuhunu (roasted garlic). (See the video for the easiet way to do this).
- Whakawhenumia ngā kai katoa (combine all of the ingredients together).
Set aside some of the Garlic Butter:
- Reserve ¼ cup of this pata kāriki (garlic butter) to baste onto the hot buns.The rest will be used to spread on to our delicious pokenga (dough).
Prepare the Oven Tray:
- Line a 25 cm by 30 cm tray with high-ish sides with baking paper. Note: Make sure the tin isn't too much bigger than this so that the buns rise together and all of the flavour is infused.
Roll out the Dough:
- Once the pokenga (dough) has risen, add it to a lightly floured surface.
- Roll out the dough to a 50 cm x 27 cm rectangle.
Fill it with Garlic and Cheese:
- Add the pata kāriki (garlic butter) and spread it out to the edges.
- Sprinkle the tīhi kua waruwarutia (grated cheese) on to the top half of the dough.
- Then fold the bottom half of the dough up so that it is halved (check the video for reference).
Create the Roasted Garlic Knots:
- With the dough folded, mark out 12 equal strips and cut the strips with a sharp knife.
- Hold each end of a strip and twist it two or three times. Then fold the two ends under each other. It is that simple, you have made a pona (knot).
- Repeat this process with each of the 12 pieces, placing each pond (knot) in to the tray as you go. Space them out evenly.
Second Rise:
- Cover the tray with a tea towel and rise for another 30 - 45 minutes on the bench, until they have puffed up and the knots are touching each other.
Heat the Oven:
- Preheat the oven to 170 °C as they rise.
Bake the Roasted Garlic Knots:
- Once they have risen, bake the garlic knots for 30 minutes. As soon as they come out of the oven, brush them with the reserved pata kāriki (garlic butter)!
- Serve them warm with your favourite soups, salads or summer barbecues.
Storing the Roasted Garlic Knots:
- These are best served warm. If you have any left over, store in a plastic bag or in a sealed container. Toast them under the grill the next day to bring them back to life.
Video
Tips for making the Best Roasted Garlic Knots:
Let the yeast activate fully
Always give the īhi (yeast) enough time to activate before adding the dry ingredients. It’s ready when it floats to the top and becomes slightly foamy.
Follow the kneading time:
Stick to the kneading times as written so the gluten can properly develop. If you need extra guidance, check out your How to Knead Dough post.
Use the palms of your hands:
When hand kneading, use the palms of your hands rather than your fingers. This helps reduce sticking and allows you to work the dough more effectively.
Roast the garlic until very soft
Make sure the kāriki (garlic) is roasted until completely soft. When squeezed, it should come out like a paste. If not, roast it for another 10 minutes. The roasted garlic can also be made ahead and stored in a sealed container in the fridge for a few days.
Use the right tray size:
Use a tray around 25 cm x 30 cm so the pona kāriki (garlic knots) bake evenly. Keeping them slightly close together helps them rise upwards, creating soft, fluffy buns packed with flavour.
Variations:
Extra Cheesy garlic knots:
There is already cheese in this recipe but you can add extra tīhi (cheese) inside the knots or sprinkle more on top before baking for a richer, gooey finish.
Spicy garlic knots:
Add a pinch of chilli flakes or cayenne pepper to the garlic butter for a gentle heat kick. You can also drizzle over a couple of tablespoons of chilli oil after the knots are baked.
Vegan-friendly option:
Use plant-based butter and dairy-free cheese alternatives while keeping the roasted garlic as the flavour base.
STORAGE OPTIONS:
STORE IN AN AIRTIGHT CONTAINER:
Keep leftover pona kāriki (garlic knots) in an airtight container at room temperature to help maintain their softness.
FREEZE FOR LONGER STORAGE:
For longer storage, wrap the knots well and freeze. This helps keep their texture and prevents them from drying out.
REHEAT BEFORE SERVING:
Warm the knots in the oven, microwave, or under the grill to bring back their soft, fresh-from-the-oven texture.
Frequently Asked Questions:
This can be for a number of reasons. The first one is adding extra puehu parāoa (flour) in to the recipe, the more you add, the denser it will be. Try following the measurements exactly and I promise they won't be dense. Also, make sure the rising time is stuck to unless it is cold in your kitchen. If so, increase the rising times by 10 - 15 minutes to boost the rising of the dough.
Roasting the kāriki (garlic) is highly recommended because it gives a sweet, mellow flavour. Raw garlic alone will be much stronger and sharper in taste. Trust me when I say that it is completely worth roasting the garlic.


Cherie
This recipe has given me legend status amongst friends and family!!! Thank you for always generously sharing your cooking secrets.
Naomi Toilalo WhānauKai
Yes Cherie! How good are the flavours in this recipe?!? I love that it has given you legendary status in your whānau, you deserve it! Thank you for the feedback!
Nicky
I made these for my hubby's birthday dinner and they were AMAZING, the flavors were divine and the rolls were straightforward and quite fun to make, will definitely be making again
Naomi Toilalo WhānauKai
Yes Nicki - they are definitely a favourite in our whānau. I am stoked to hear you liked making the knots too - they look pretty but are super to make!