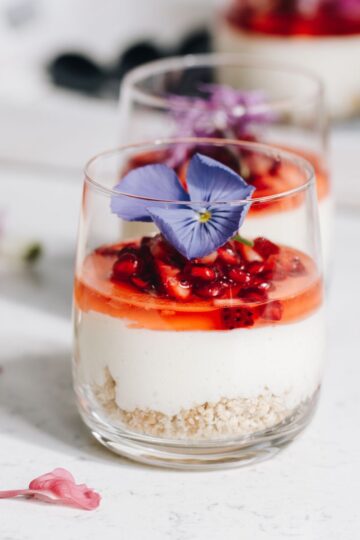
These Mini Berry Trifles are absolutely glorious. A cranberry and pomegranate jelly sits at the base of the dessert, topped with vanilla sponge. Cream and white chocolate shards rest on top for another level of flavour. Finally a white chocolate pōtae (hat) sits on the glass to hide the deliciousness that waits inside. Everything about this is a little bit extra so get ready to wow you guests with epic dessert.

I have a confession...I am actually not the biggest fan of trifle. Sometimes, the gooey texture of every single element puts me off! I know that might be outrageous to some but that is exactly why I created these delicious purini (desserts). Let's take a closer look.
More purini (dessert) recipes to try:
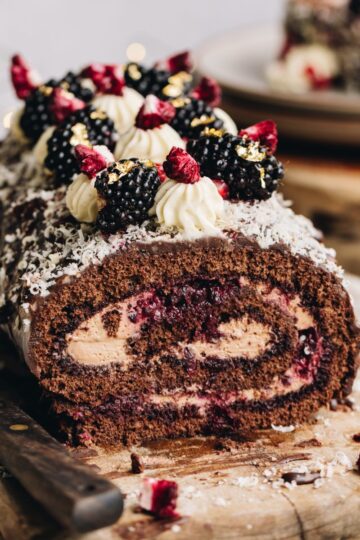
Do you need a recipe that works perfectly as a gift? Then try my Rocky Road with Homemade Marshmallow. Are you a chocolate mousse and salted caramel fan? I created this Chocolate Mousse and Salted Caramel Dessert for entertaining and special occasions. Serve these in glasses too for an elegant look.
Videography and photography taken by Sarah Henderson.
Ingredient Tips for the Mini Berry Trifles:
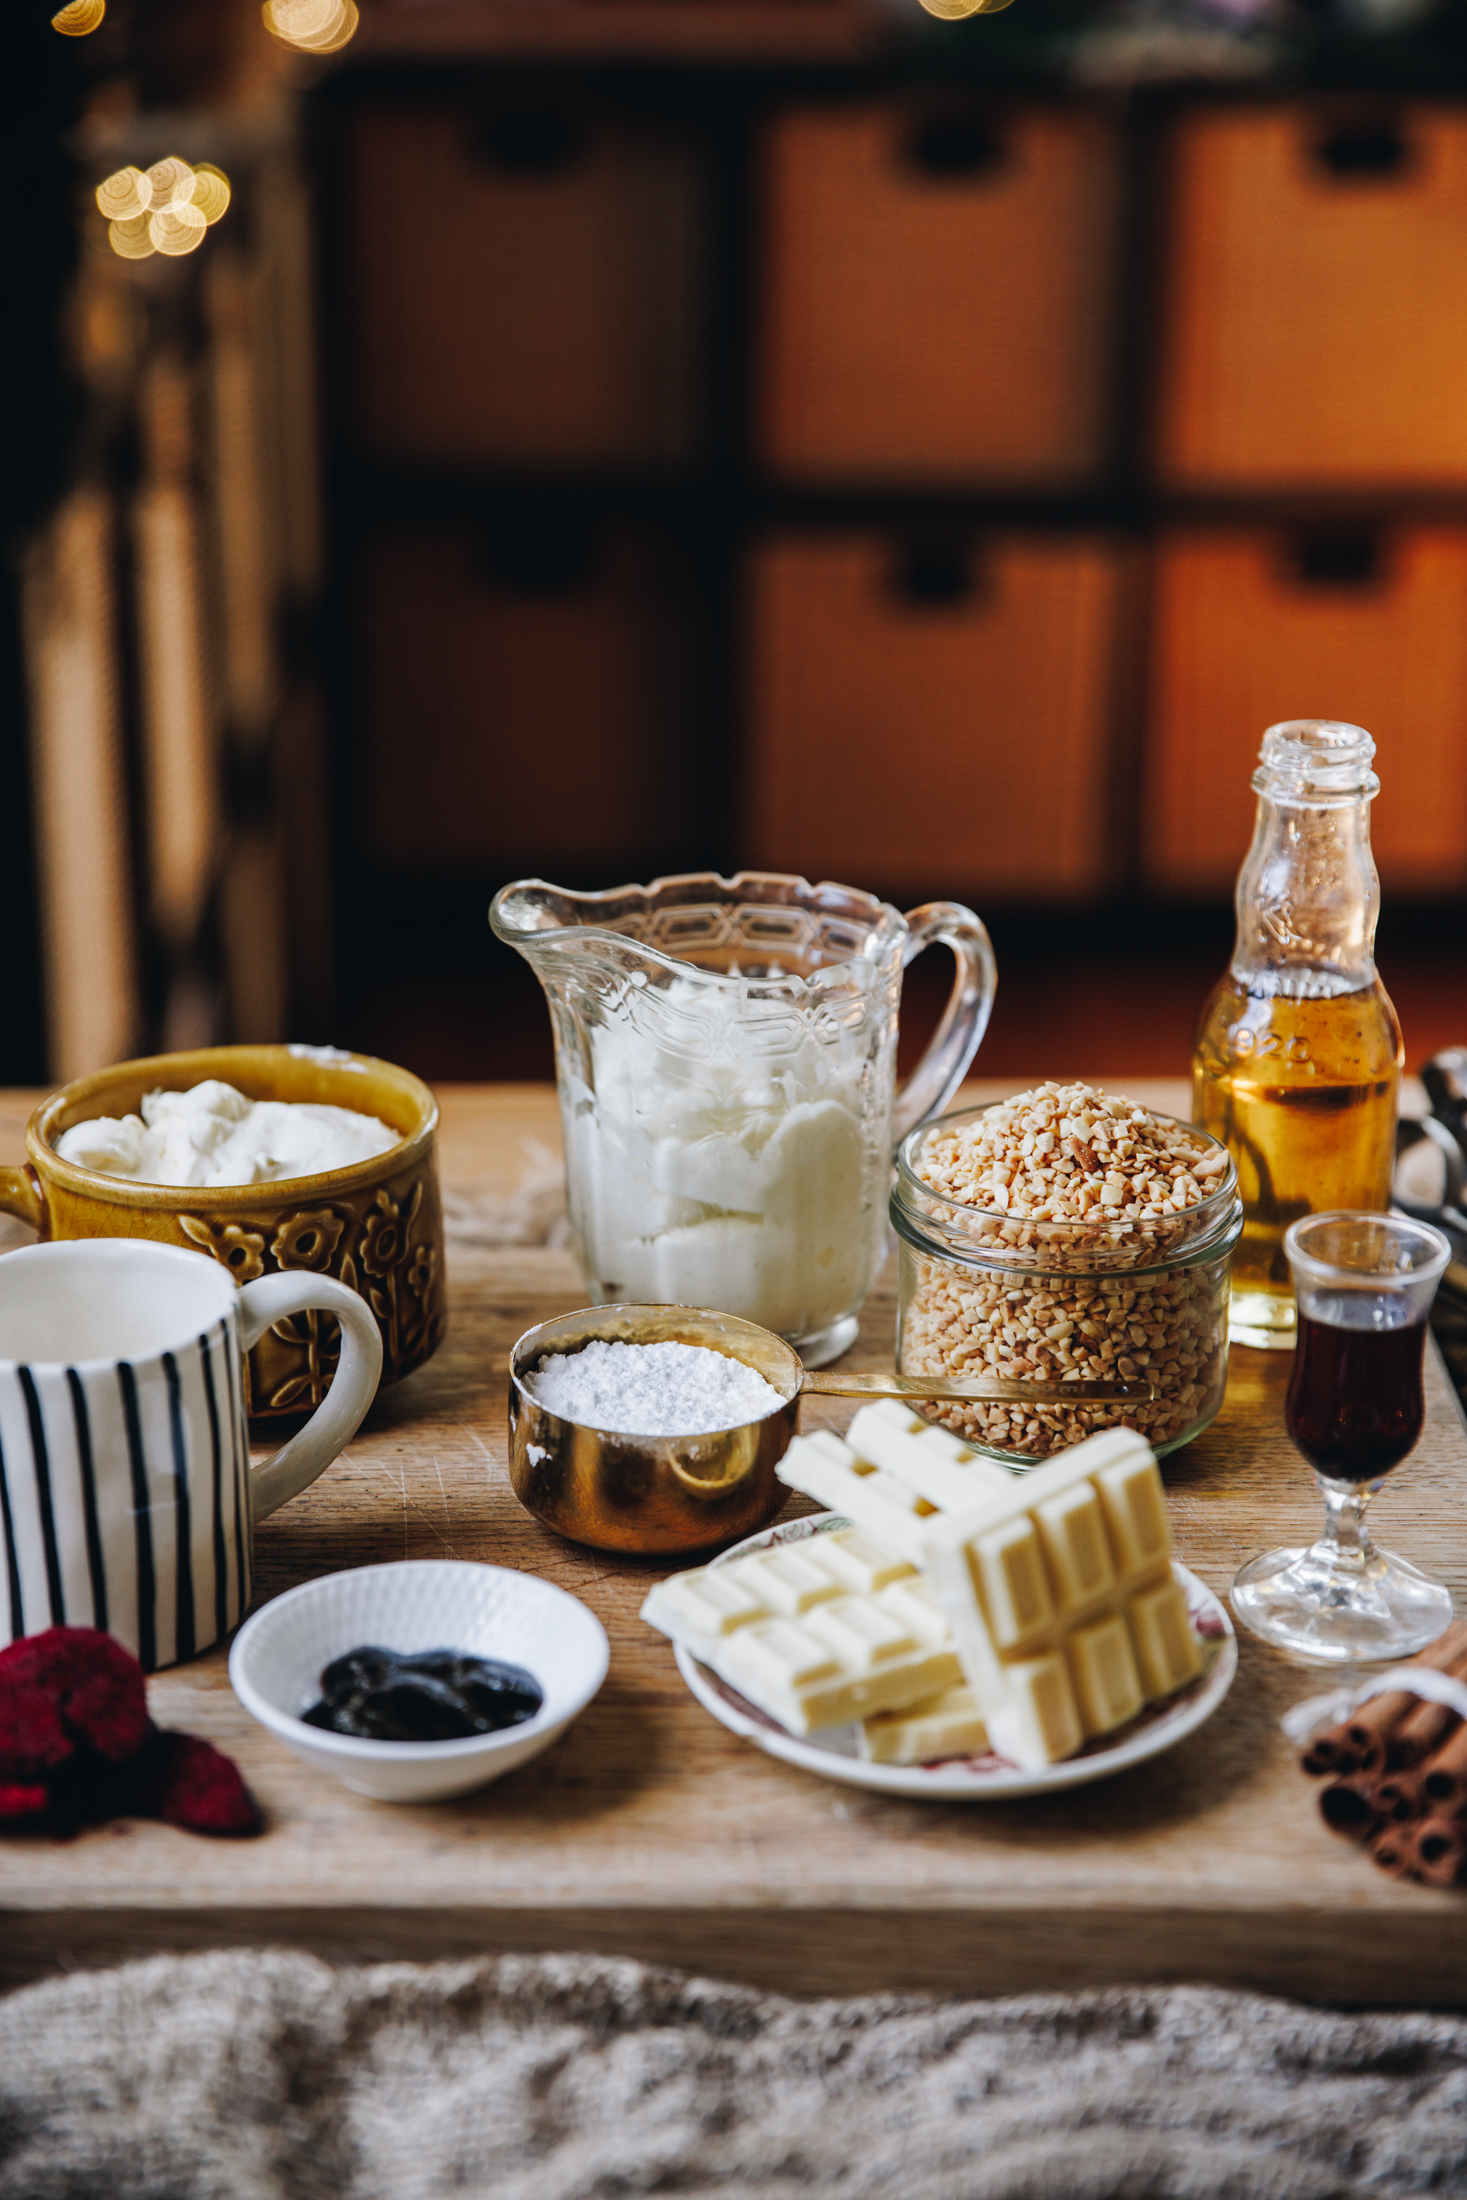
- Cranberry Juice: I prefer cranberry for the colour and the tartness but any light coloured juice will work.
- Pomegranate Seeds and Blueberries: These work deliciously in the jelly but they can be swapped for other hua (berries) or the jelly can be left plain.
- Thickened Cream: I love thickened cream in this recipe but it can also be swapped for crème fraîche or mascarpone.
- Store bought Custard: Make sure you find a thick one so it doesn't loosen the whipped cream too much when it is added.
- White Chocolate: Use a good quality tiakarete mā (white chocolate) for the best results.
- Vanilla Syrup: Find this in the coffee section in the supermarket.
Expert Tips:
If you want to make a large trifle instead, all good. All you need is a 2 litre capacity glass bowl. Cut the sponge in to whatever shape you want and layer all of the components in the bowl in the same order.
You can really play with this recipe anyway you want to. Use different hua (berries), use a store-bought sponge instead of making it or use plain kirīmi (cream) instead of adding the kahitete. Kei a koe te kōwhiringa - the choice is yours.
I make my keke kōpungapunga (sponge cake) but you can use a store-bought sponge cake. The flavour will not be quite as good as the homemade version but up to you!
STEP BY STEP INSTRUCTIONS FOR THE MINI BERRY TRIFLES:
Note: The full recipe card with the full list of ingredients, instructions and step by step video are found at the bottom of this page.
1. Bloom the Gelatine:
Add the paura tetepe (gelatine powder) and wai ārani (orange juice) in to a small bowl or glass.
Stir and leave to bloom for 5 minutes.
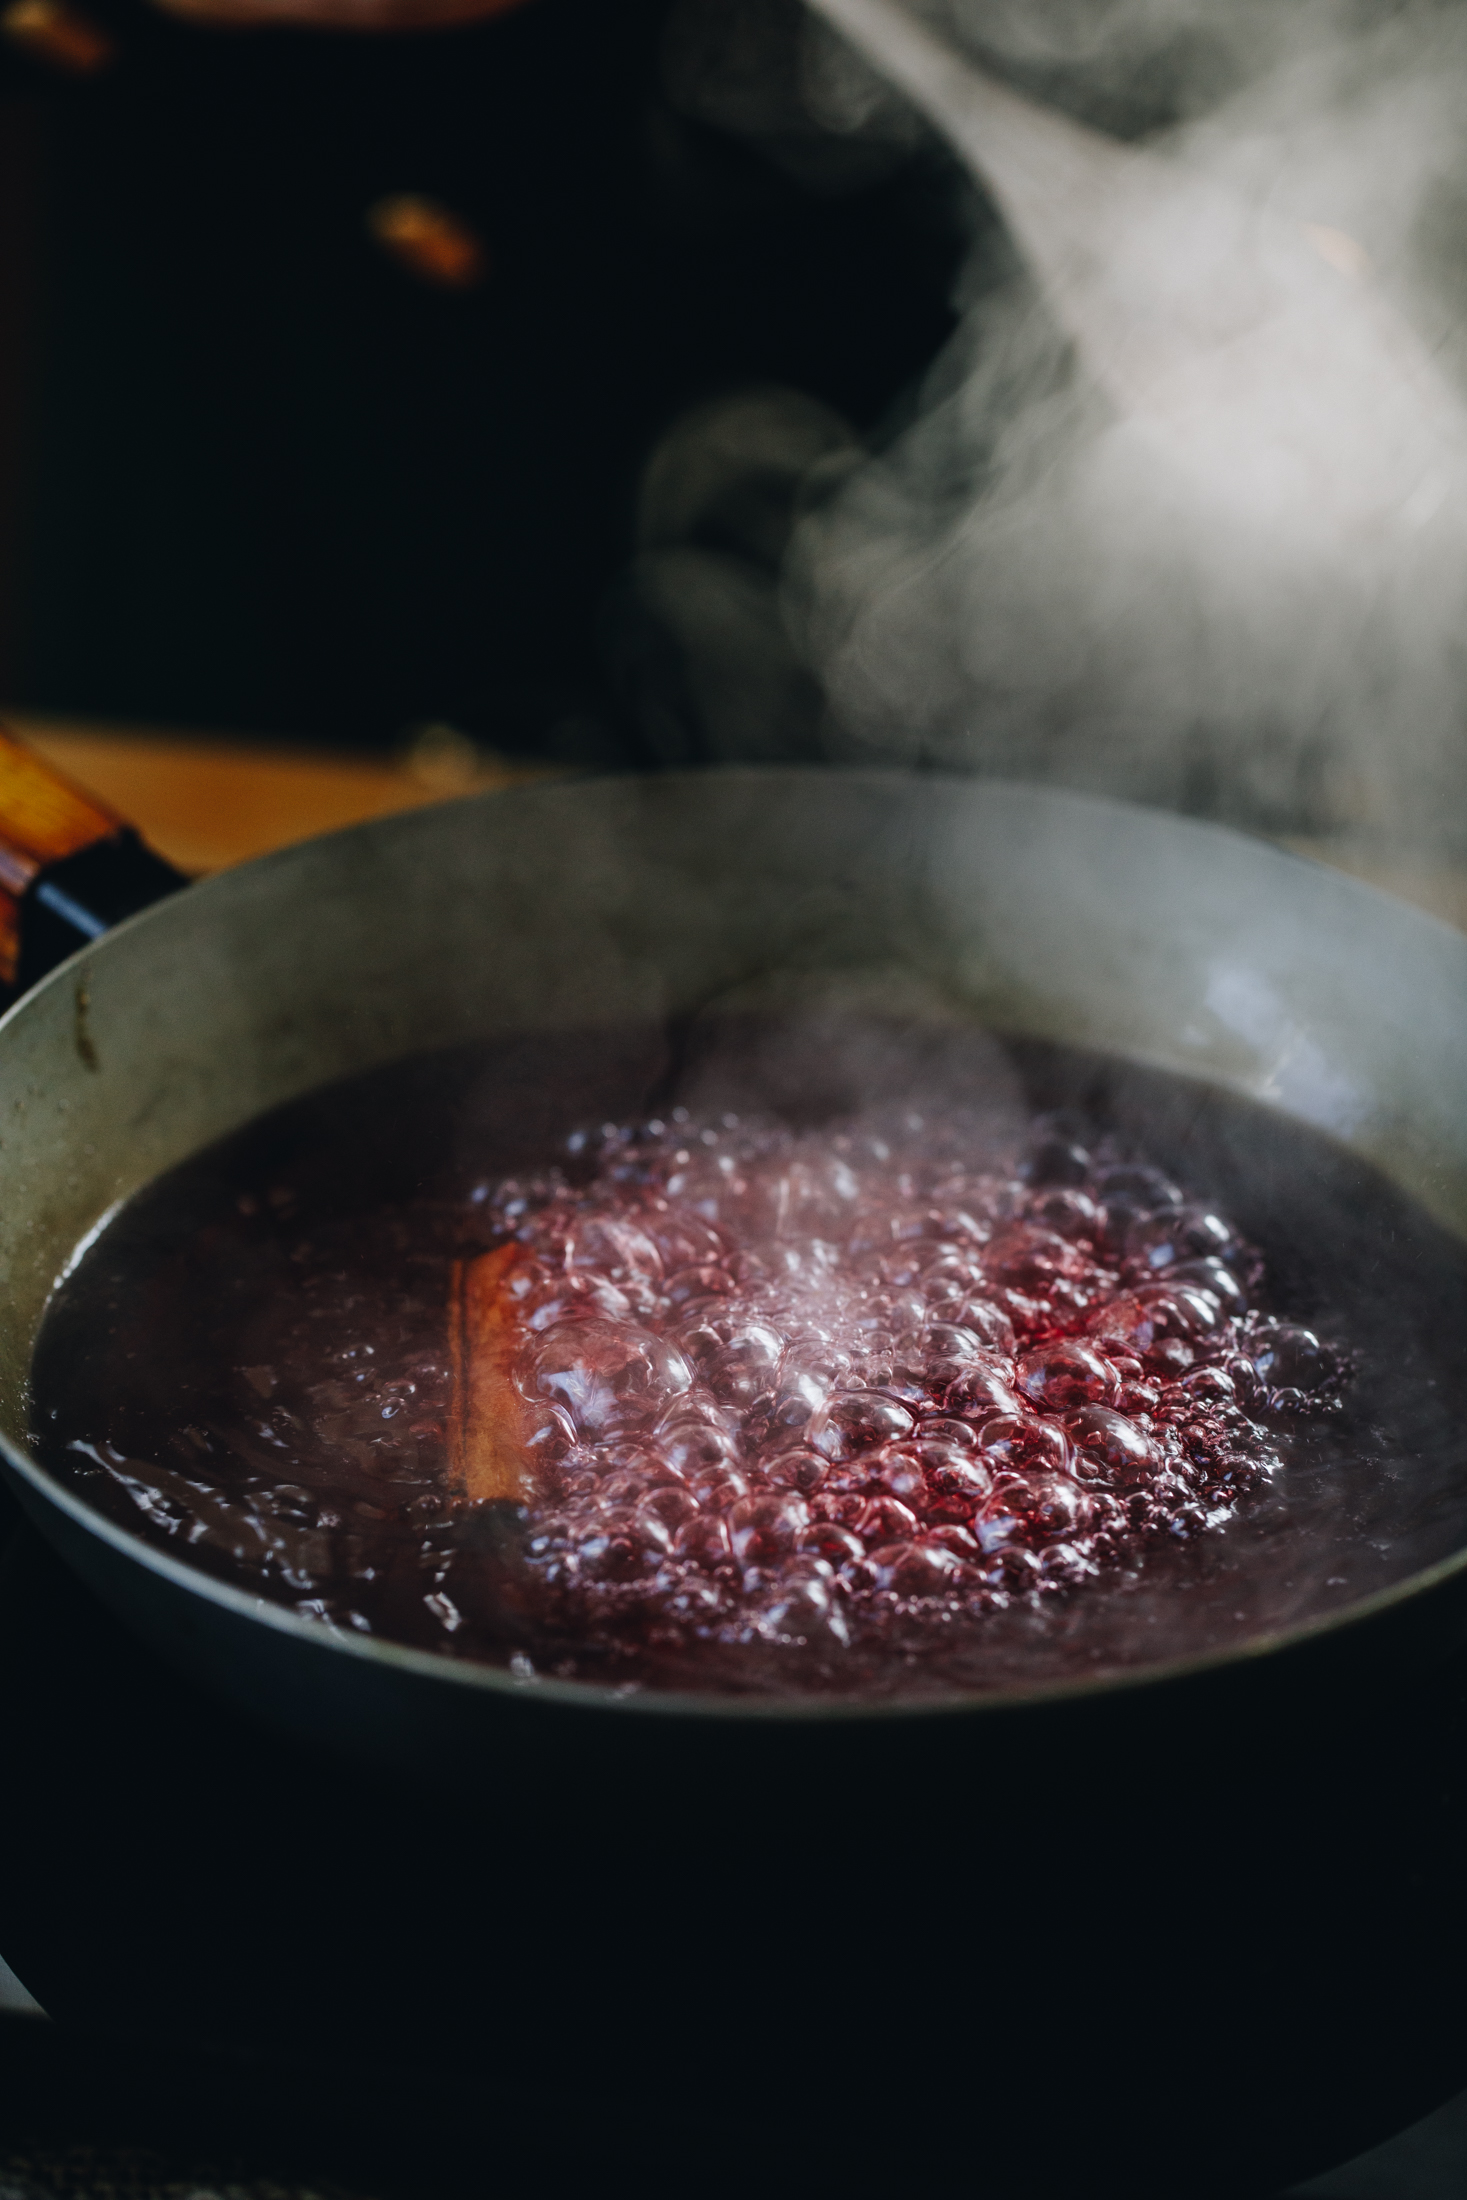
2. Heat Juice and Sugar:
Pour 250ml (half) of the wai karanipere (cranberry juice), huka one (caster sugar) and rākau hinamona (cinnamon sticks) in to a pot.
Bring it to a simmer and add the bloomed gelatine. Kaurorihia (stir it) until the gelatine and sugar is melted.
Remove from the heat and pour in the remaining 250ml of the wai karanipere (cranberry juice). Stir to combine.
Cool for 10 - 15 minutes until the mixture is lukewarm.
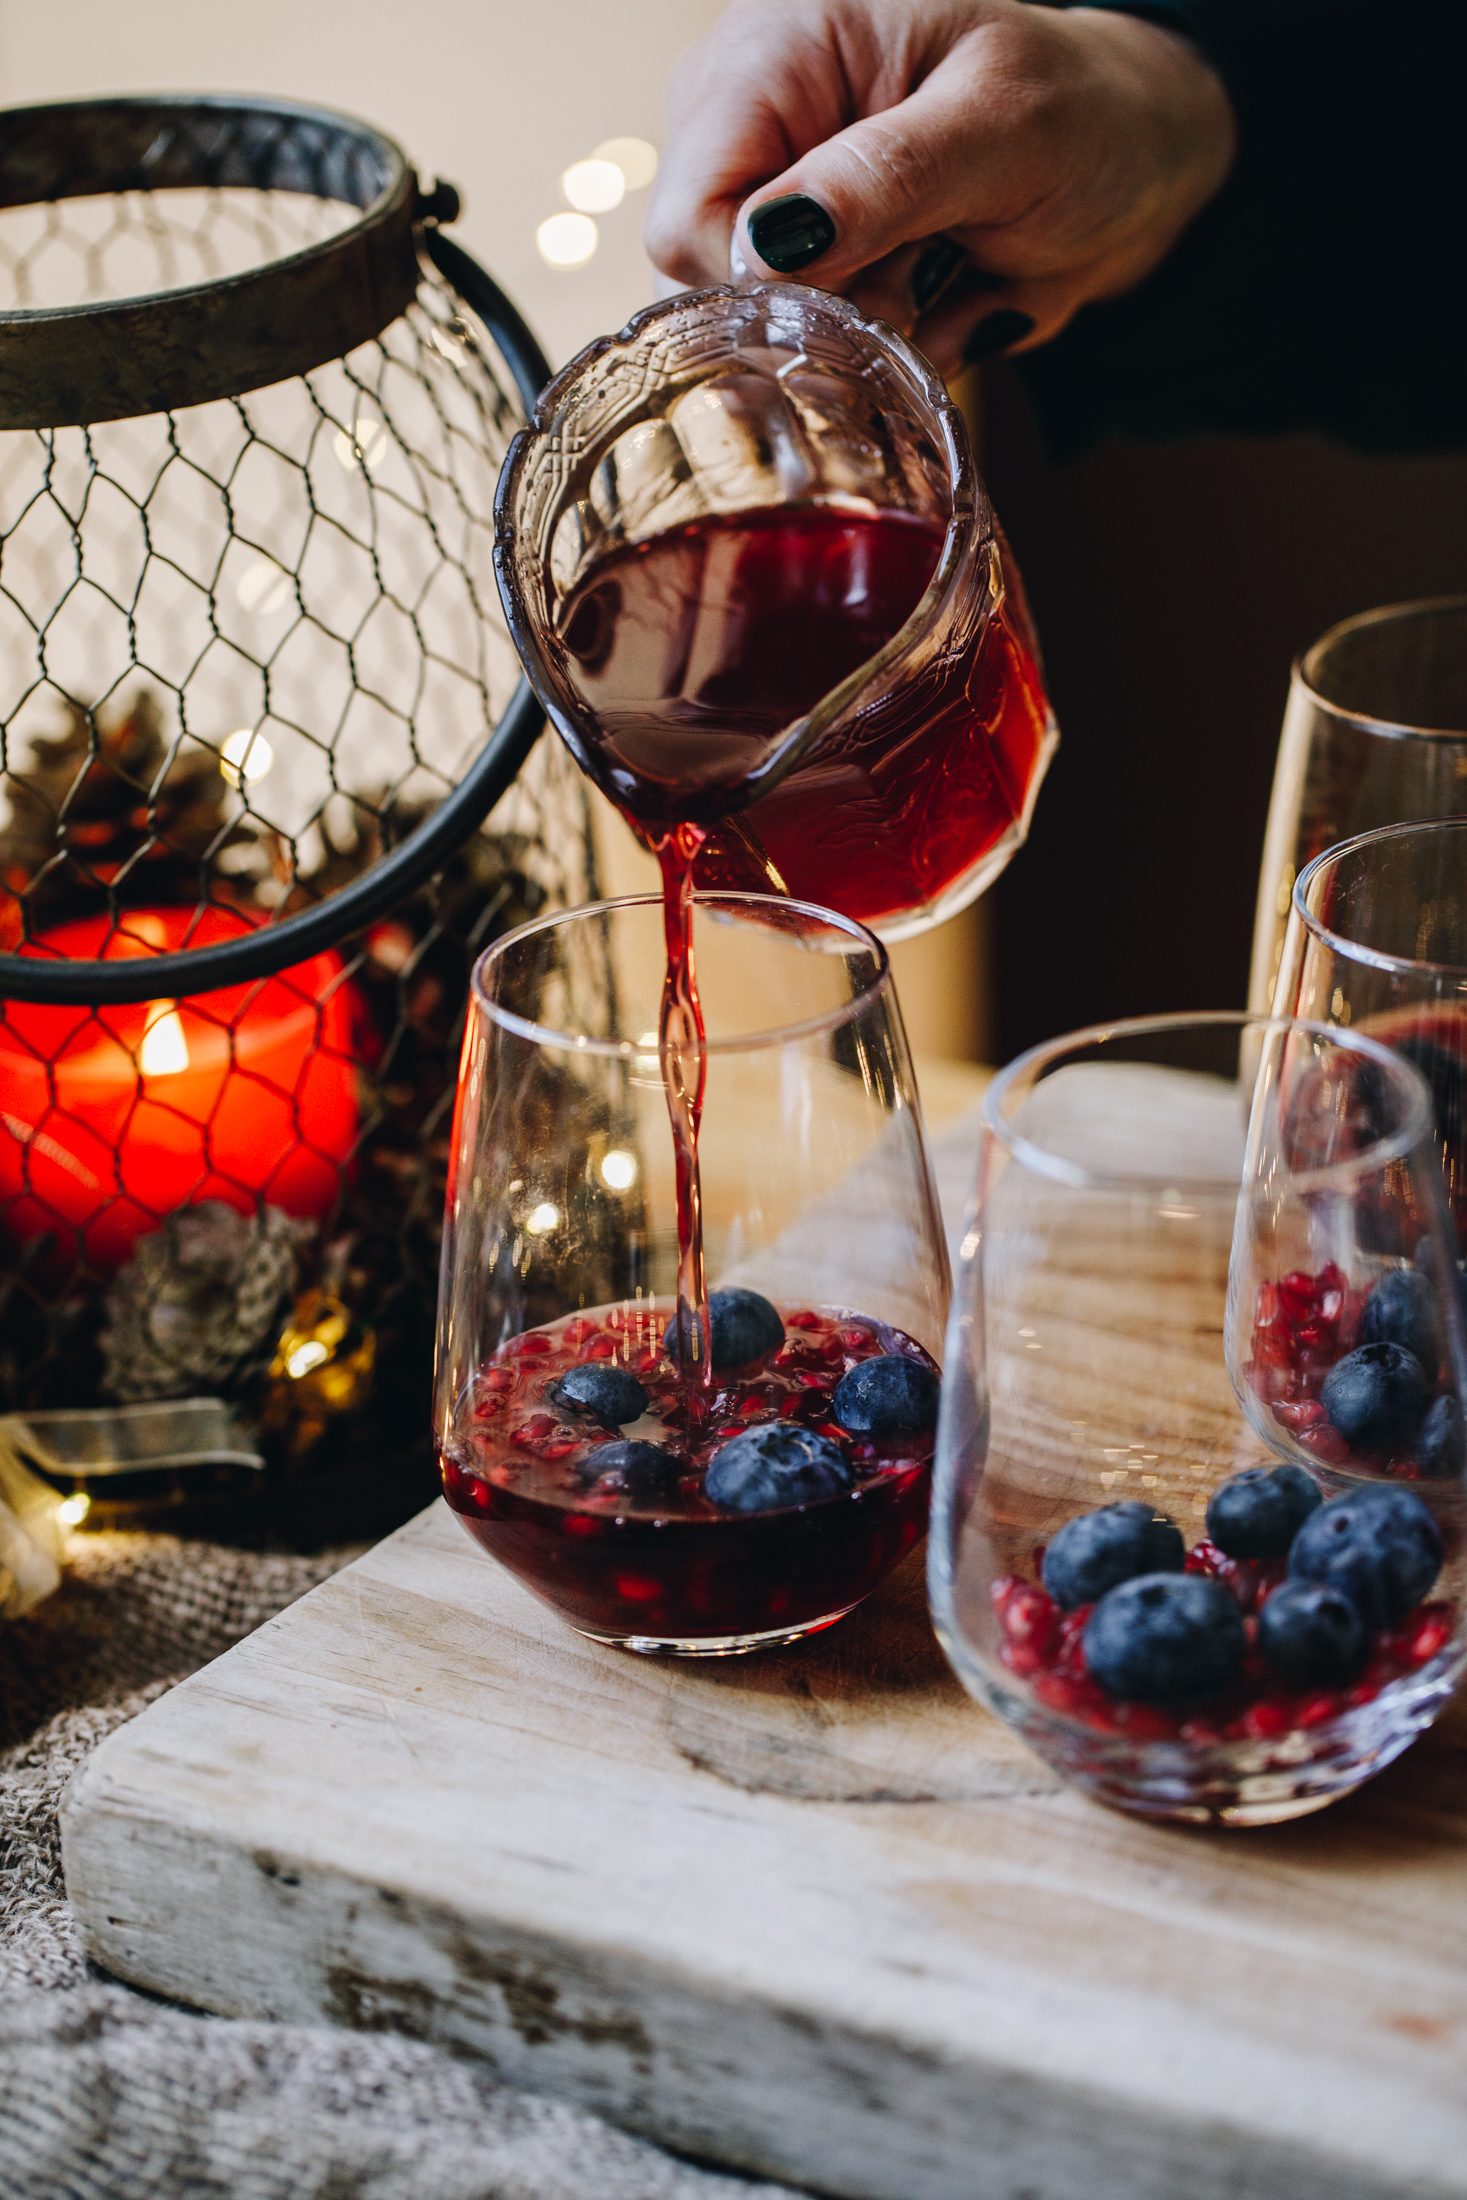
3. Add the Fruit in to the Glasses:
Add the kākano pamakaranete (pomegranate seeds) and tūrutu (blueberries) in to the base of each glass.
Pour around ¼ - ⅓ C of the cooled jelly liquid in to each glass.
Set in the fridge for an hour, until the jelly is just set.
4. Preheat the Oven for Sponge Cake:
Note: You can skip this step and use a store-bought sponge cake here. The flavour will not be quite as good as the homemade version but up to you!
Preheat the oven to 165 °C.
Grease a 30 cm x 20 cm tin with butter and line it with baking paper.
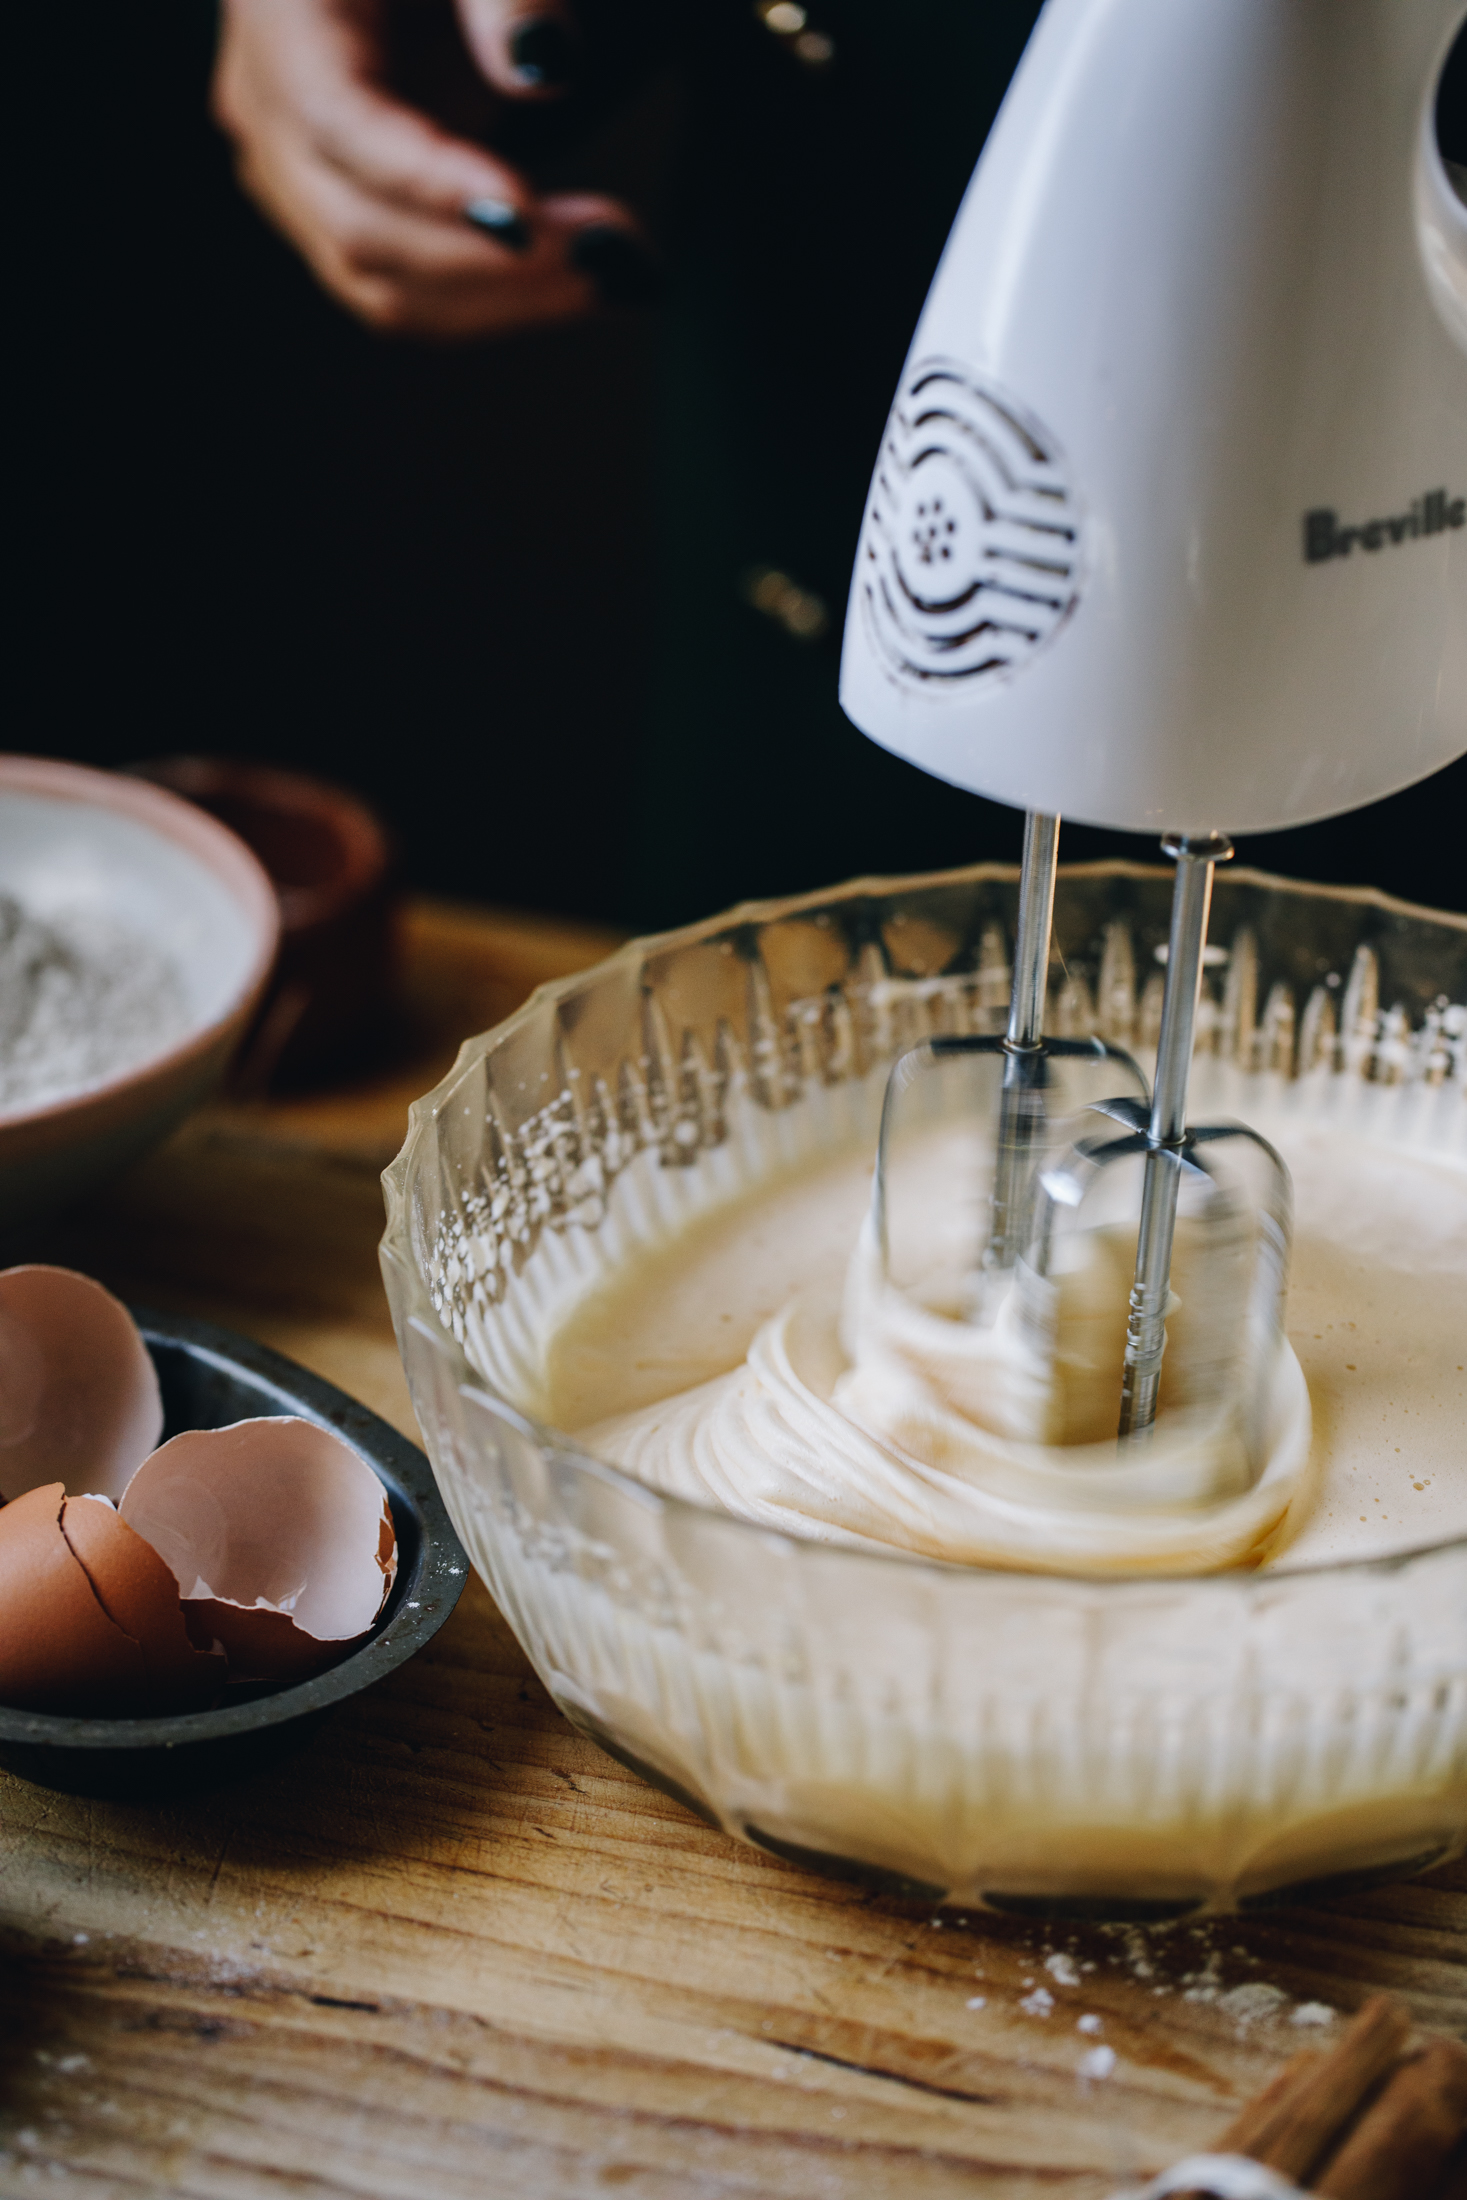
5. Whip the Eggs for the Sponge Cake:
Melt the pata (butter) gently in the microwave or in a small pot on the stove. Set aside to cool.
Add the hēki (eggs), wanira (vanilla) and tote (salt) in to a bowl.
Whakapāhukahukatia (whip it) on high for 2 minutes until foamy.
Slowly add the huka one (caster sugar) as you whip for 7 more minutes.
When the mixture can hold a figure 8, it is ready (see the video for reference).
6. Fold in the Dry Ingredients:
Sift the puehu parāoa (flour) and pēkana paura (baking powder) in to the egg mixture. Fold it gently through.
Add the cooled pata (butter) around the edge of the bowl in two additions, folding after each addition.
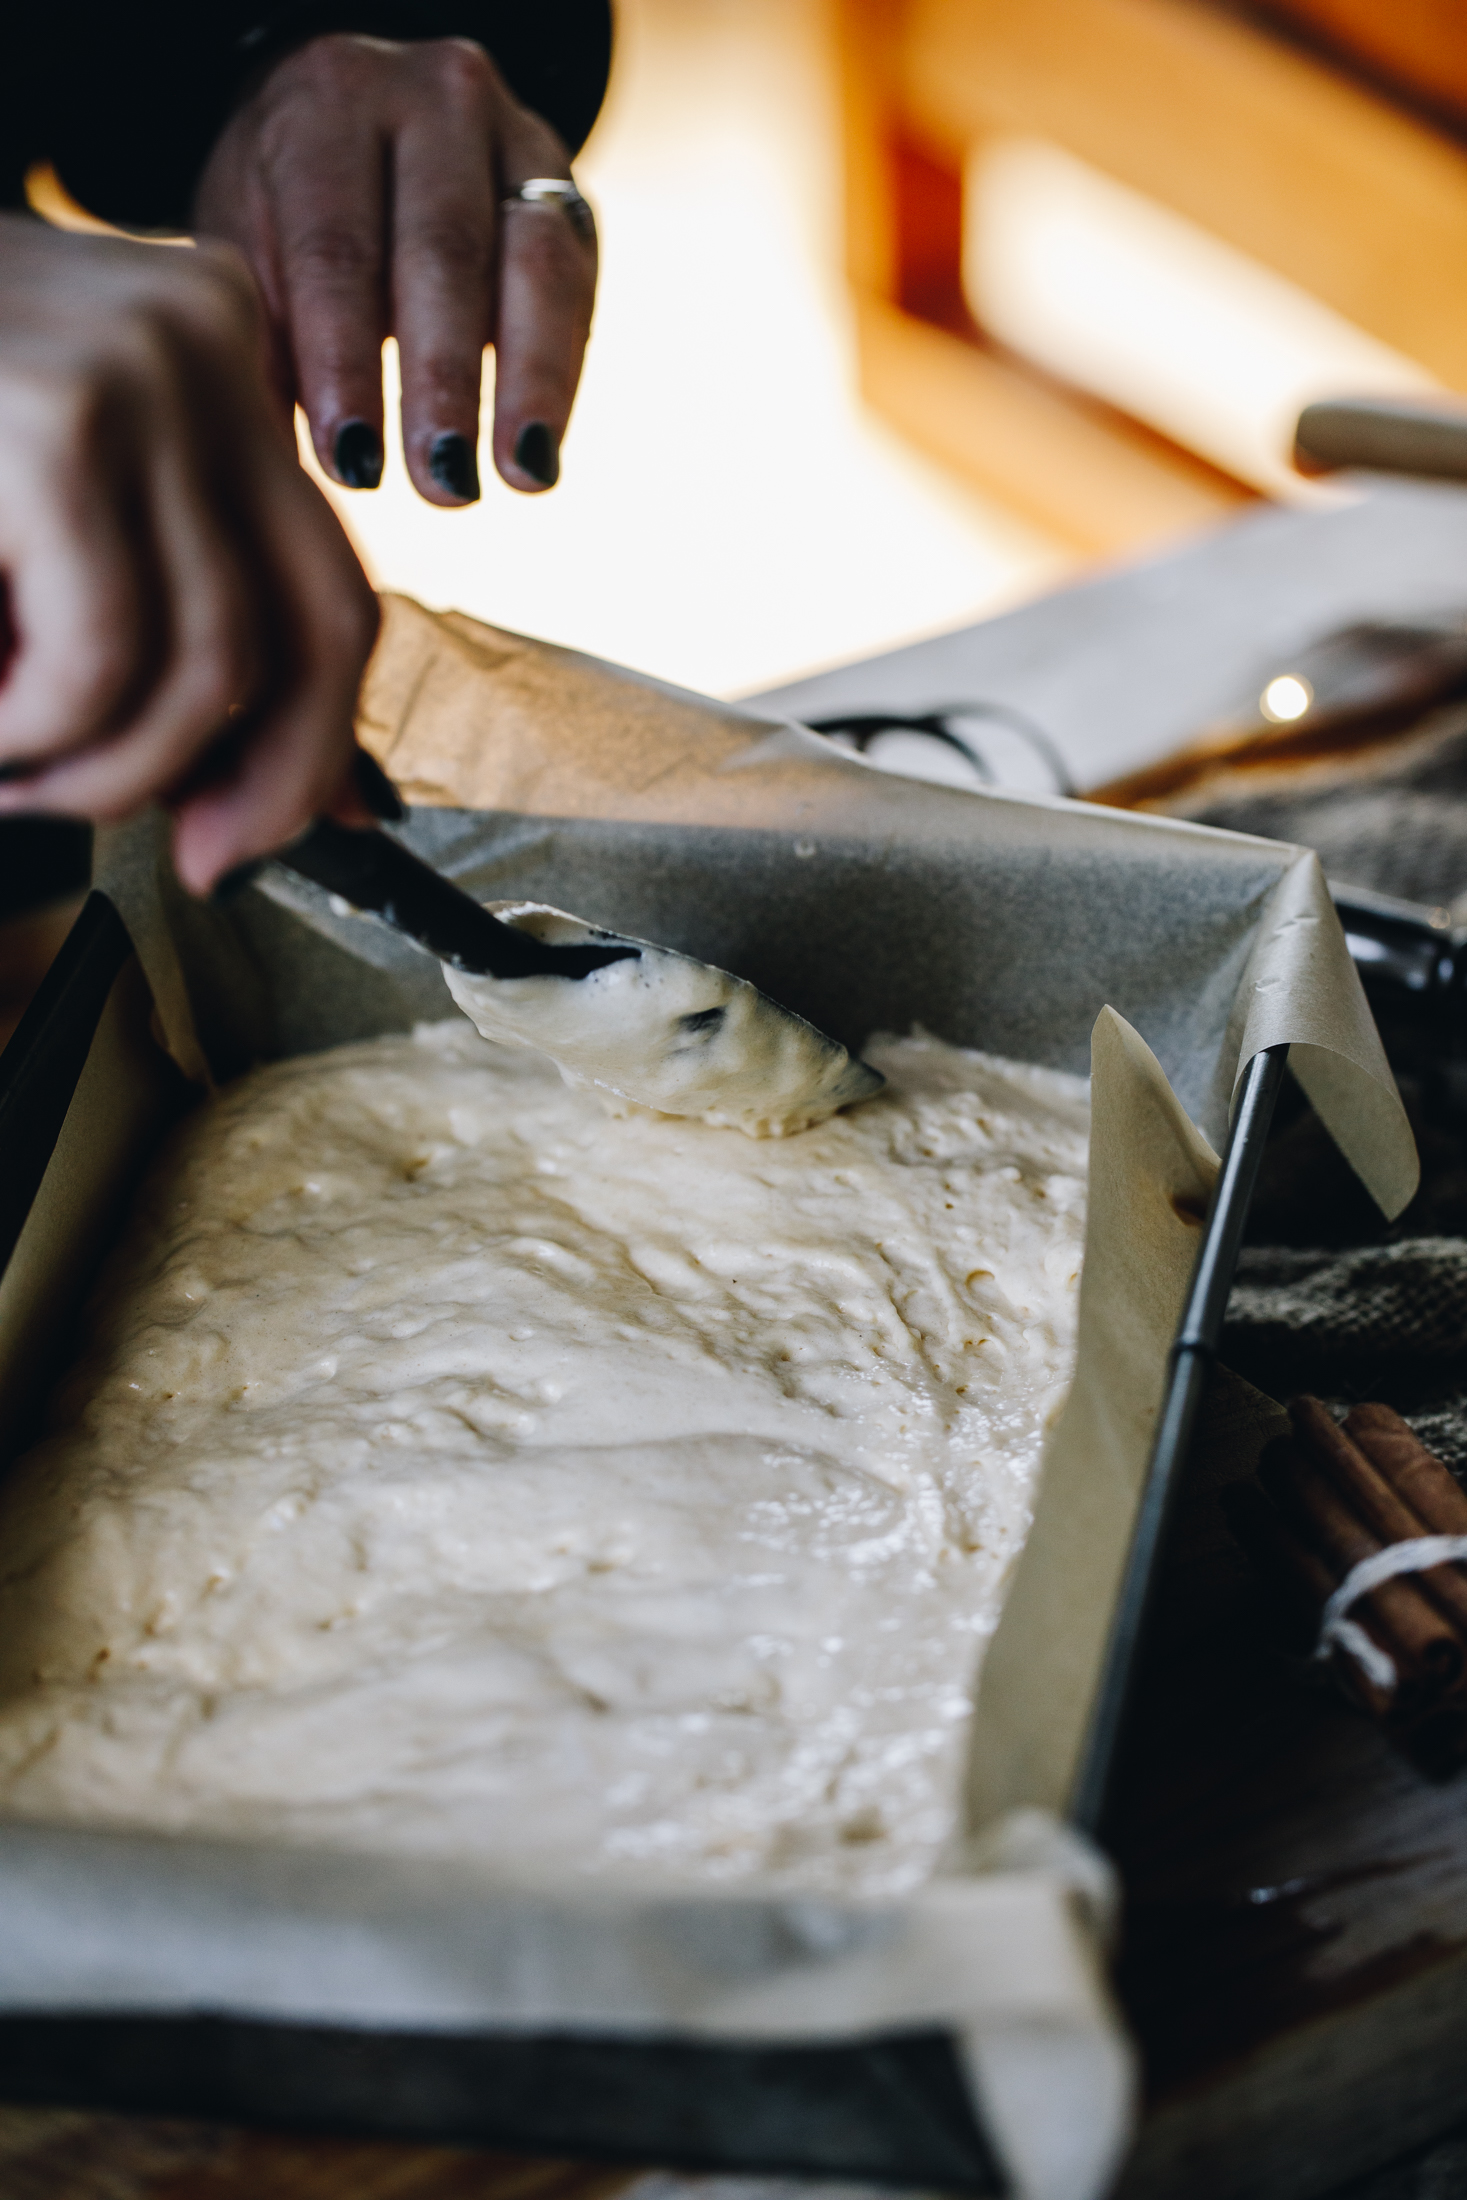
7. Bake the Sponge:
Spread the mixture in to the prepared tin.
Bake for 11 minutes in the pre-heated oven.
Remove from oven. Flip the tin on to a cooling rack and cool the keke (cake) as you prepare the final elements.
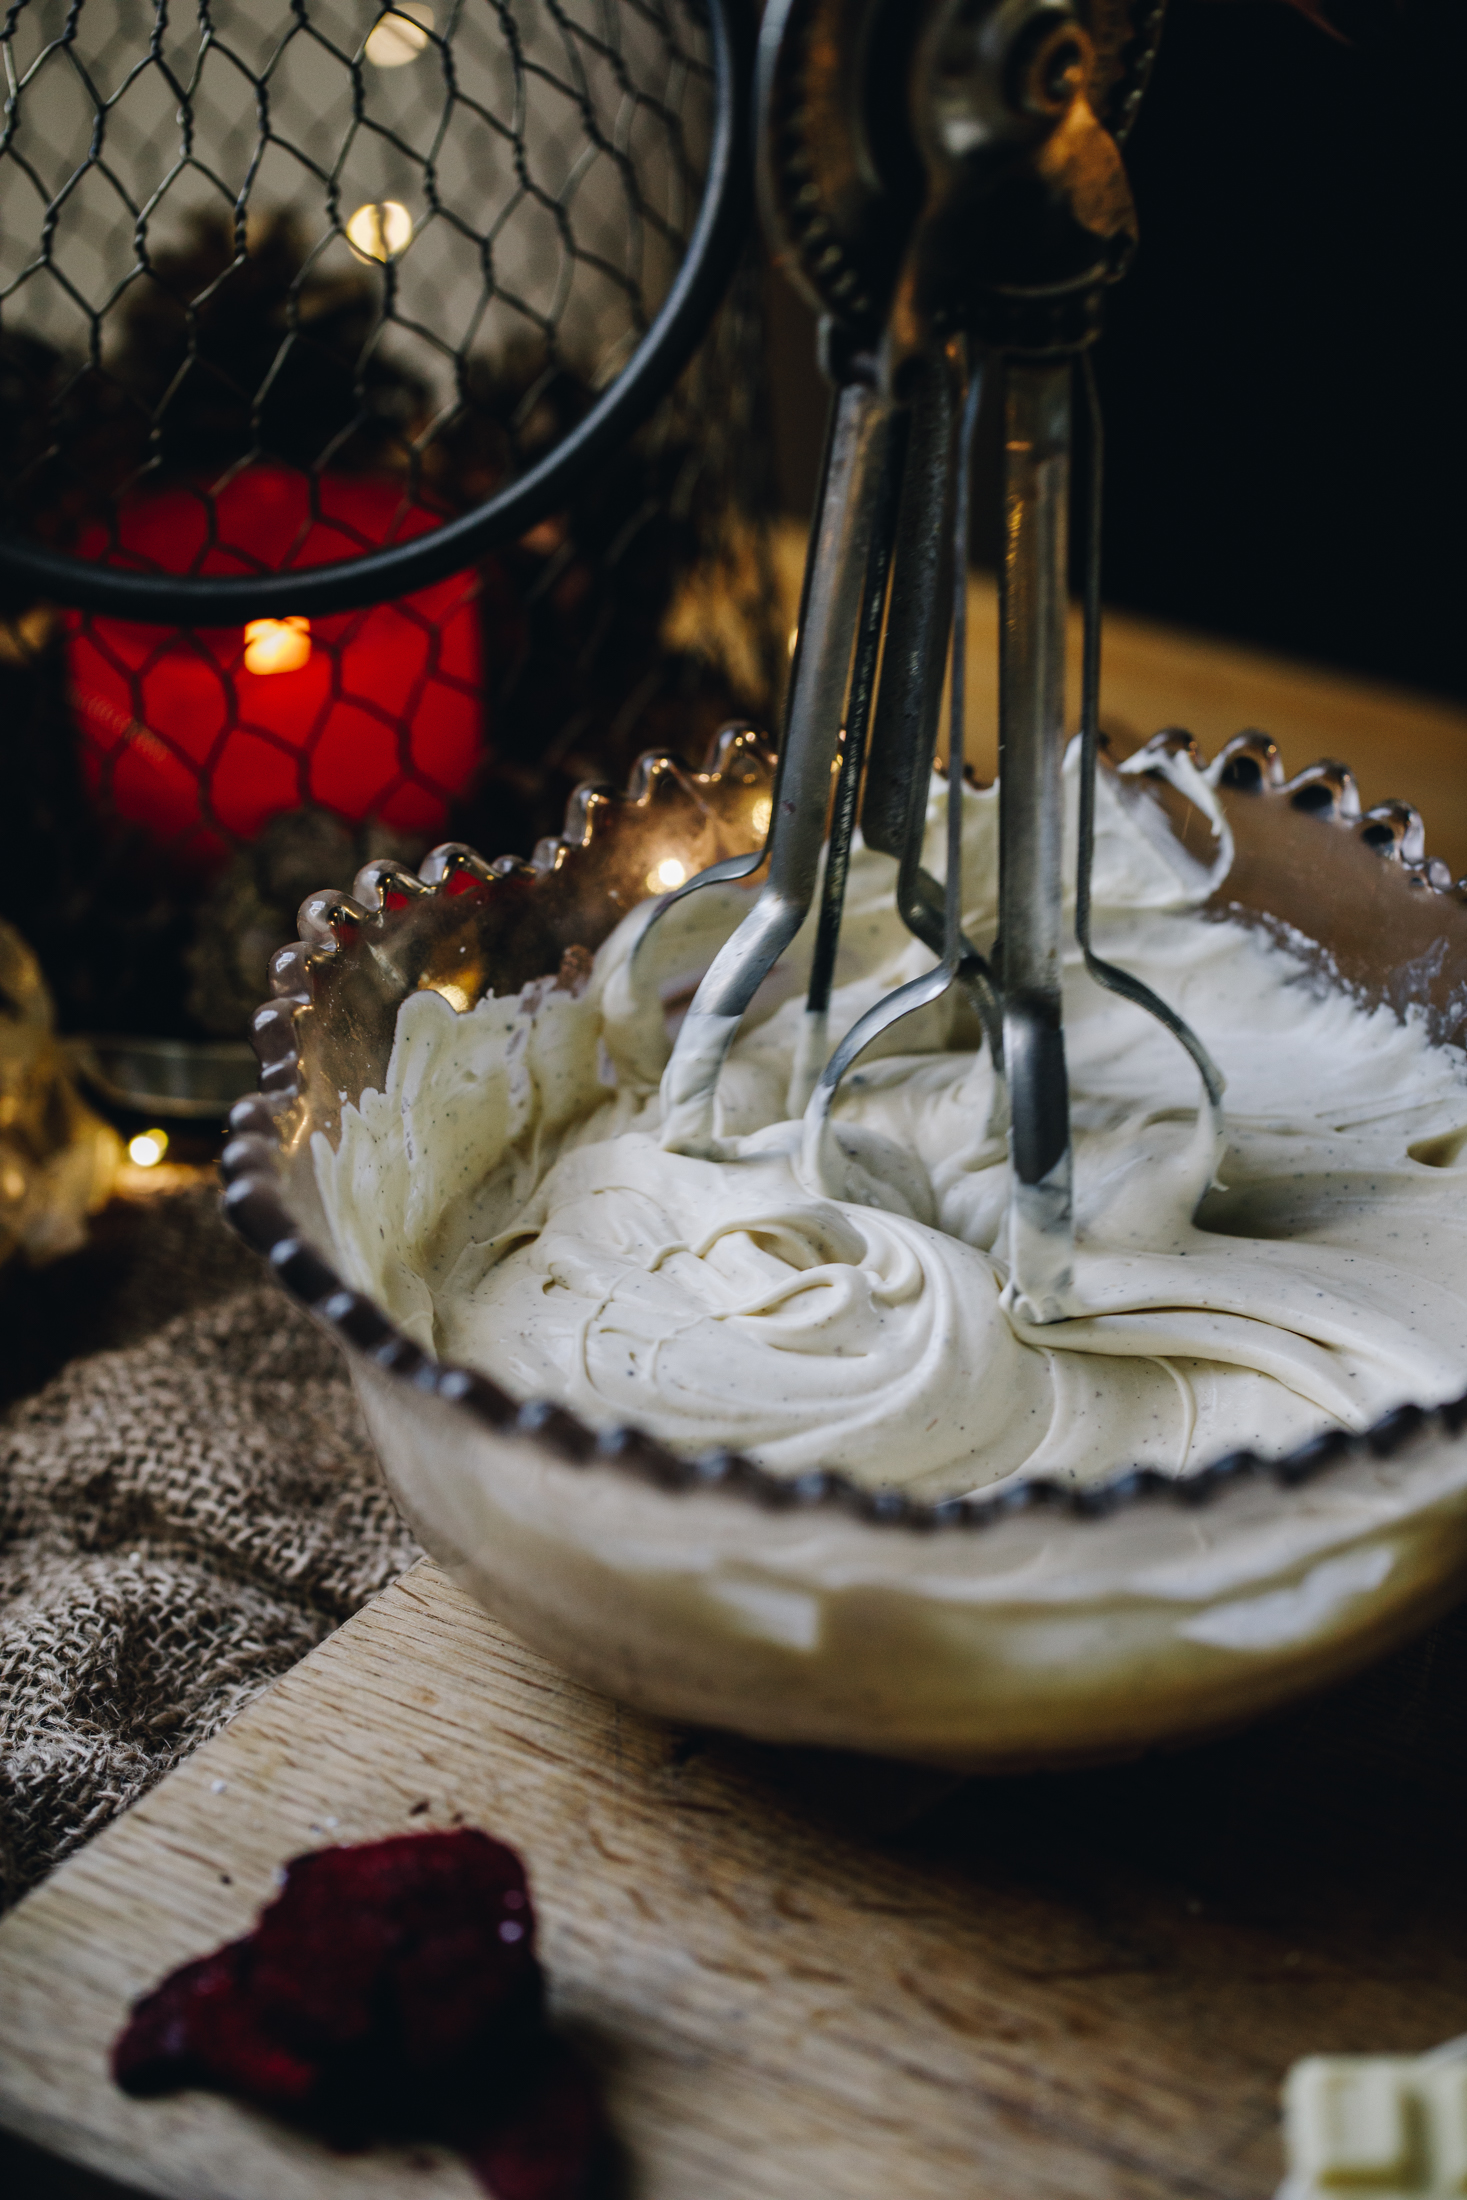
8. Make The Custard Cream:
Alternative options:
If you want a non-cream version, simply double the amount of kahitete (custard) and spoon it directly on top of the sponge instating of piping.
If you want a plain cream version: Omit the kahitete (custard) and use an extra cup of kirīmi (cream) and whip that with all the other ingredients.
Pipe it on just like I have done.
For the Custard Cream: Add the kirīmi kukū (thickened cream), kirīmi (cream), puehu huka (icing sugar) and wanira (vanilla) in to a medium bowl.
Whakapāhukahukatia (whip it) until medium peaks are formed.
Fold through the kahitete (custard) and it is ready.
9. Melt the White Chocolate:
Chop the tiakarete mā (white chocolate) in to small pieces, add it in to a heatproof bowl.
Add 3 cm of wai (water) in to pot and heat over low-medium heat until gently simmering. Place the bowl of tiakarete mā (white chocolate) on to the pot and melt it, stirring occasionally until it is melted and smooth. Remove it from the heat.
You can also melt the tiakarete mā (white chocolate) in the microwave for 20 second increments, stirring after each time.
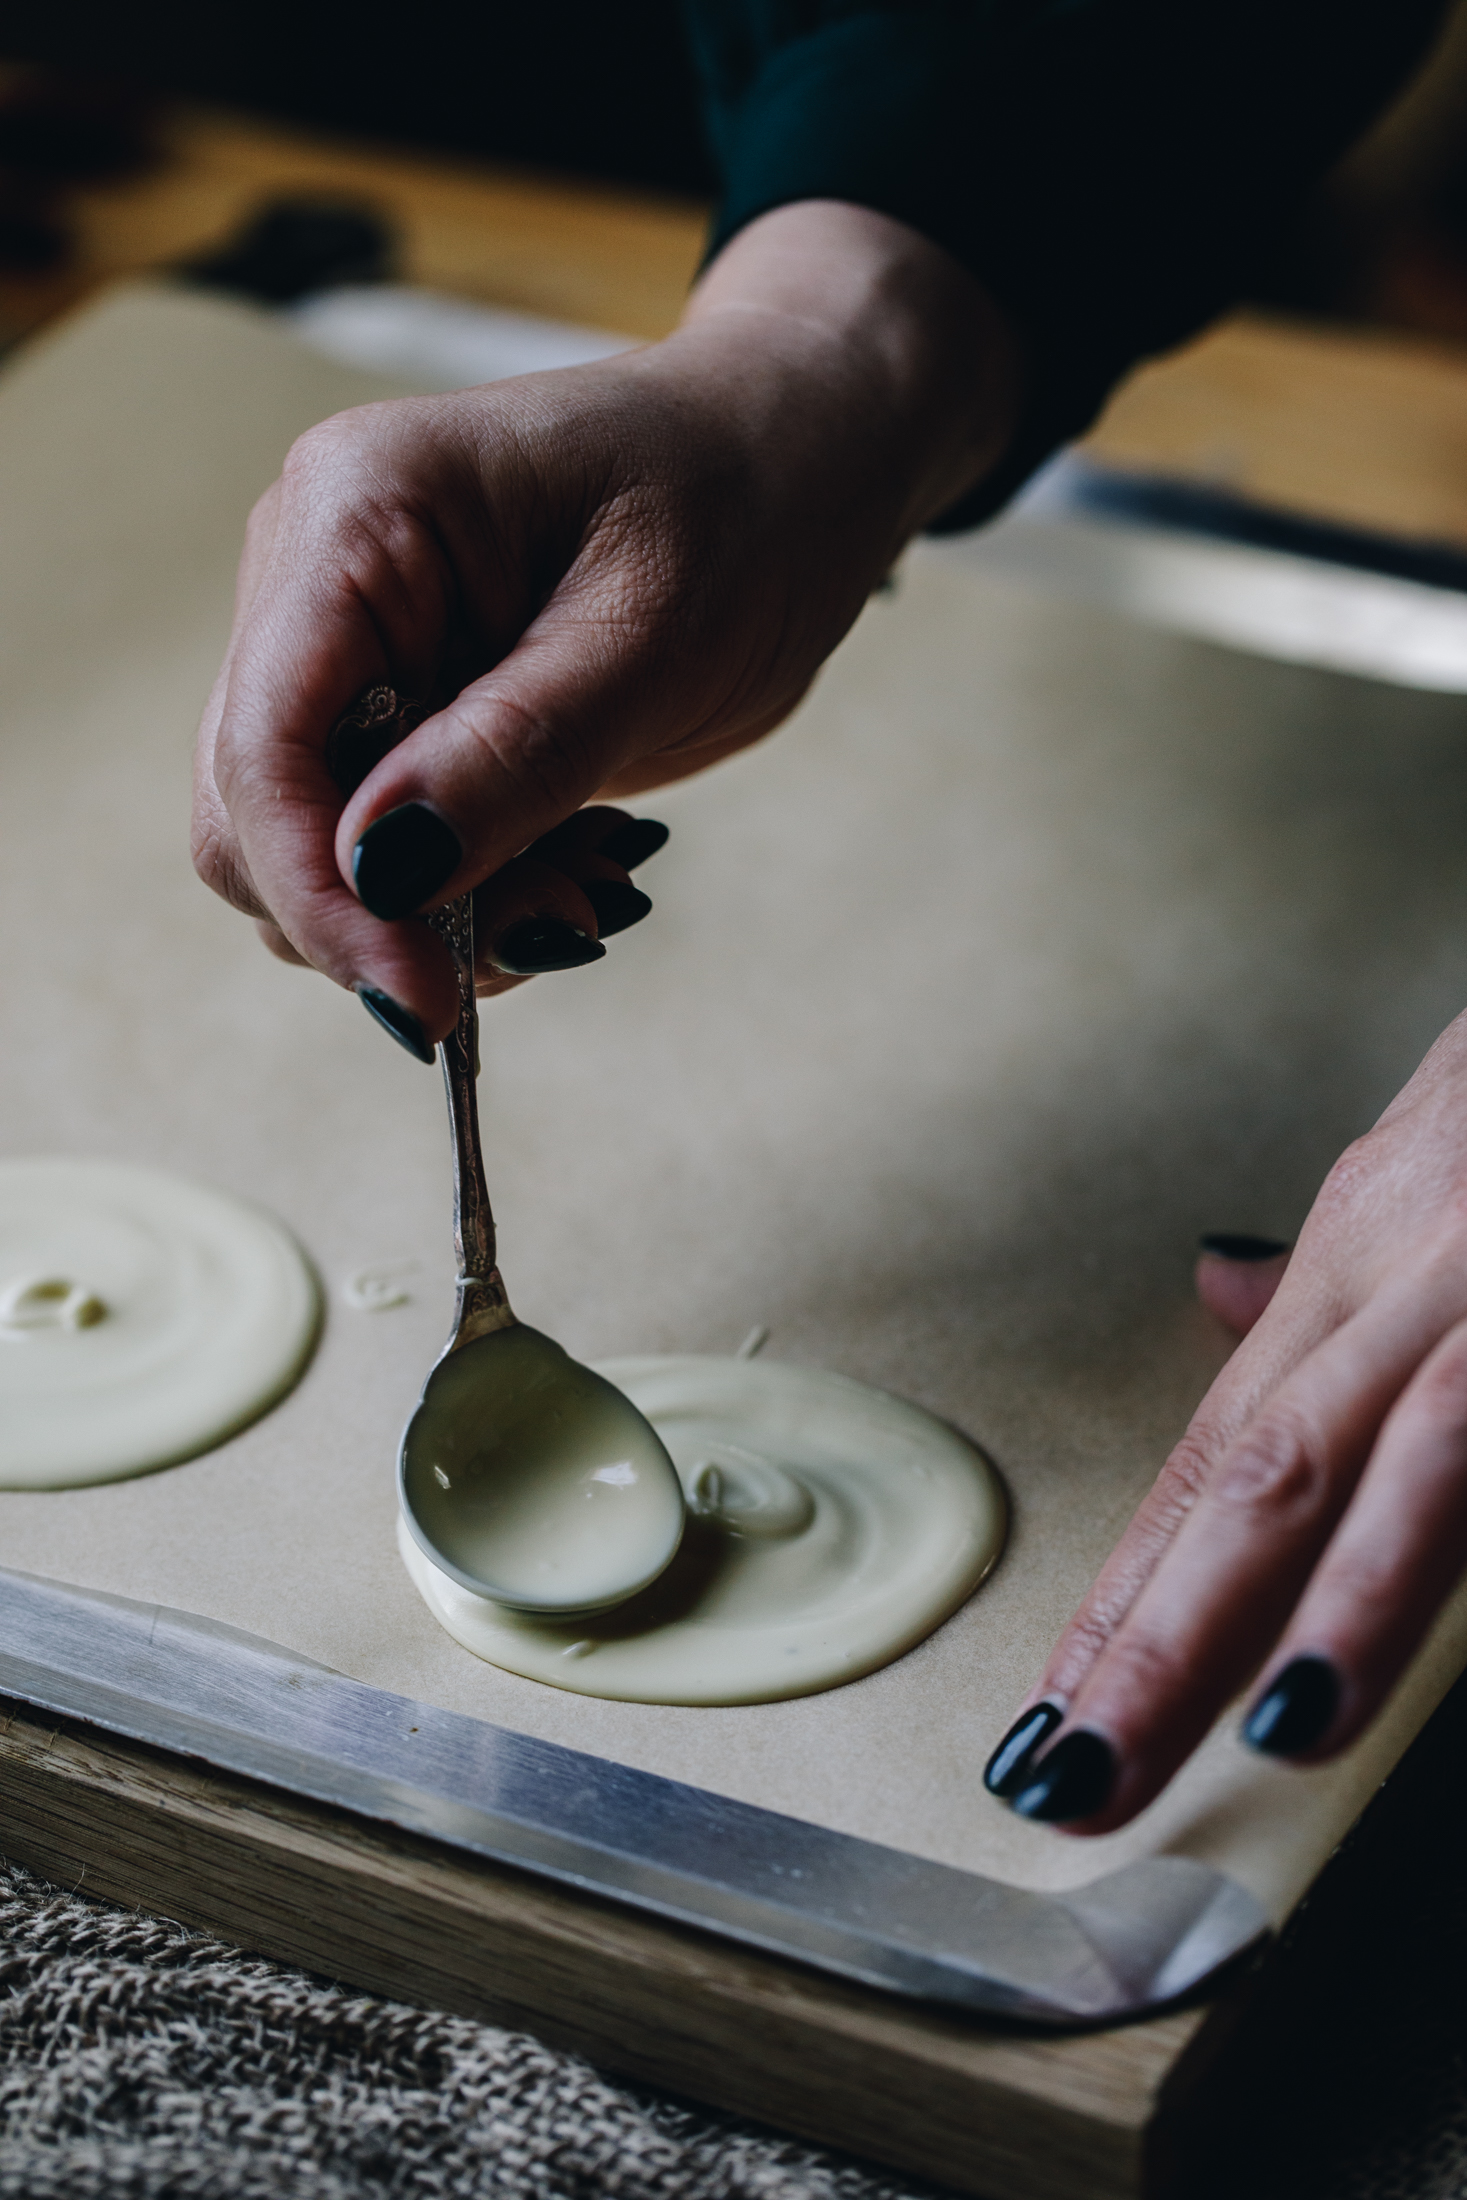
10. Make the Chocolate Discs:
Place a large piece of baking paper on to a chopping board. Spoon a teaspoon or so of the tiakarete mā (white chocolate). Gently create 6-8 porohita (circles) that are slightly bigger than the rim of your glasses.
10. Make the Chocolate Discs:
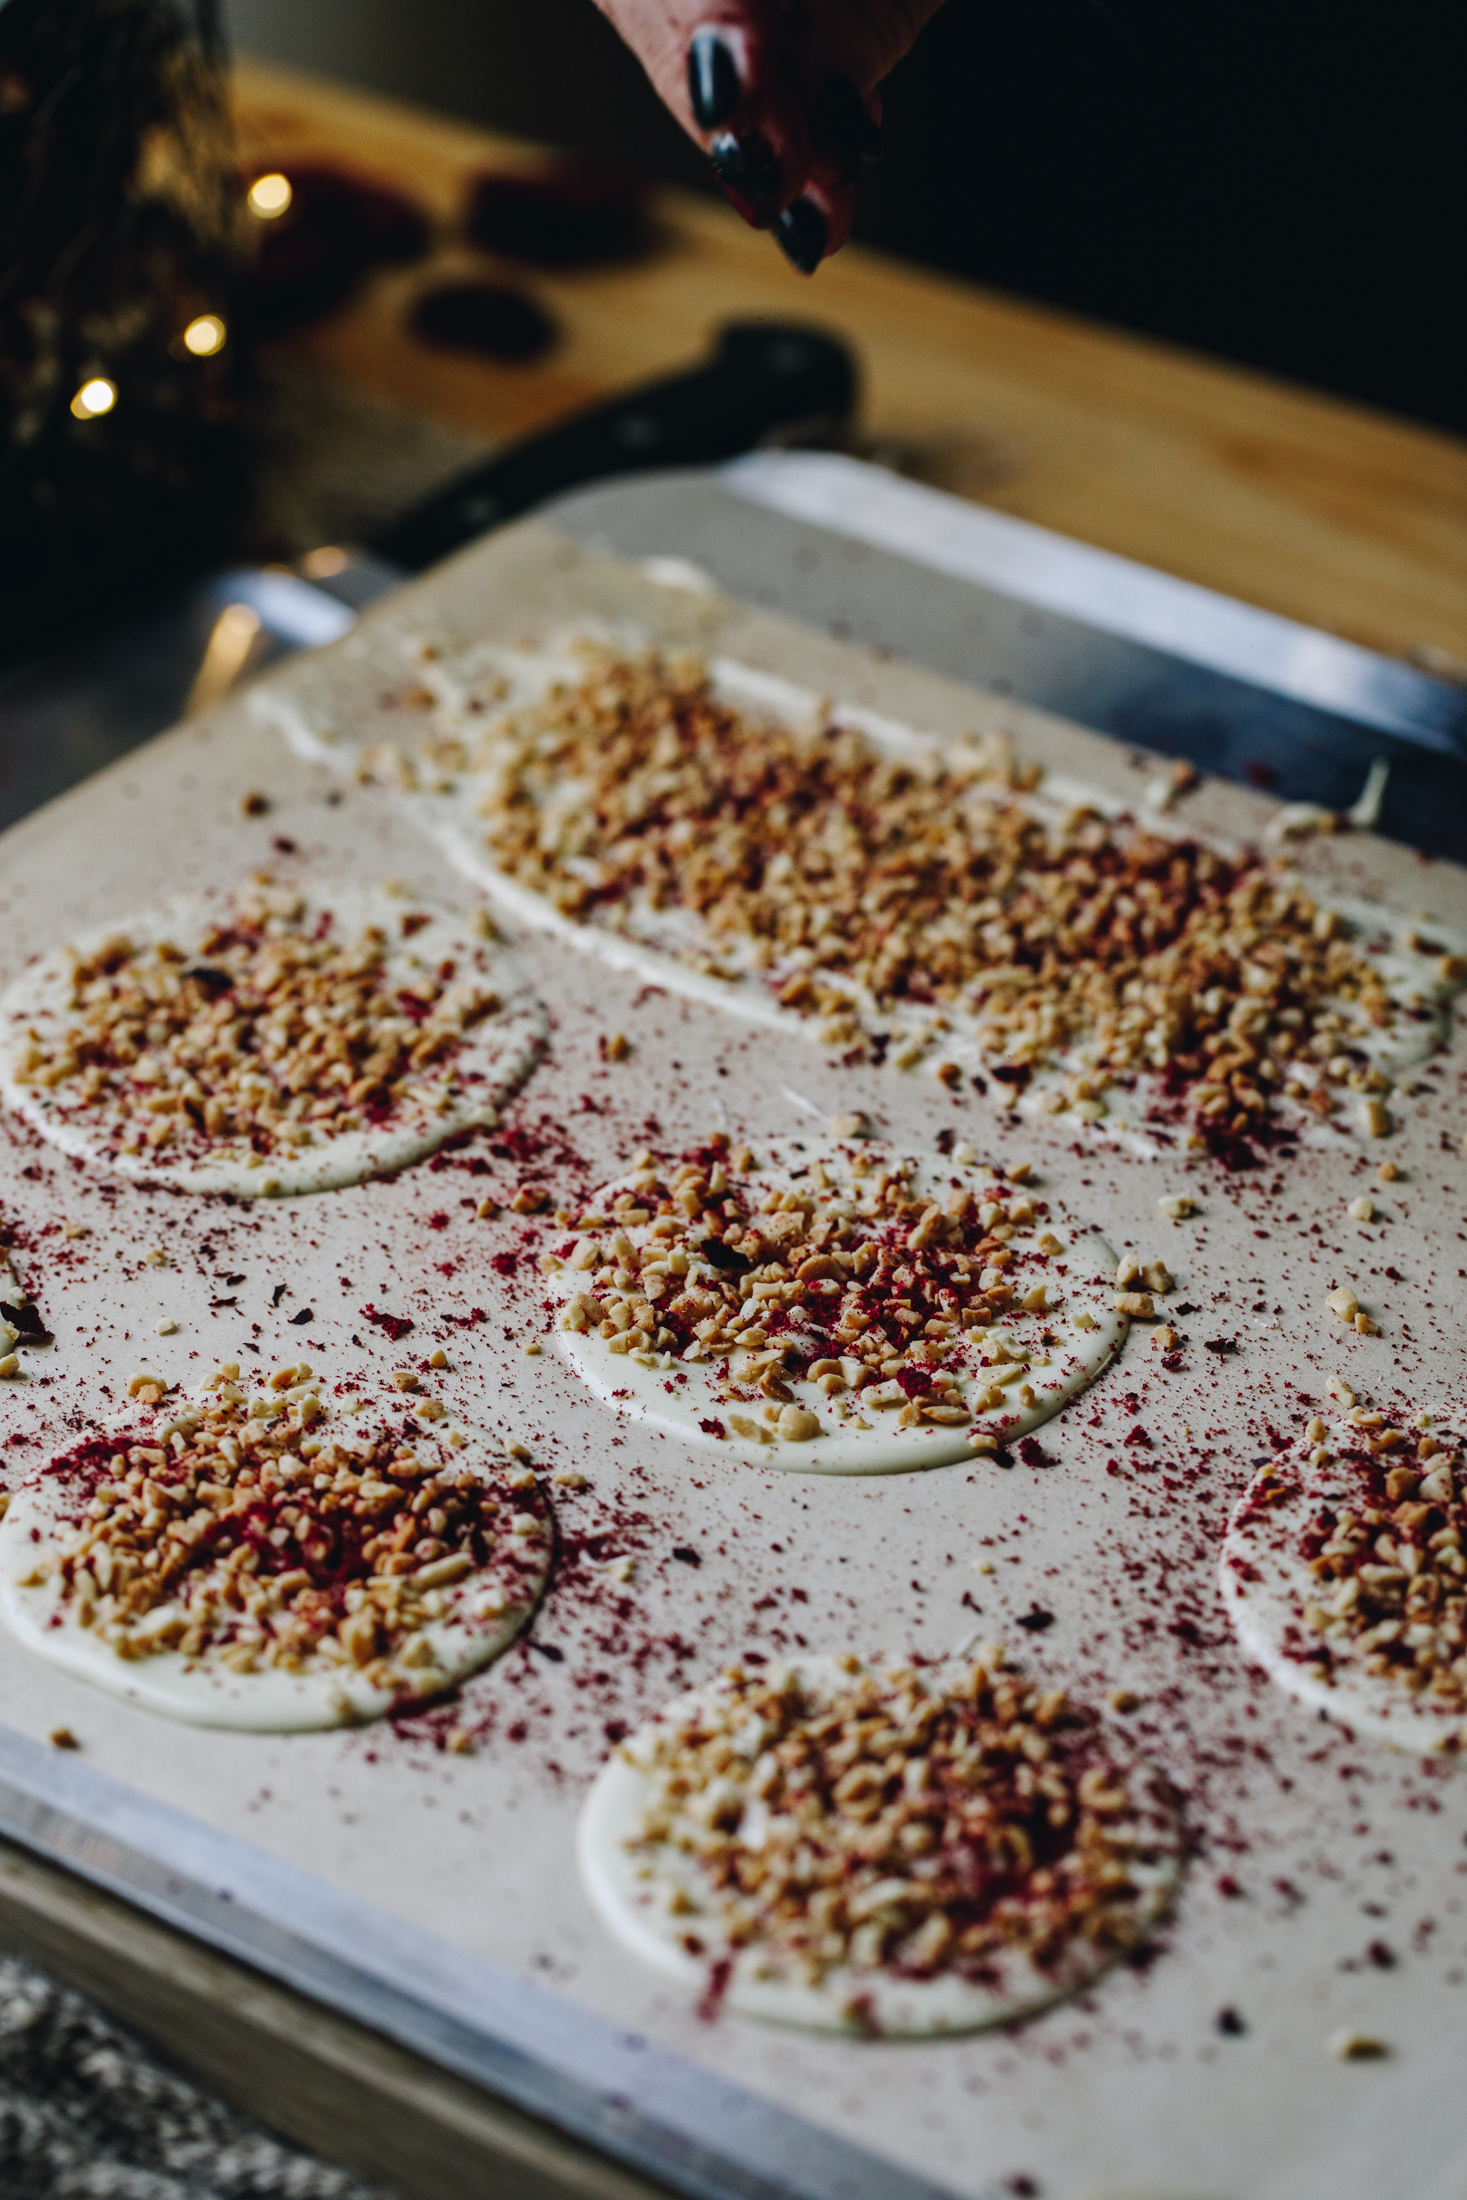
Sprinkle over nati kua tapahia (chopped nuts) and crush over the poihanapere tauraki-tio (freeze-dried boysenberries).
11. Make the Chocolate Shards:
With the remaining tiakarete mā (white chocolate), spread it in on the rest of the baking paper in to a rough rectangle. This will be broken in to shards.
Sprinkle over nati kua tapahia (chopped nuts) and crush over the poihanapere tauraki-tio (freeze-dried boysenberries).
Transfer them all to the fridge and refrigerate for 15 - 20 minutes.
12. Make the Vanilla Syrup to flavour the Sponge:
Combine the mīere wanira (vanilla syrup) and the wanira (vanilla). All of the elements are now ready.
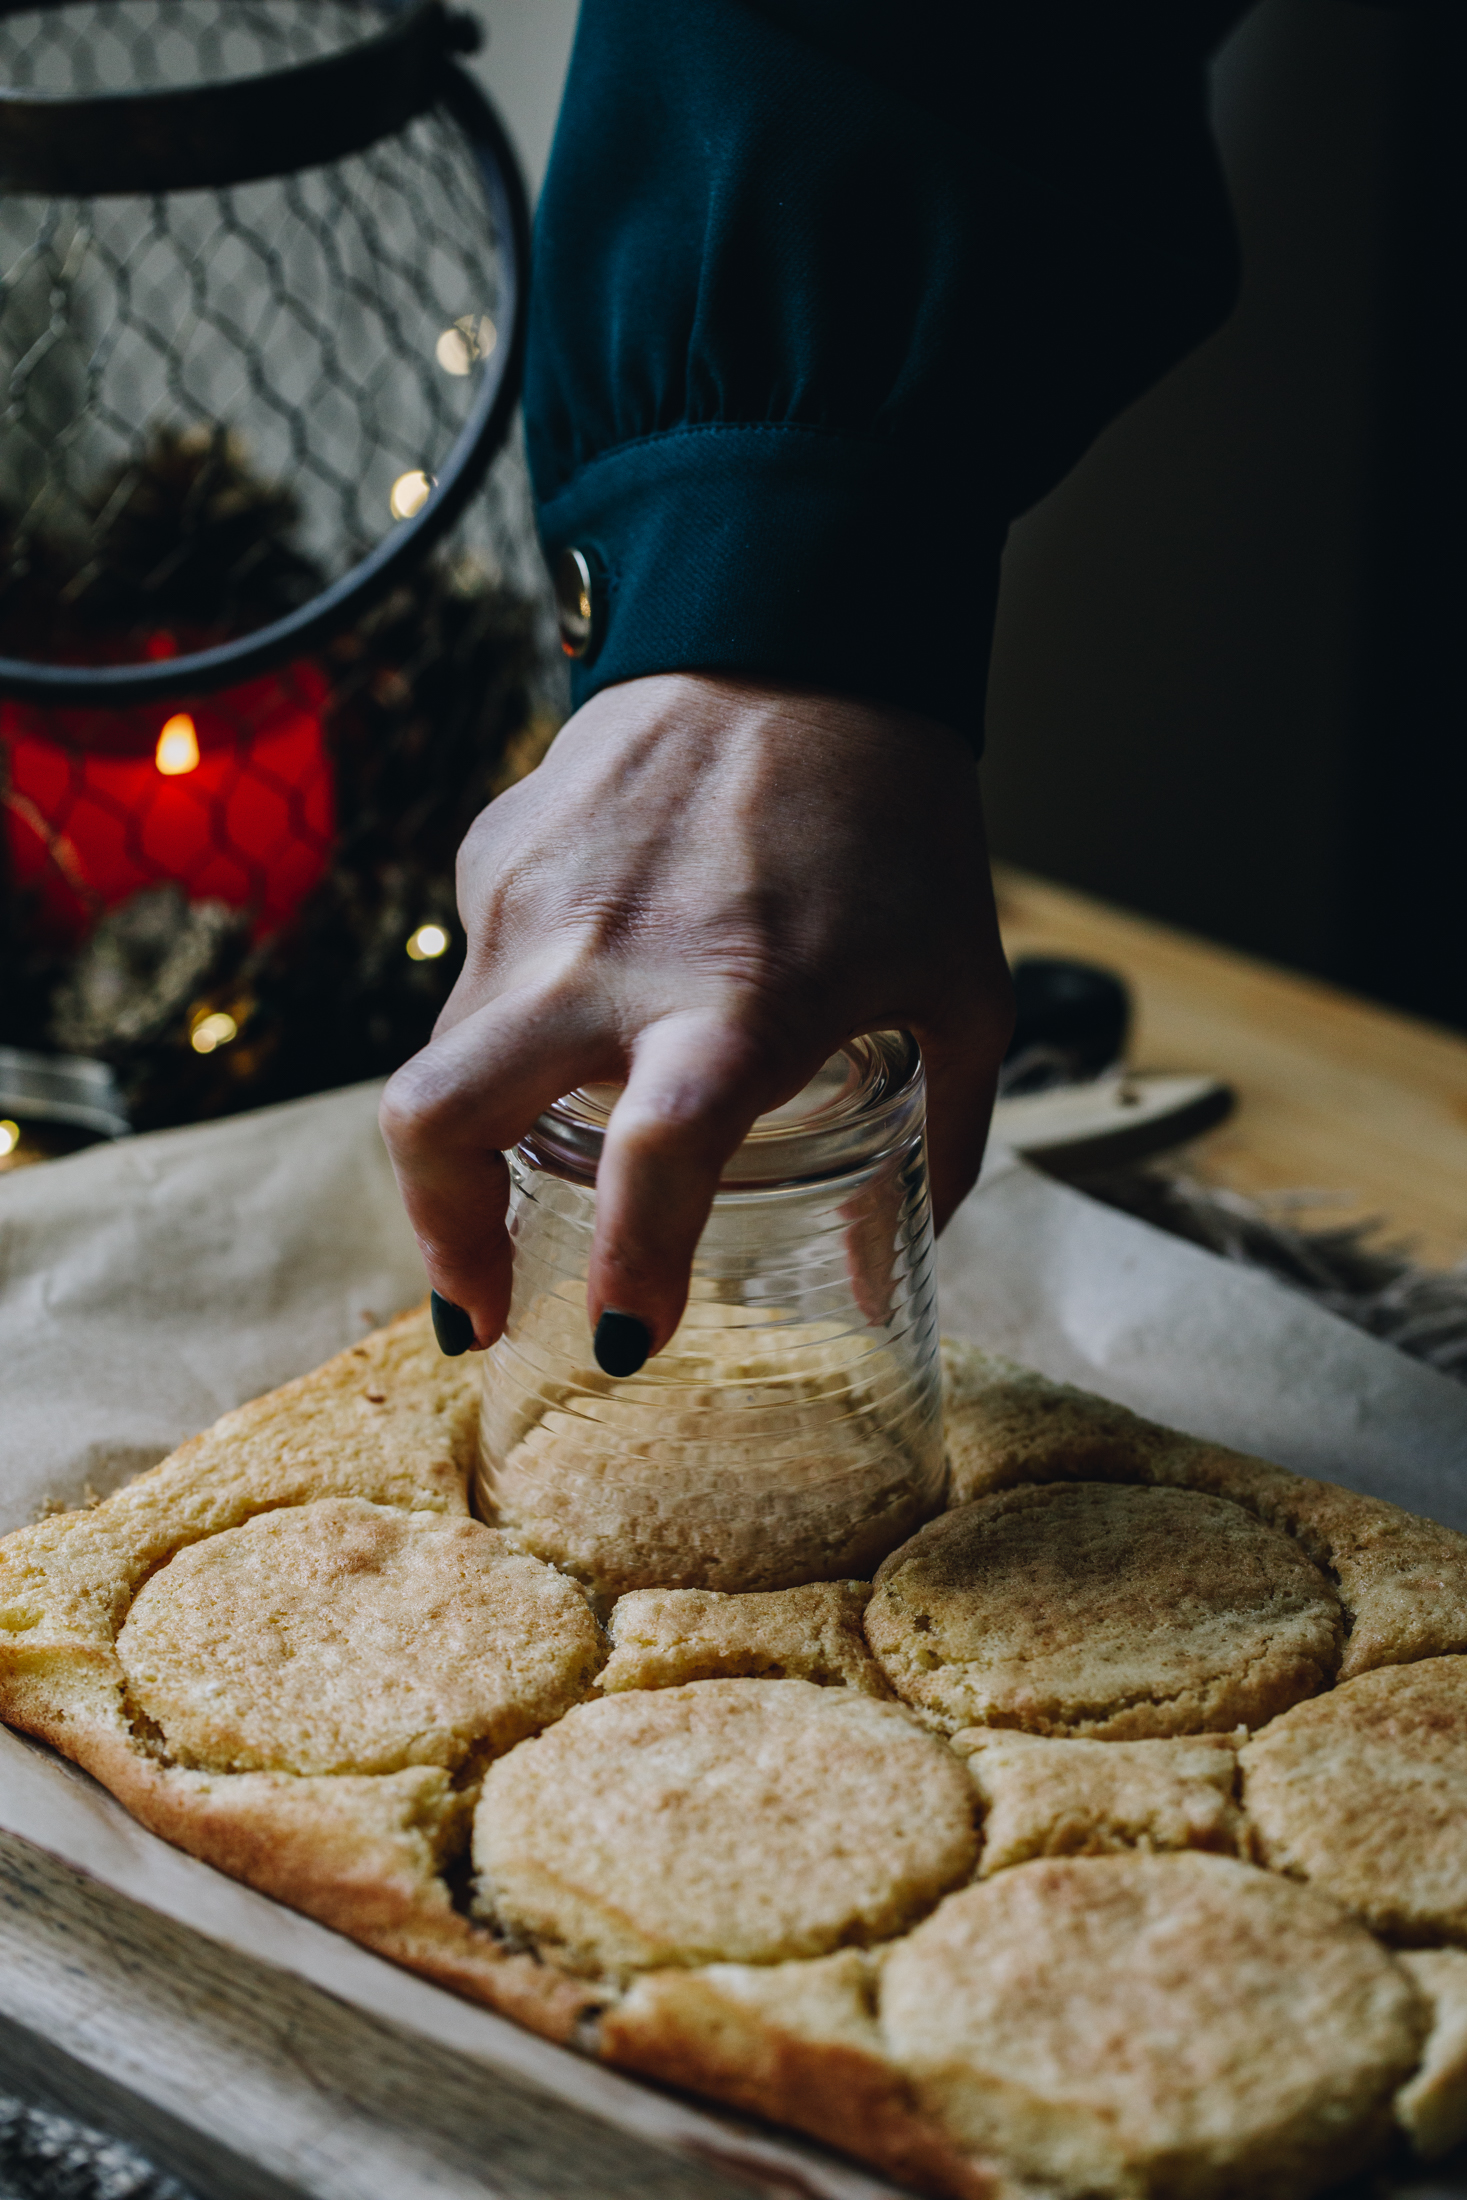
13. Cut out the Sponge:
Using a cookie cutter or a cup, cut out 6 - 8 sponge circles that are the same shape as your glasses. Don't forget to eat the scrap pieces as you go! 😉
Baste both sides of each piece with mīere wanira (vanilla syrup), don't soak them as we add more once they are in the glasses.

14. Place the Sponge on the Jelly:
Add a piece of sponge on to each set tieri (jelly) in the glasses.
Add a tablespoon or so of the left over mīere wanira (vanilla syrup) on to the sponge inside the glasses.
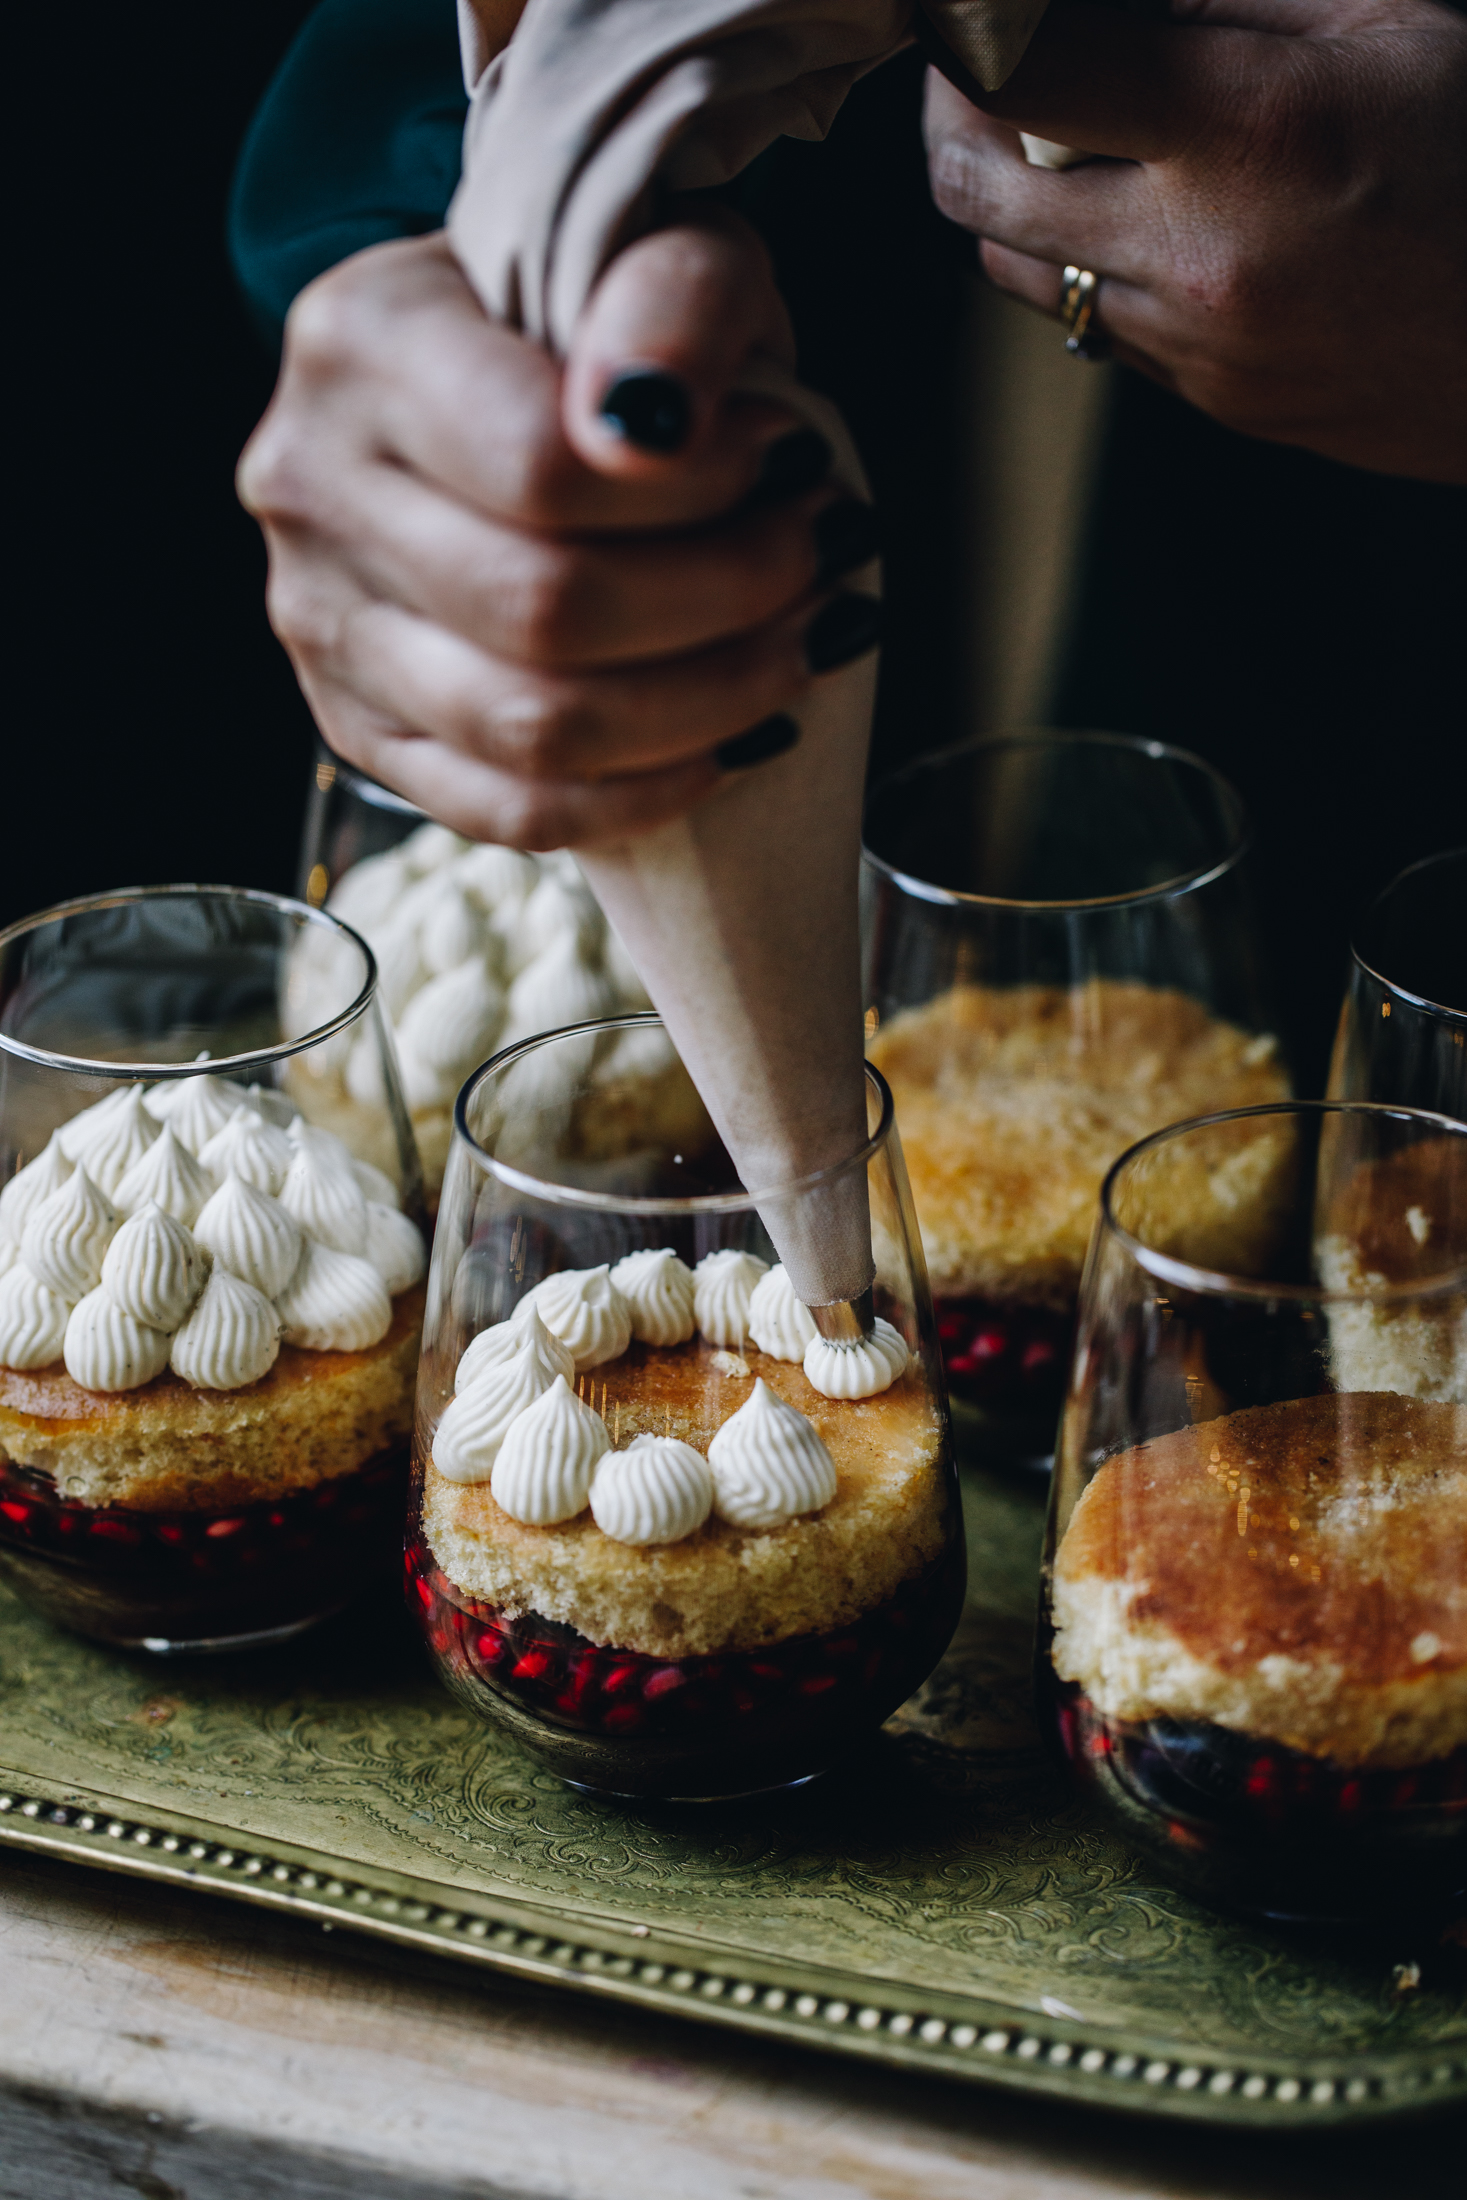
15. Add the Custard Cream:
Spoon or pipe on the kirīmi kahitete (custard cream).
If you are just using kahitete (custard), spoon it on.
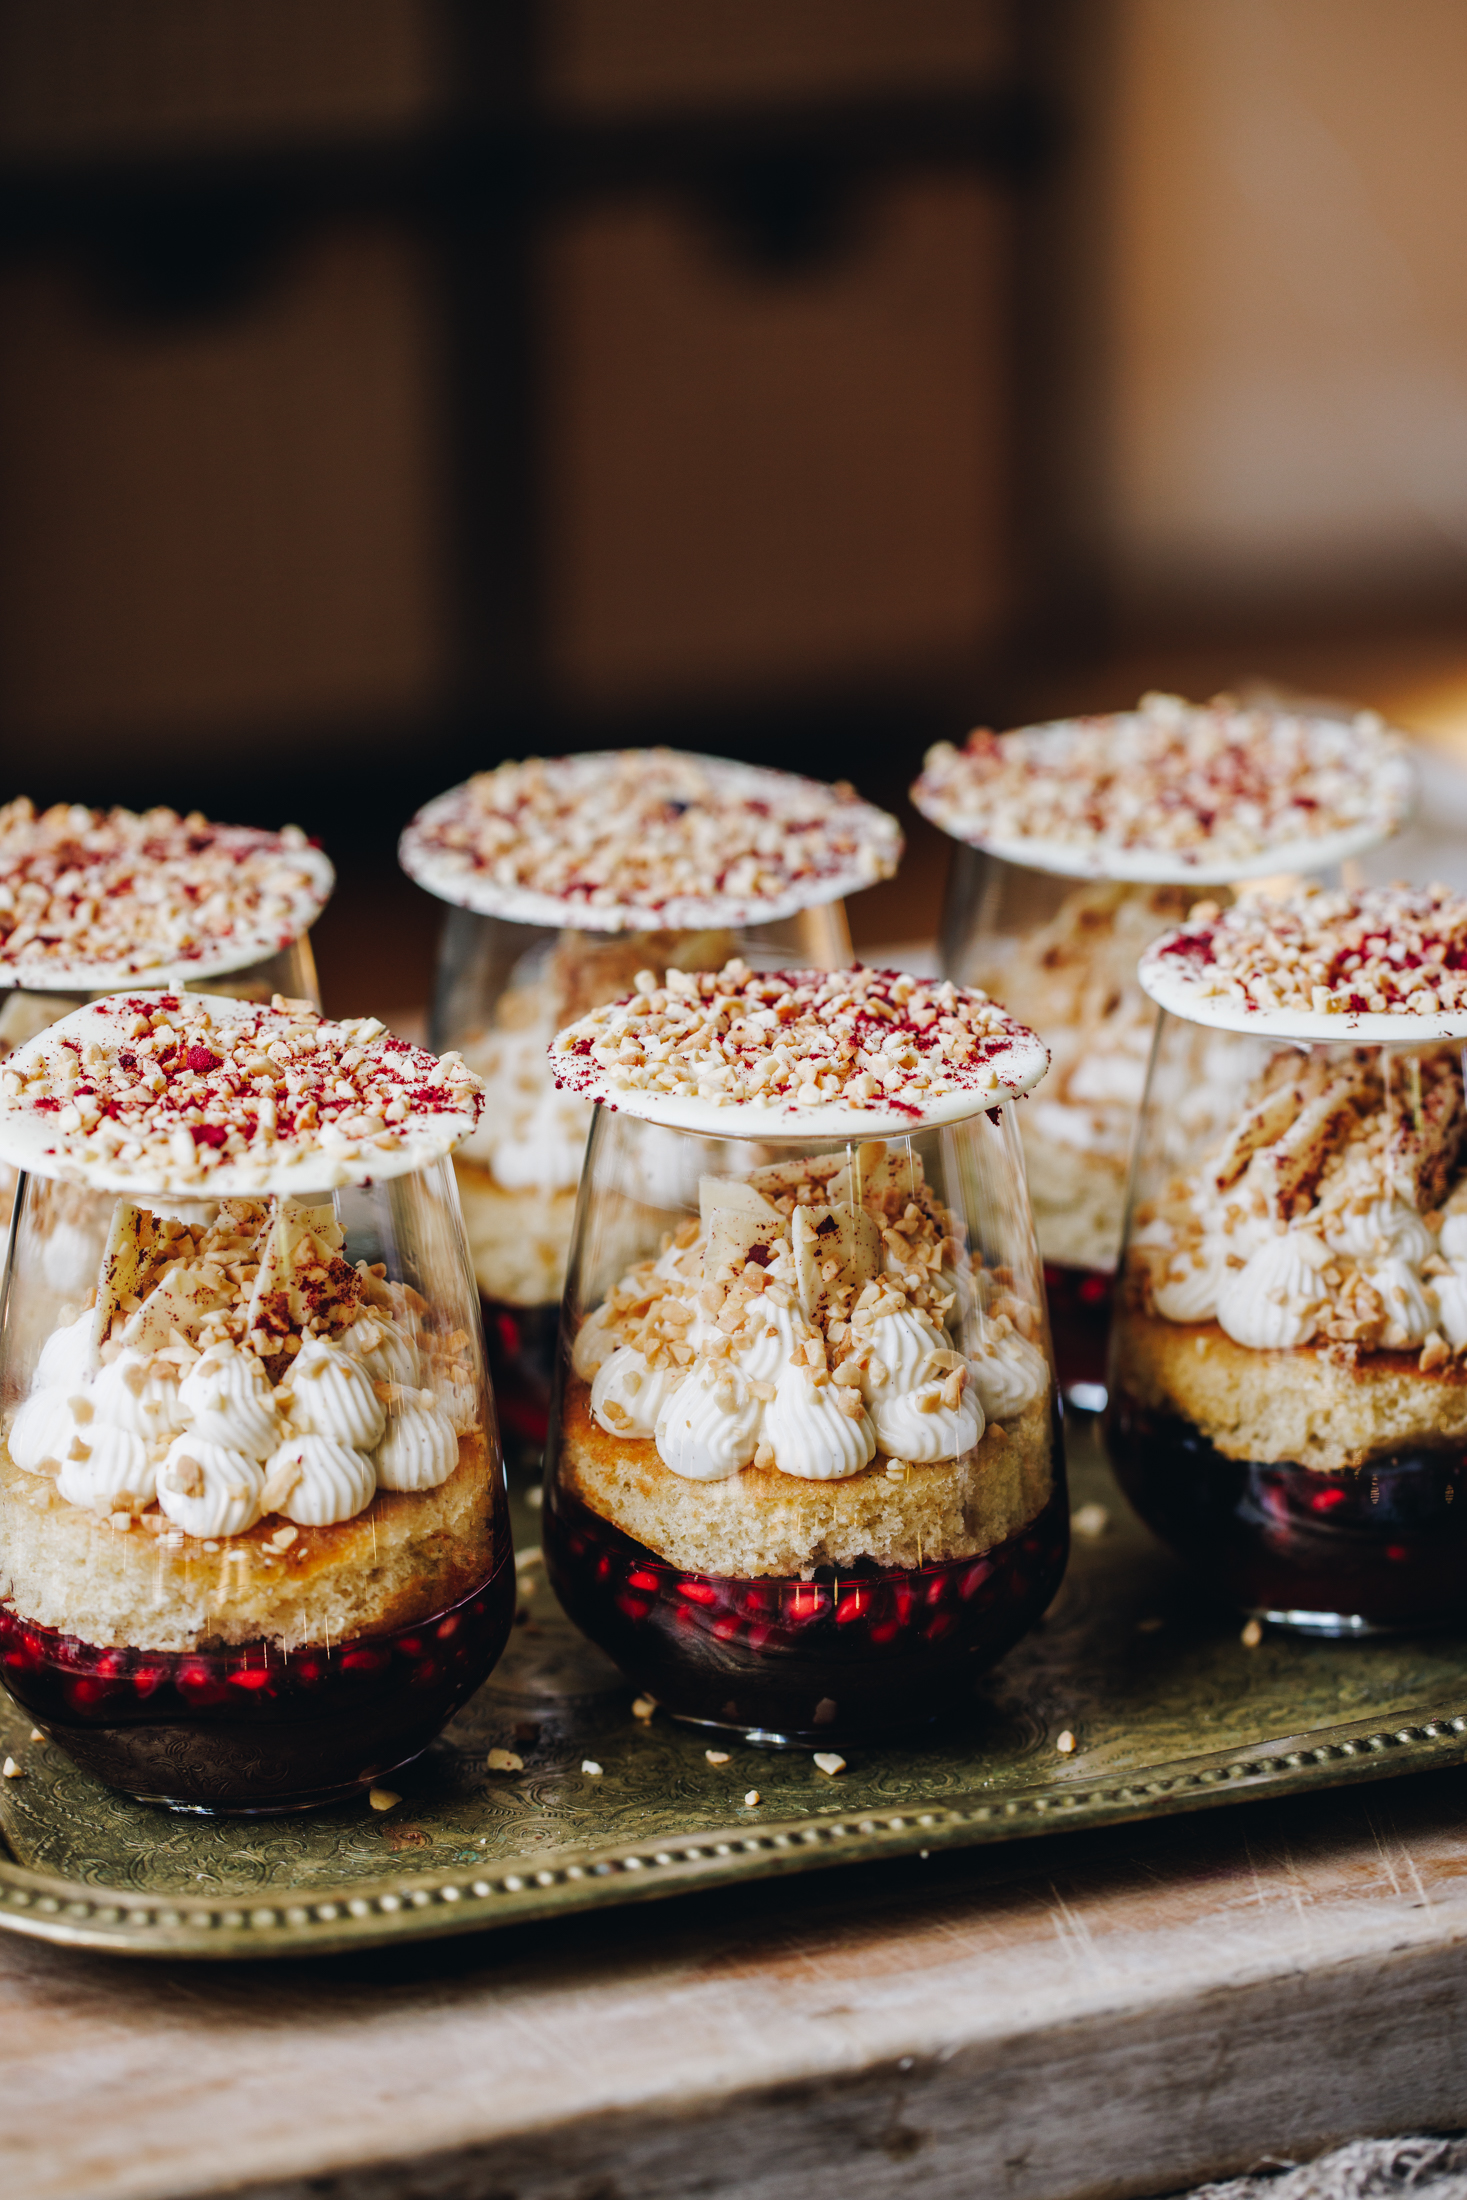
16. Decorate the Desserts:
Break some of the tiakarete mā (white chocolate) that was shaped in to a rectangle in to small shards.
Arrange them on top of the cream.
Add the taupoki tiakarete mā (white chocolate lids) on top of each glass for the final flourish.
These will keep well in the fridge for a couple of days.
Take a closer look at these
Purini (Dessert) Recipes
A dessert baked with aroha (love) will always be appreciated.

DID YOU ENJOY THIS RECIPE?
It would be so awesome if you could please leave a review/comment by clicking the “leave a comment” section at the top of the page.
I love seeing you all make my creations, so send a whakaahua (photo) or kiriata (video) to my Instagram and show me what you made. Let me know if you have any pātai (questions) too, I would love to help.
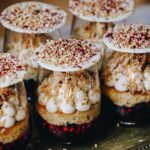
Trifle Cups - Kapu Taraiwhara
Equipment
- 7 - 9 500 ml glasses (You choose whether you make 7 larger desserts or 9-10 smaller ones).
Ingredients
The Cranberry Jelly - Te Tieri Karanipere
- 3 ½ teaspoon paura tetepe (gelatine powder)
- ¼ C wai ārani māota (fresh orange juice)
- 500 ml wai karanipere (cranberry juice)
- ⅔ C huka one (caster sugar)
- 1 rākau hinamona (cinnamon stick)
- 100 g (⅔ C) kākano pamakaranete (pomegranate seeds)
- 100 g tūrutu māota (fresh blueberries)
The Sponge Cake - Te Keke Kōpungapunga
- 35 g pata (butter)
- 3 hēki (eggs, size 6)
- 1 teaspoon wanira (vanilla)
- ¼ teaspoon tote (salt, fine)
- ½ C huka one (caster sugar)
- ¾ C puehu parāoa noa (plain flour)
- ¼ teaspoon pēkana paura (baking powder)
The Custard Cream - The Kirīmi Kahitete
- 250 g kirīmi kukū (thickened cream)
- ⅓ C kirīmi (cream)
- ⅓ C puehu huka (icing sugar)
- ½ tablespoon wanira (vanilla)
- 1 ¼ C kahitete (custard, store bought - make sure it is a thick type of custard)
The Decorations - Ngā Whakarākei (all optional)
- 150 g tiakarete mā (white chocolate)
- ⅔ C nati kua tapahia (chopped nuts)
- 3 poihanapere tauraki-tio (freeze-dried boysenberries)
Vanilla Syrup to flavour the Sponge - Mīere Wanira hei whakatāwara i te Keke Kōpungapunga
- 150 ml mīere wanira (vanilla syrup, this is in the coffee section of the supermarket)
- ½ tablespoon wanira (vanilla)
Instructions
Bloom the Gelatine:
- Add the paura tetepe (gelatine powder) and wai ārani (orange juice) in to a small bowl or glass. Stir and leave to bloom for 5 minutes.
Heat Juice and Sugar:
- Pour 250ml (half) of the wai karanipere (cranberry juice), huka one (caster sugar) and rākau hinamona (cinnamon sticks) in to a pot.
- Bring to a simmer and add the bloomed gelatine. Kaurorihia (stir it) until the gelatine and sugar is melted.
- Remove from the heat and pour in the remaining 250ml of the wai karanipere (cranberry juice). Stir to combine.
- Cool for 10 - 15 minutes until the mixture is lukewarm.
Add the Fruit in to the Glasses:
- Add the kākano pamakaranete (pomegranate seeds) and tūrutu (blueberries) in to the base of each glass.
- Pour around ¼ - ⅓ C of the cooled jelly liquid in to each glass.
- Set in the fridge for an hour, until the jelly is just set.
Preheat the Oven for Sponge Cake:
- Note: You can skip this step and use a store-bought sponge cake here. The flavour will not be quite as good as the homemade version but up to you!
- Preheat the oven to 165 °C.
- Grease a 30 cm x 20 cm tin with butter and line it with baking paper.
Whip the Eggs for the Sponge Cake:
- Melt the pata (butter) gently in the microwave or in a small pot on the stove. Set aside to cool.
- Add the hēki (eggs), wanira (vanilla) and tote (salt) in to a bowl. Whakapāhukahukatia (whip it) on high for 2 minutes until foamy.
- Slowly add the huka one (caster sugar) as you whip for 7 more minutes. When the mixture can hold a figure 8, it is ready (see the video for reference).
Fold in the Dry Ingredients:
- Sift the puehu parāoa (flour) and pēkana paura (baking powder) in to the egg mixture. Fold it gently through.
- Add the cooled pata (butter) around the edge of the bowl in two additions, folding after each addition.
Bake the Sponge:
- Spread the mixture in to the prepared tin.
- Bake for 11 minutes in the pre-heated oven.
- Remove from oven. Flip the tin on to a cooling rack and cool the keke (cake) as you prepare the final elements.
Make The Custard Cream - The Kirīmi Kahitete
- Alternative options: If you want a non-cream version, simply double the amount of kahitete (custard) and spoon it directly on top of the sponge instating of piping.If you want a plain cream version: Omit the kahitete (custard) and use an extra cup of kirīmi (cream) and whip that with all the other ingredients. Pipe it on just like I have done.
- For the Custard Cream: Add the kirīmi kukū (thickened cream), kirīmi (cream), puehu huka (icing sugar) and wanira (vanilla) in to a medium bowl.
- Whakapāhukahukatia (whip it) until medium peaks are formed.
- Fold through the kahitete (custard) and it is ready.
Melt the White Chocolate:
- Chop the tiakarete mā (white chocolate) in to small pieces, add it in to a heatproof bowl.
- Add 3 cm of wai (water) in to pot and heat over low-medium heat until gently simmering.Place the bowl of tiakarete mā (white chocolate) on to the pot and melt it, stirring occasionally until it is melted and smooth. Remove it from the heat.
- You can also melt the tiakarete mā (white chocolate) in the microwave for 20 second increments, stirring after each time. This way can cause the chocolate to burn though so I recommend the above method.
Make the Chocolate Discs:
- Place a large piece of baking paper on to a chopping board.
- Spoon a teaspoon or so of the tiakarete mā (white chocolate) on to the paper. Gently create 6-8 porohita (circles) that are slightly bigger than the rim of your glasses.
- Sprinkle over nati kua tapahia (chopped nuts) and crush over the poihanapere tauraki-tio (freeze-dried boysenberries).
Make the Chocolate Shards:
- With the remaining tiakarete mā (white chocolate), spread it in on the rest of the baking paper in to a rough rectangle. This will be broken in to shards.
- Sprinkle over nati kua tapahia (chopped nuts) and crush over the poihanapere tauraki-tio (freeze-dried boysenberries).
- Transfer them all to the fridge and refrigerate for 15 - 20 minutes.
Make the Vanilla Syrup to flavour the Sponge:
- Combine the mīere wanira (vanilla syrup) and the wanira (vanilla). All of the elements are now ready.
Add the Sponge on to the Jelly:
- Using a cookie cutter or a cup, cut out 6 - 8 sponge circles that are the same shape as your glasses. Don't forget to eat the scrap pieces as you go! 😉
- Baste both sides of each piece with mīere wanira (vanilla syrup), don't soak them as we add more once they are in the glasses.
- Add a piece on to each set tieri (jelly) in the glasses.
- Add a tablespoon or so of the left over mīere wanira (vanilla syrup) on to the sponge inside the glasses.
Add the Custard Cream:
- Spoon or pipe on the kirīmi kahitete (custard cream). If you are just using kahitete (custard), spoon it on.
Add the Decorations:
- Break some of the tiakarete mā (white chocolate) that was shaped in to a rectangle in to small shards.
- Arrange them on top of the cream.
- Add the taupoki tiakarete mā (white chocolate lids) on top of each glass for the final flourish.
- These will keep well in the fridge for a couple of days.


Leave a Review