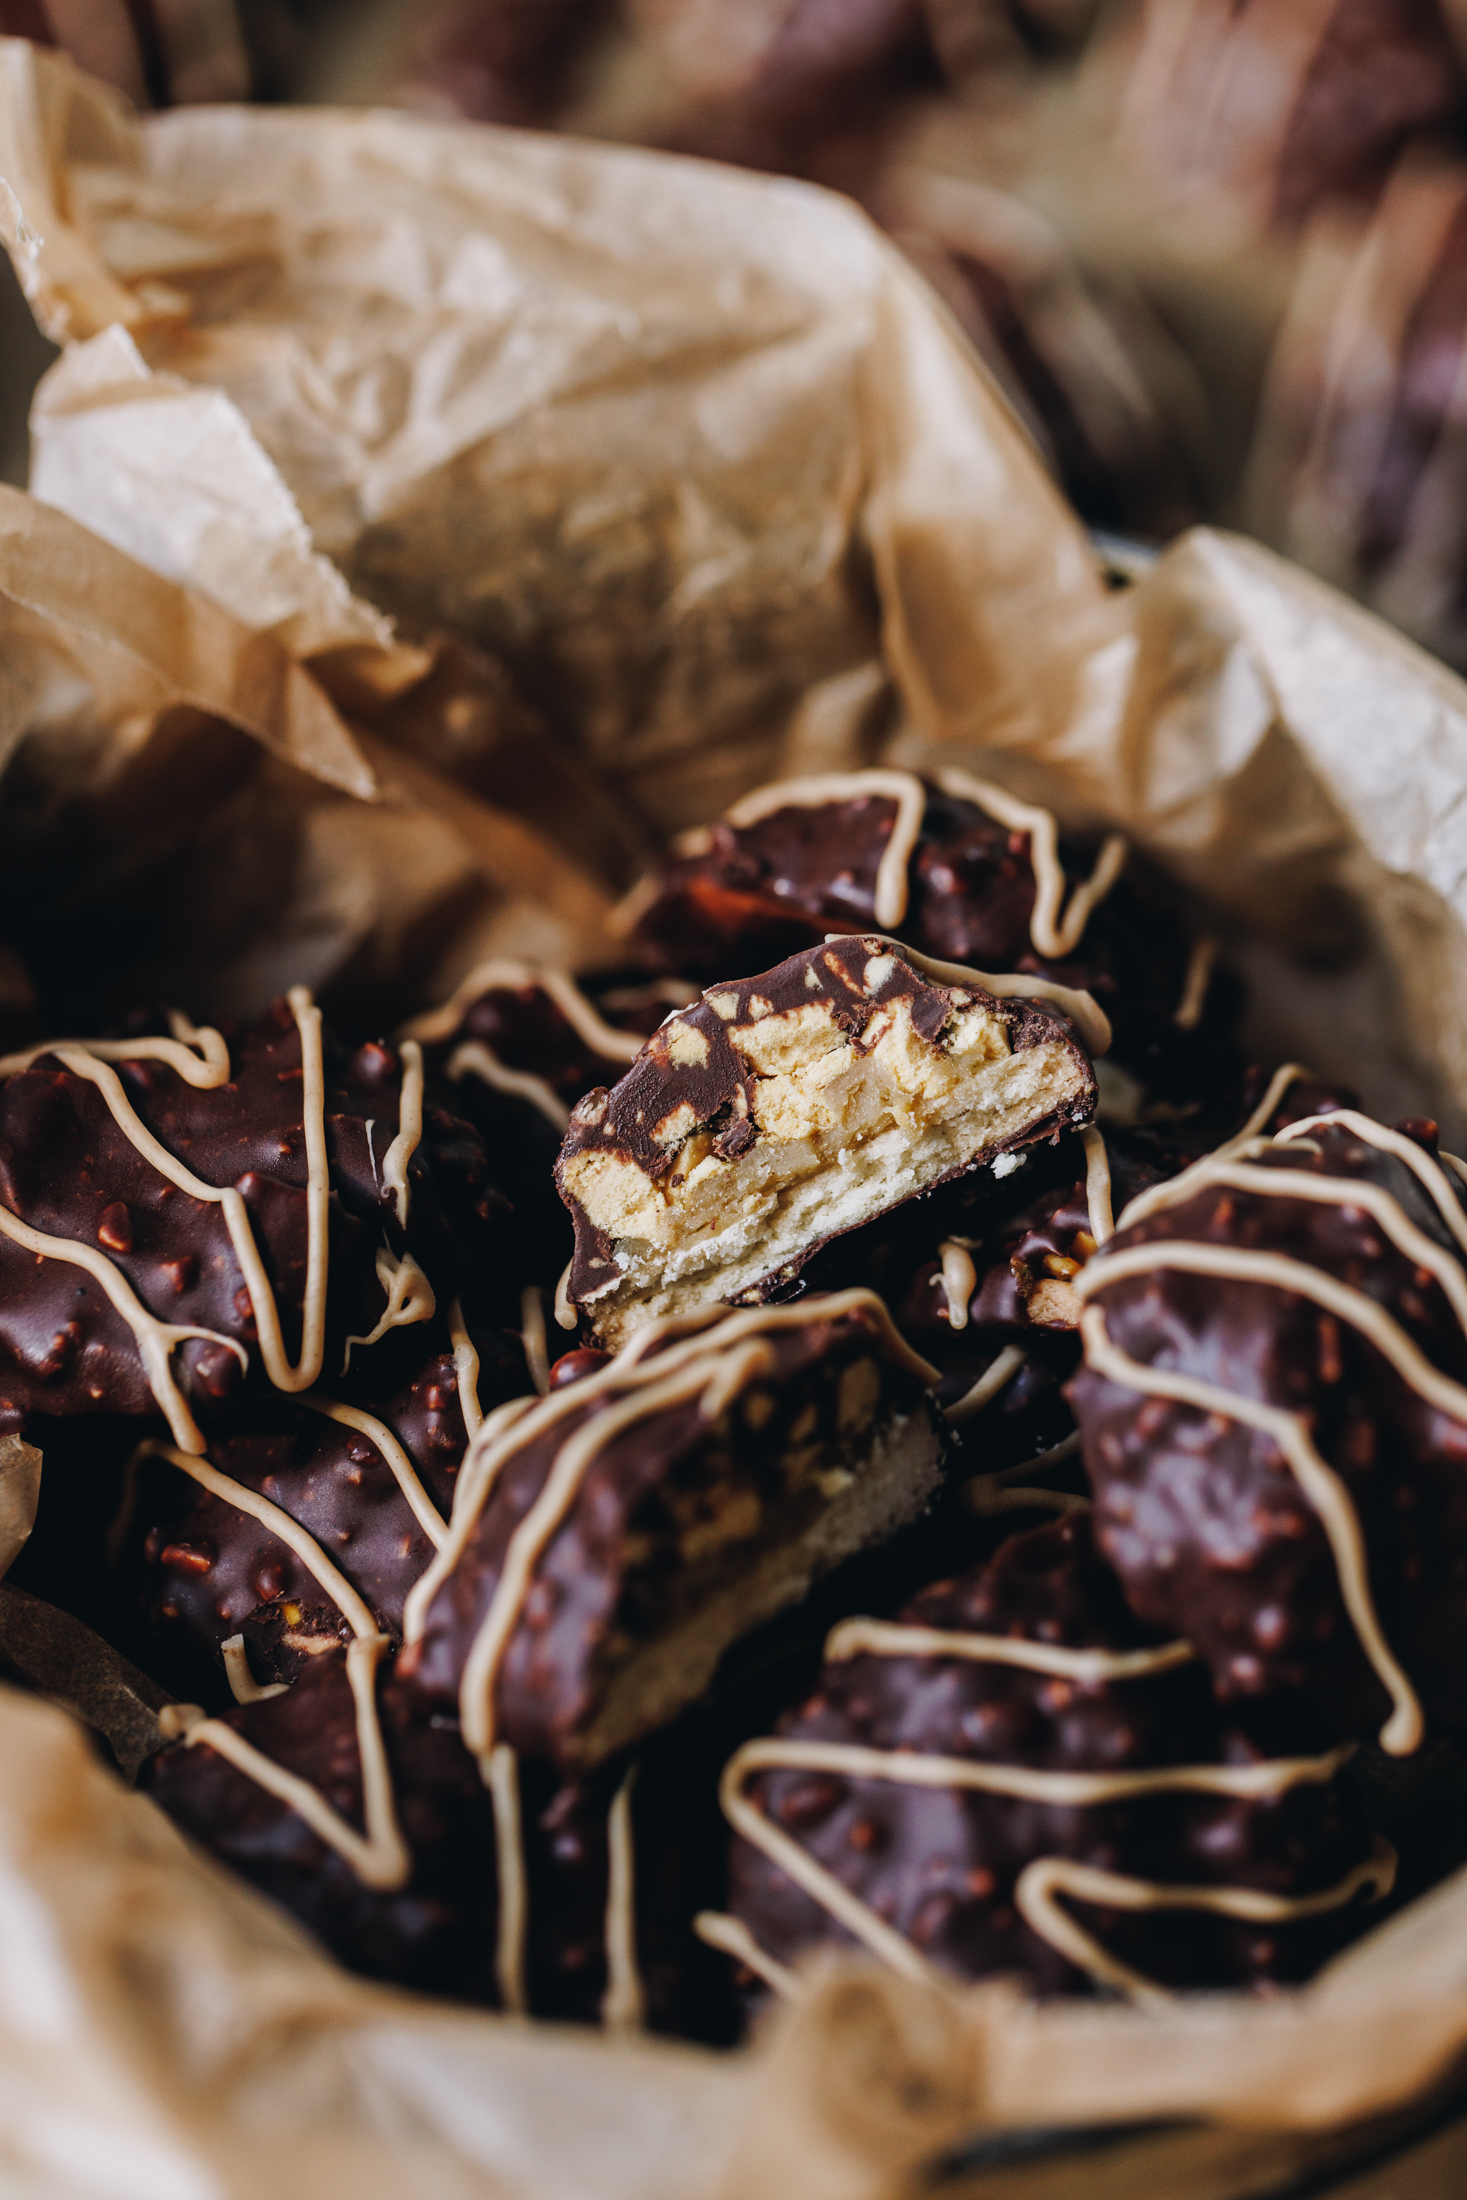
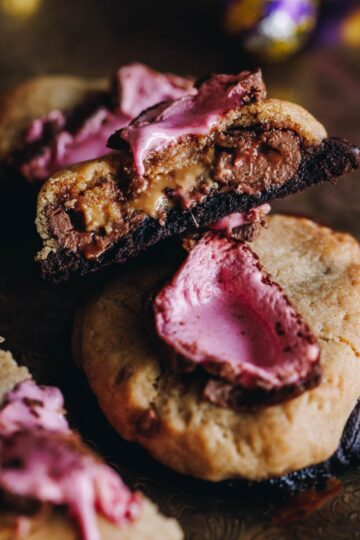
These Homemade Squiggle Top Biscuits are delicious and hit every note of nostalgia to me. The store bought Squiggles were always are part of our birthday celebrations growing up and making this recipe gave me so much joy. So join me on this baking haerenga (journey)!
Although these Homemade Squiggles look like a lot of work, do not fear! Using store-bought honeycomb chops the process and stress time down by so much. Start by baking a pihikete pata (shortbread biscuit), top with a simple buttercream and honeycomb and coat it all in chocolate. Add some squiggles and the party has begun! Karawhuia e te whānau (go for it fam)! 🙌
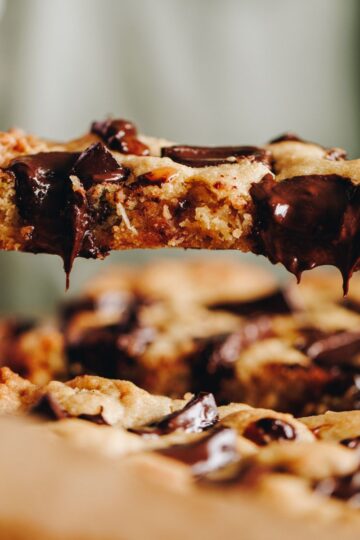
More pihikete (biscuits) to try:
Want to try another nostalgic New Zealand biscuit? Try these Hundreds and Thousands Biscuits or their fancier cousins, these Hundreds and Thousands Biscuits with Marshmallow.
Videography and photography by Sarah Henderson.
Ingredient Tips for the Homemade Squiggle Top Biscuits:
- Butter: I prefer salted pata (butter) because of the deep flavour but unsalted works.
- Icing Sugar: Use puehu huka (icing sugar) in this recipe for the lightness factor.
- Flour: Plain or high grade flour both work in this recipe so use what you have.
- Miraka: Use full fat miraka (milk), trim or dairy-free options.
- Golden Syrup: Add this in to the buttercream to mimic the flavour of the honikoma (honeycomb) perfectly.
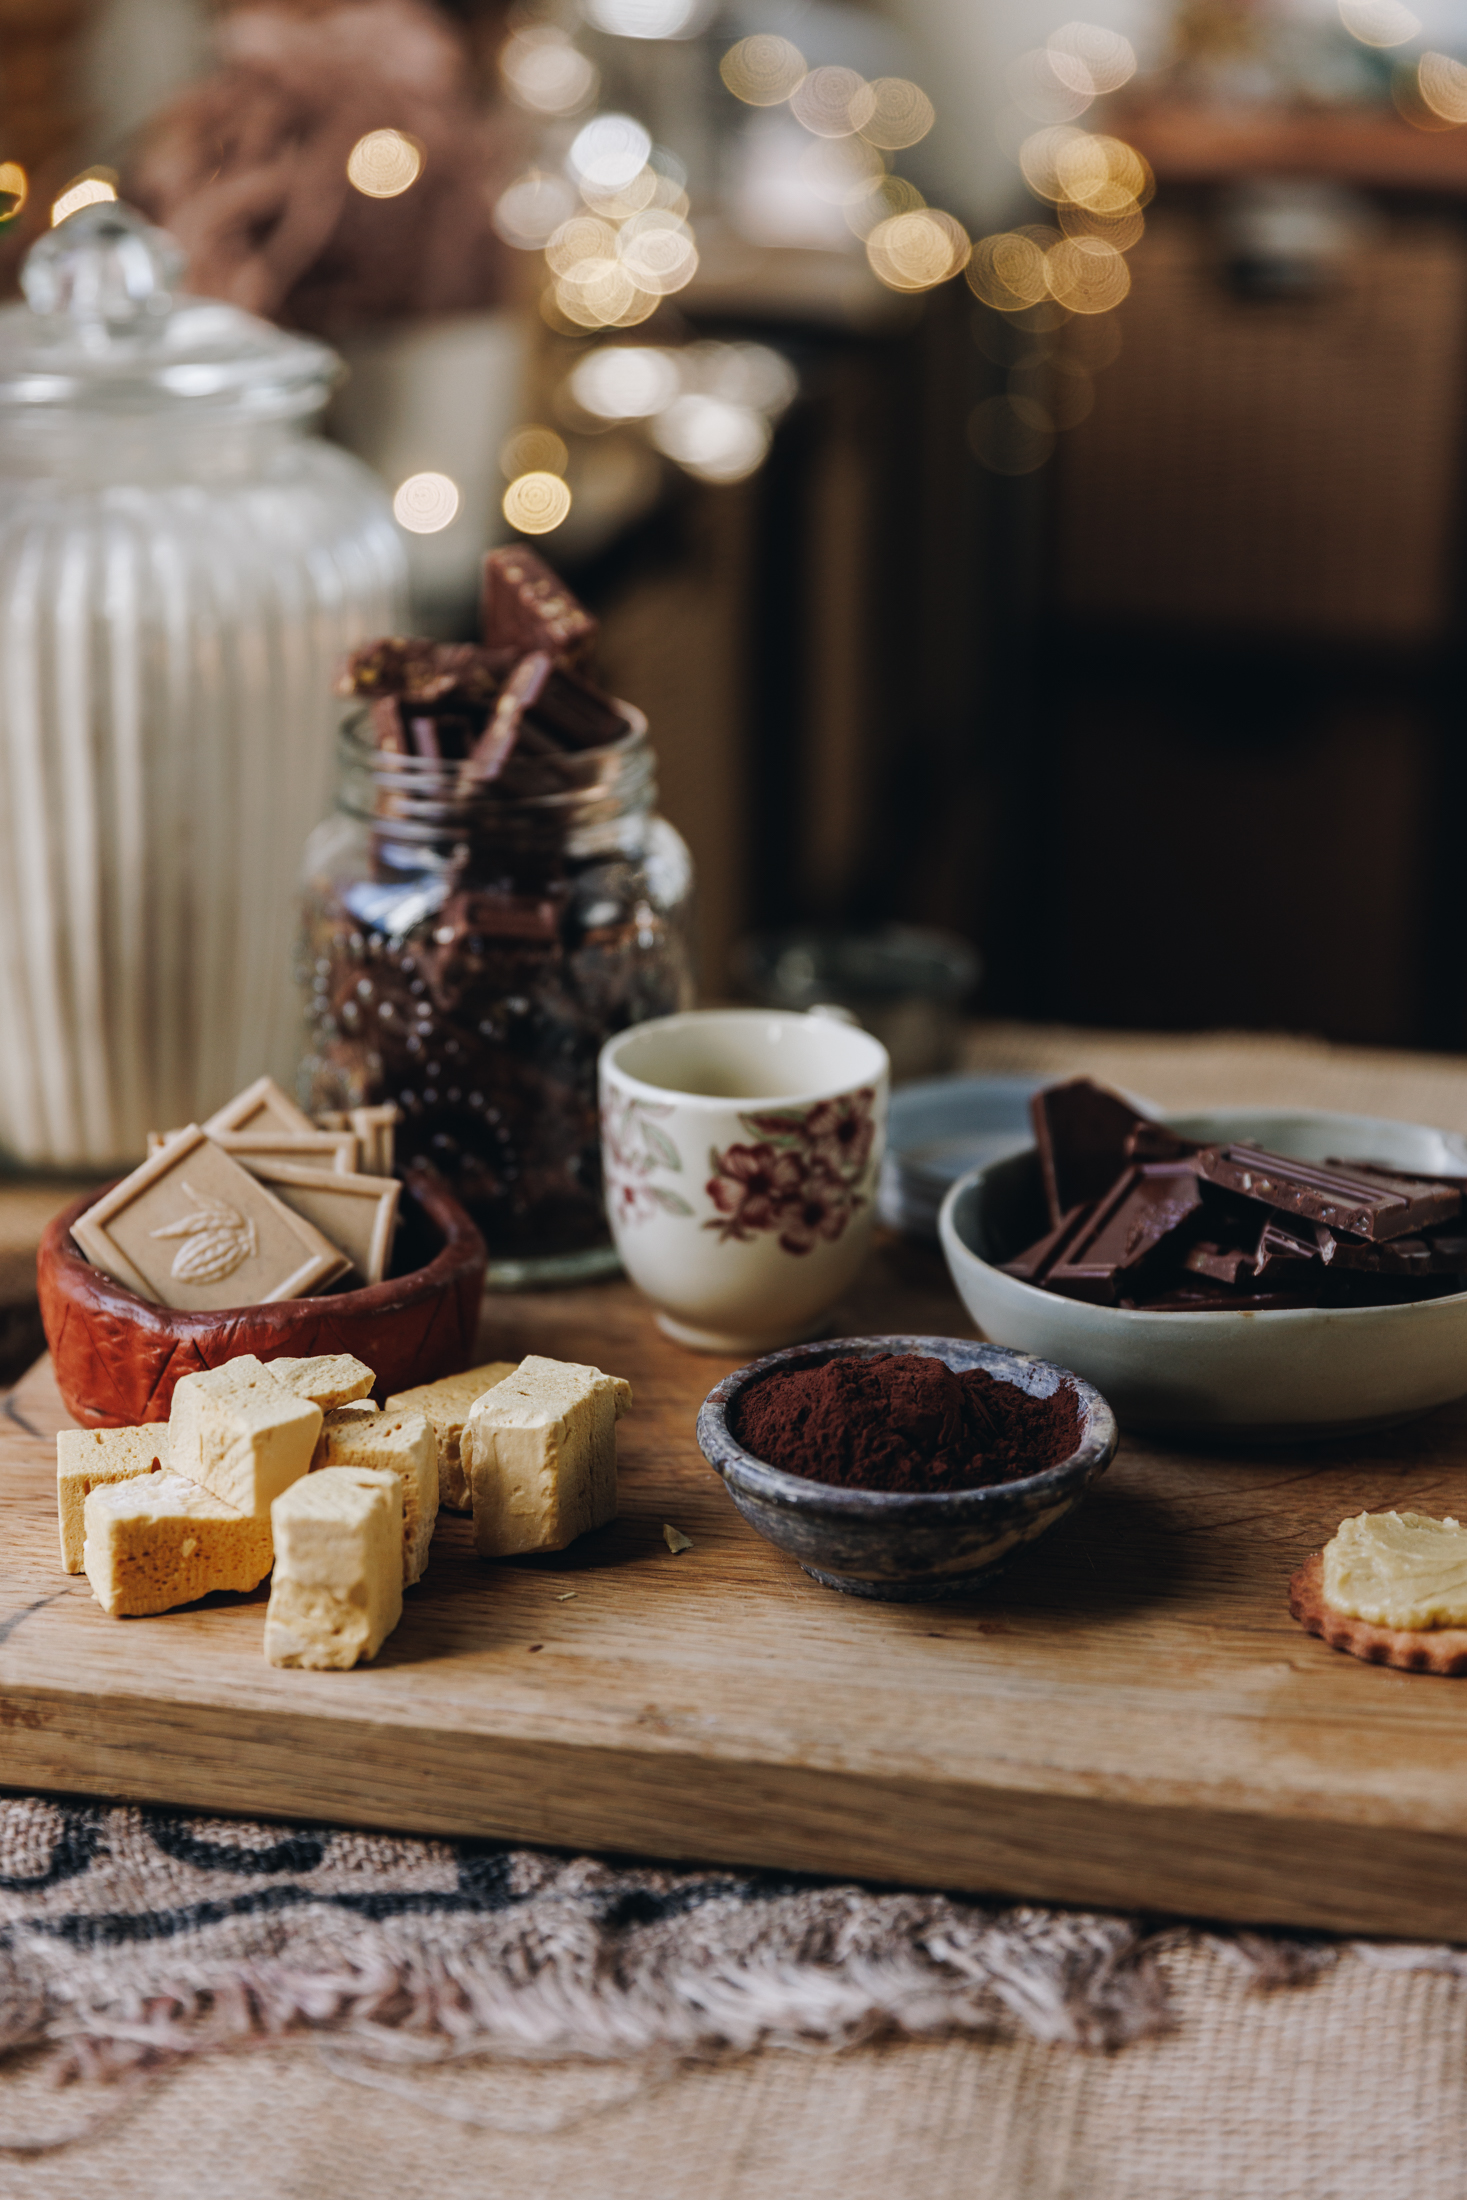
- Honeycomb: I used Kāpiti honikoma (honeycomb) but the same amount of Crunchie bars also work just as well.
- Hokey pokey chocolate: I love this tiakarete (chocolate) for the amazing texture and the fact it has hokey pokey in it but it can be swapped for milk or dark chocolate.
- Chocolate: For the extra chocolate for the topping I used sea salt and caramel brittle because I love the crunch but again, this can be swapped for any chocolate you love.
- White Chocolate: This is used for creating the squiggles, I used a caramelised tiakarete mā (white chocolate) but any white chocolate will work.
Expert Tips:
Take the time to whip the butter and sugar for 3 minutes, this helps give a lovely soft crumb to the pihikete (cookies) and a little rise when baking.
Do not over knead the cookie dough. Just bring the ingredients together and then stop kneading. If the pokenga (dough) is over worked it can result in tough cookies.
Gently melt tiakarete (chocolate) at all times because it is sensitive. Gently melt it from room temperature, in a heat proof boil that sits on a pot of barely simmering water. This gives the chocolate time to melt gently. Once it is 90 percent melted, remove from the heat and gently stir until the remaining chocolate is melted.
Watch the tiakarete (chocolate) very carefully if you are melting it on a microwave. Make sure to melt it in 10 second intervals and stir gently between each one.
When you are dipping the pihikete (biscuits), work quickly and remove all of the excess to the tiakarete (chocolate) layer is not too thick.
STEP BY STEP INSTRUCTIONS FOR THE HOMEMADE SQUIGGLE TOP BISCUITS:
Note: The full recipe card with the full list of ingredients, instructions and step by step video are found at the bottom of this page.

1. Preheat the Oven:
Preheat the oven to 170 °C bake setting or 160 °C fan bake setting.
2. Whip the Butter and Sugar:
Add the pata kūteretere (softened butter), puehu huka (icing sugar) and tote (salt) into a bowl and whip for 3 minutes on high speed until light and fluffy.
3. Add the Remaining Ingredients:
Add the iho hūperei (vanilla), puehu parāoa noa (plain flour) and miraka (milk) in to the butter mixture.
Mix it all together with your hands for a couple of minutes until you get a smooth dough. Do not knead it too much here, you are just bringing the ingredients together. If you overwork the dough, the pihikete (biscuits) will be tough.
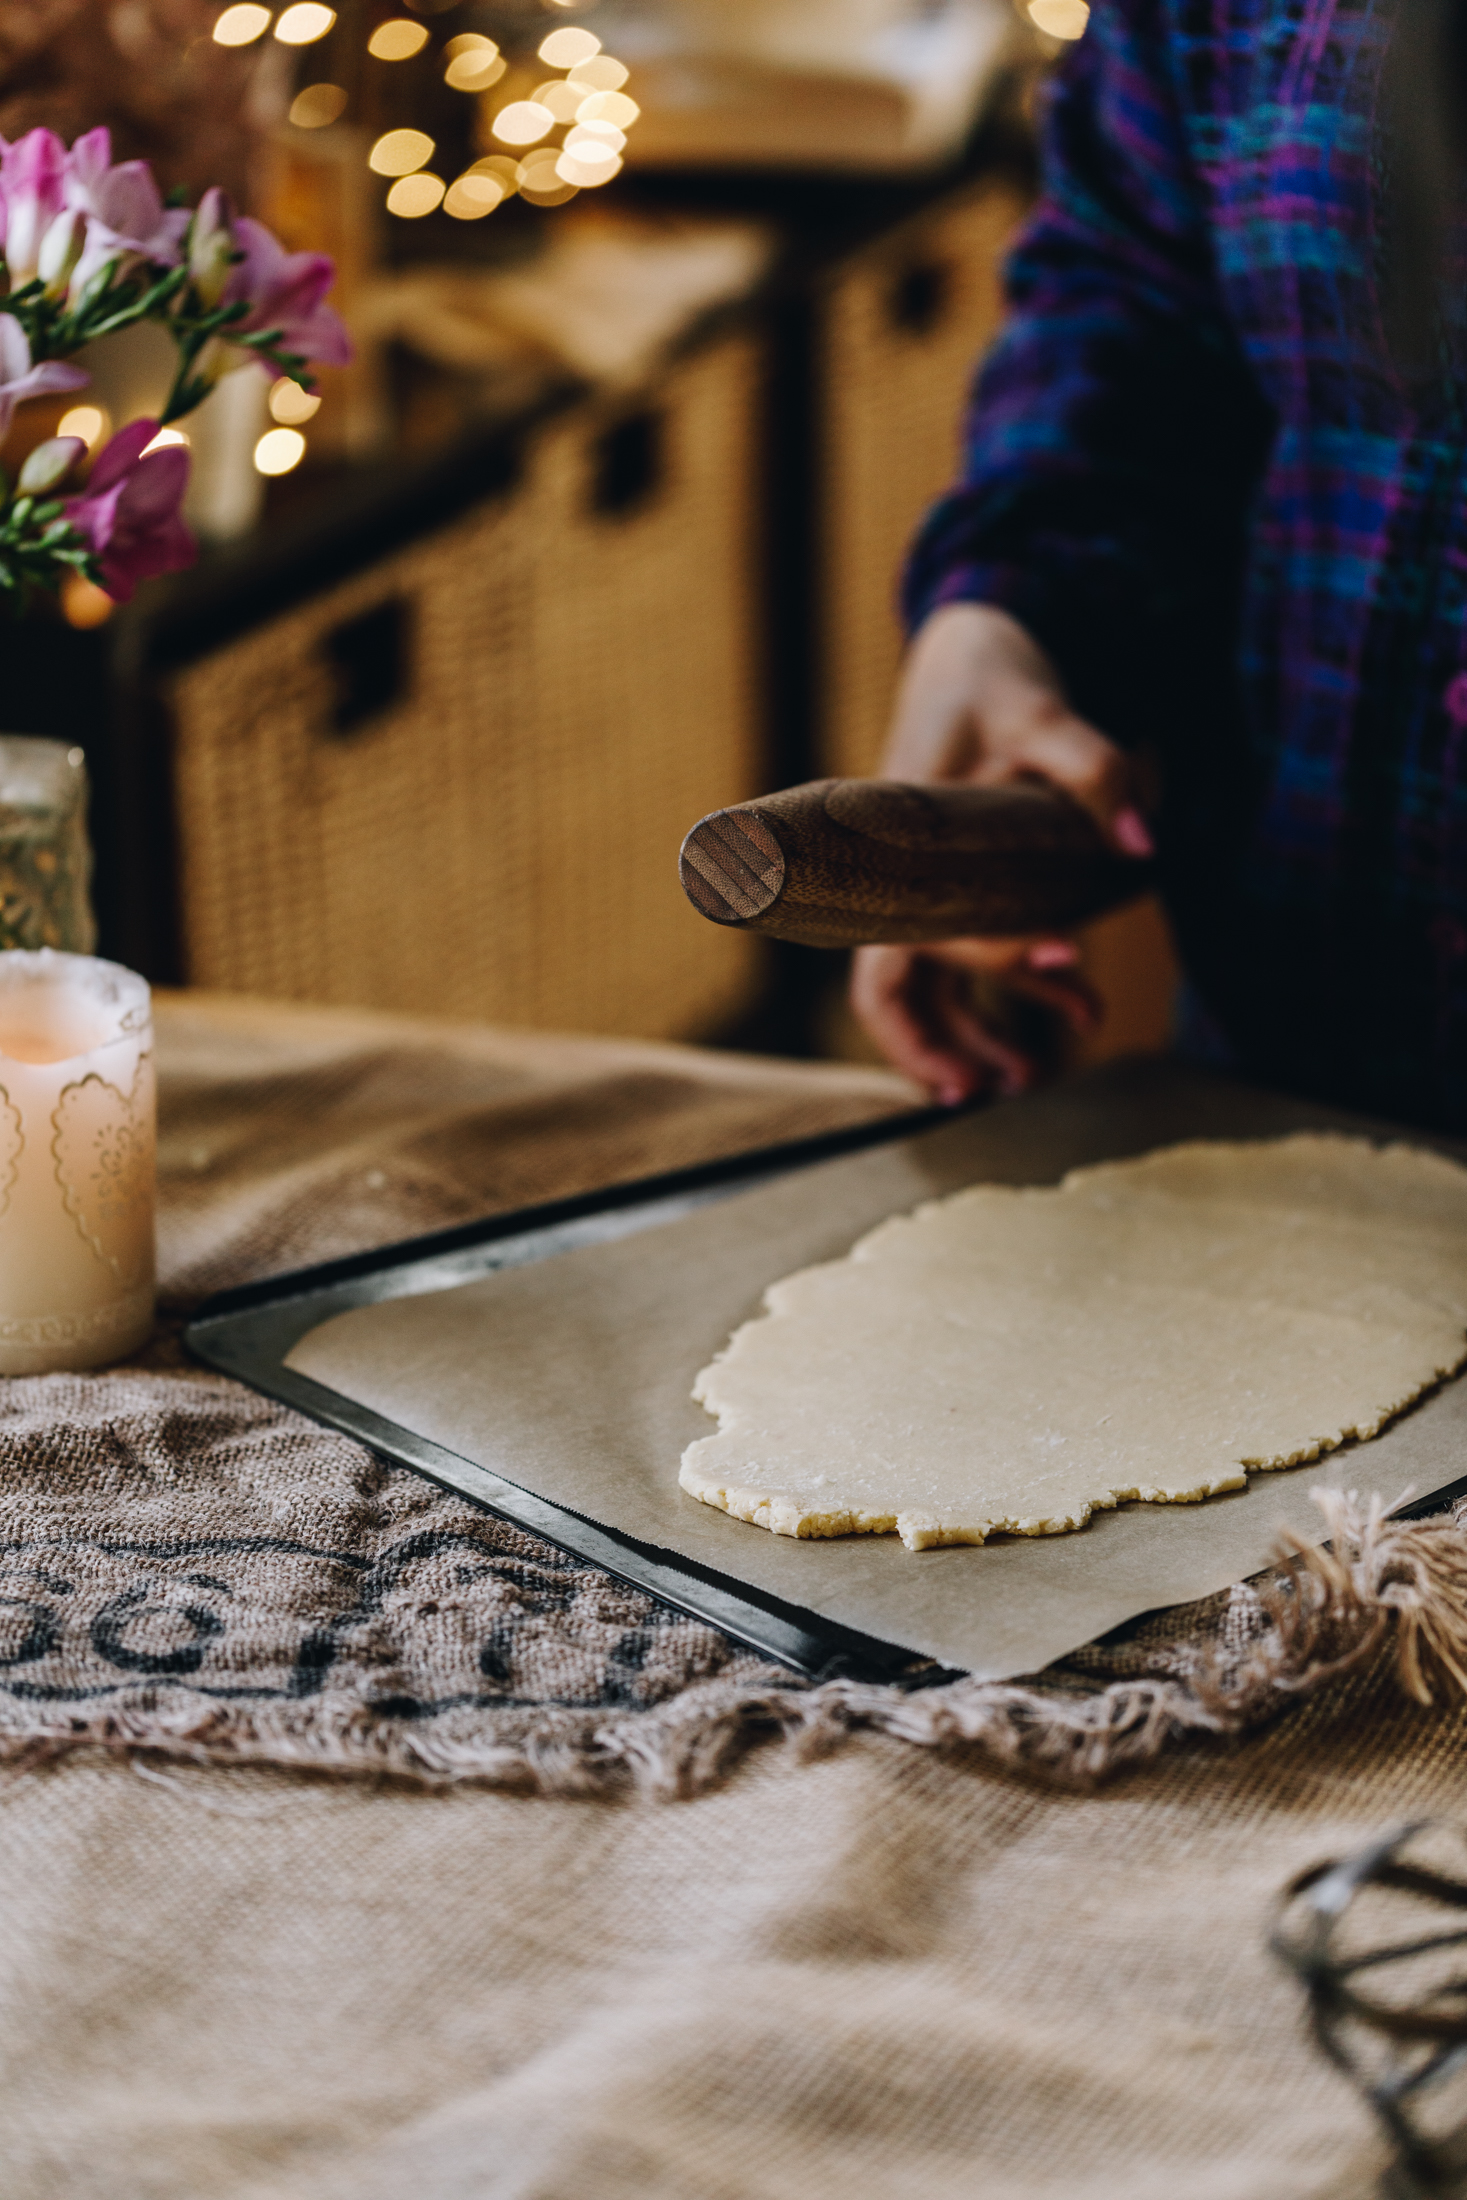
4. Roll out the Dough:
Place a large piece of baking paper on to a flat baking tray. Sprinkle over a tablespoon of puheu parāoa (flour).
Add the pokenga (dough) on to the baking paper and roll it out until it is around 0.3 cm thick.
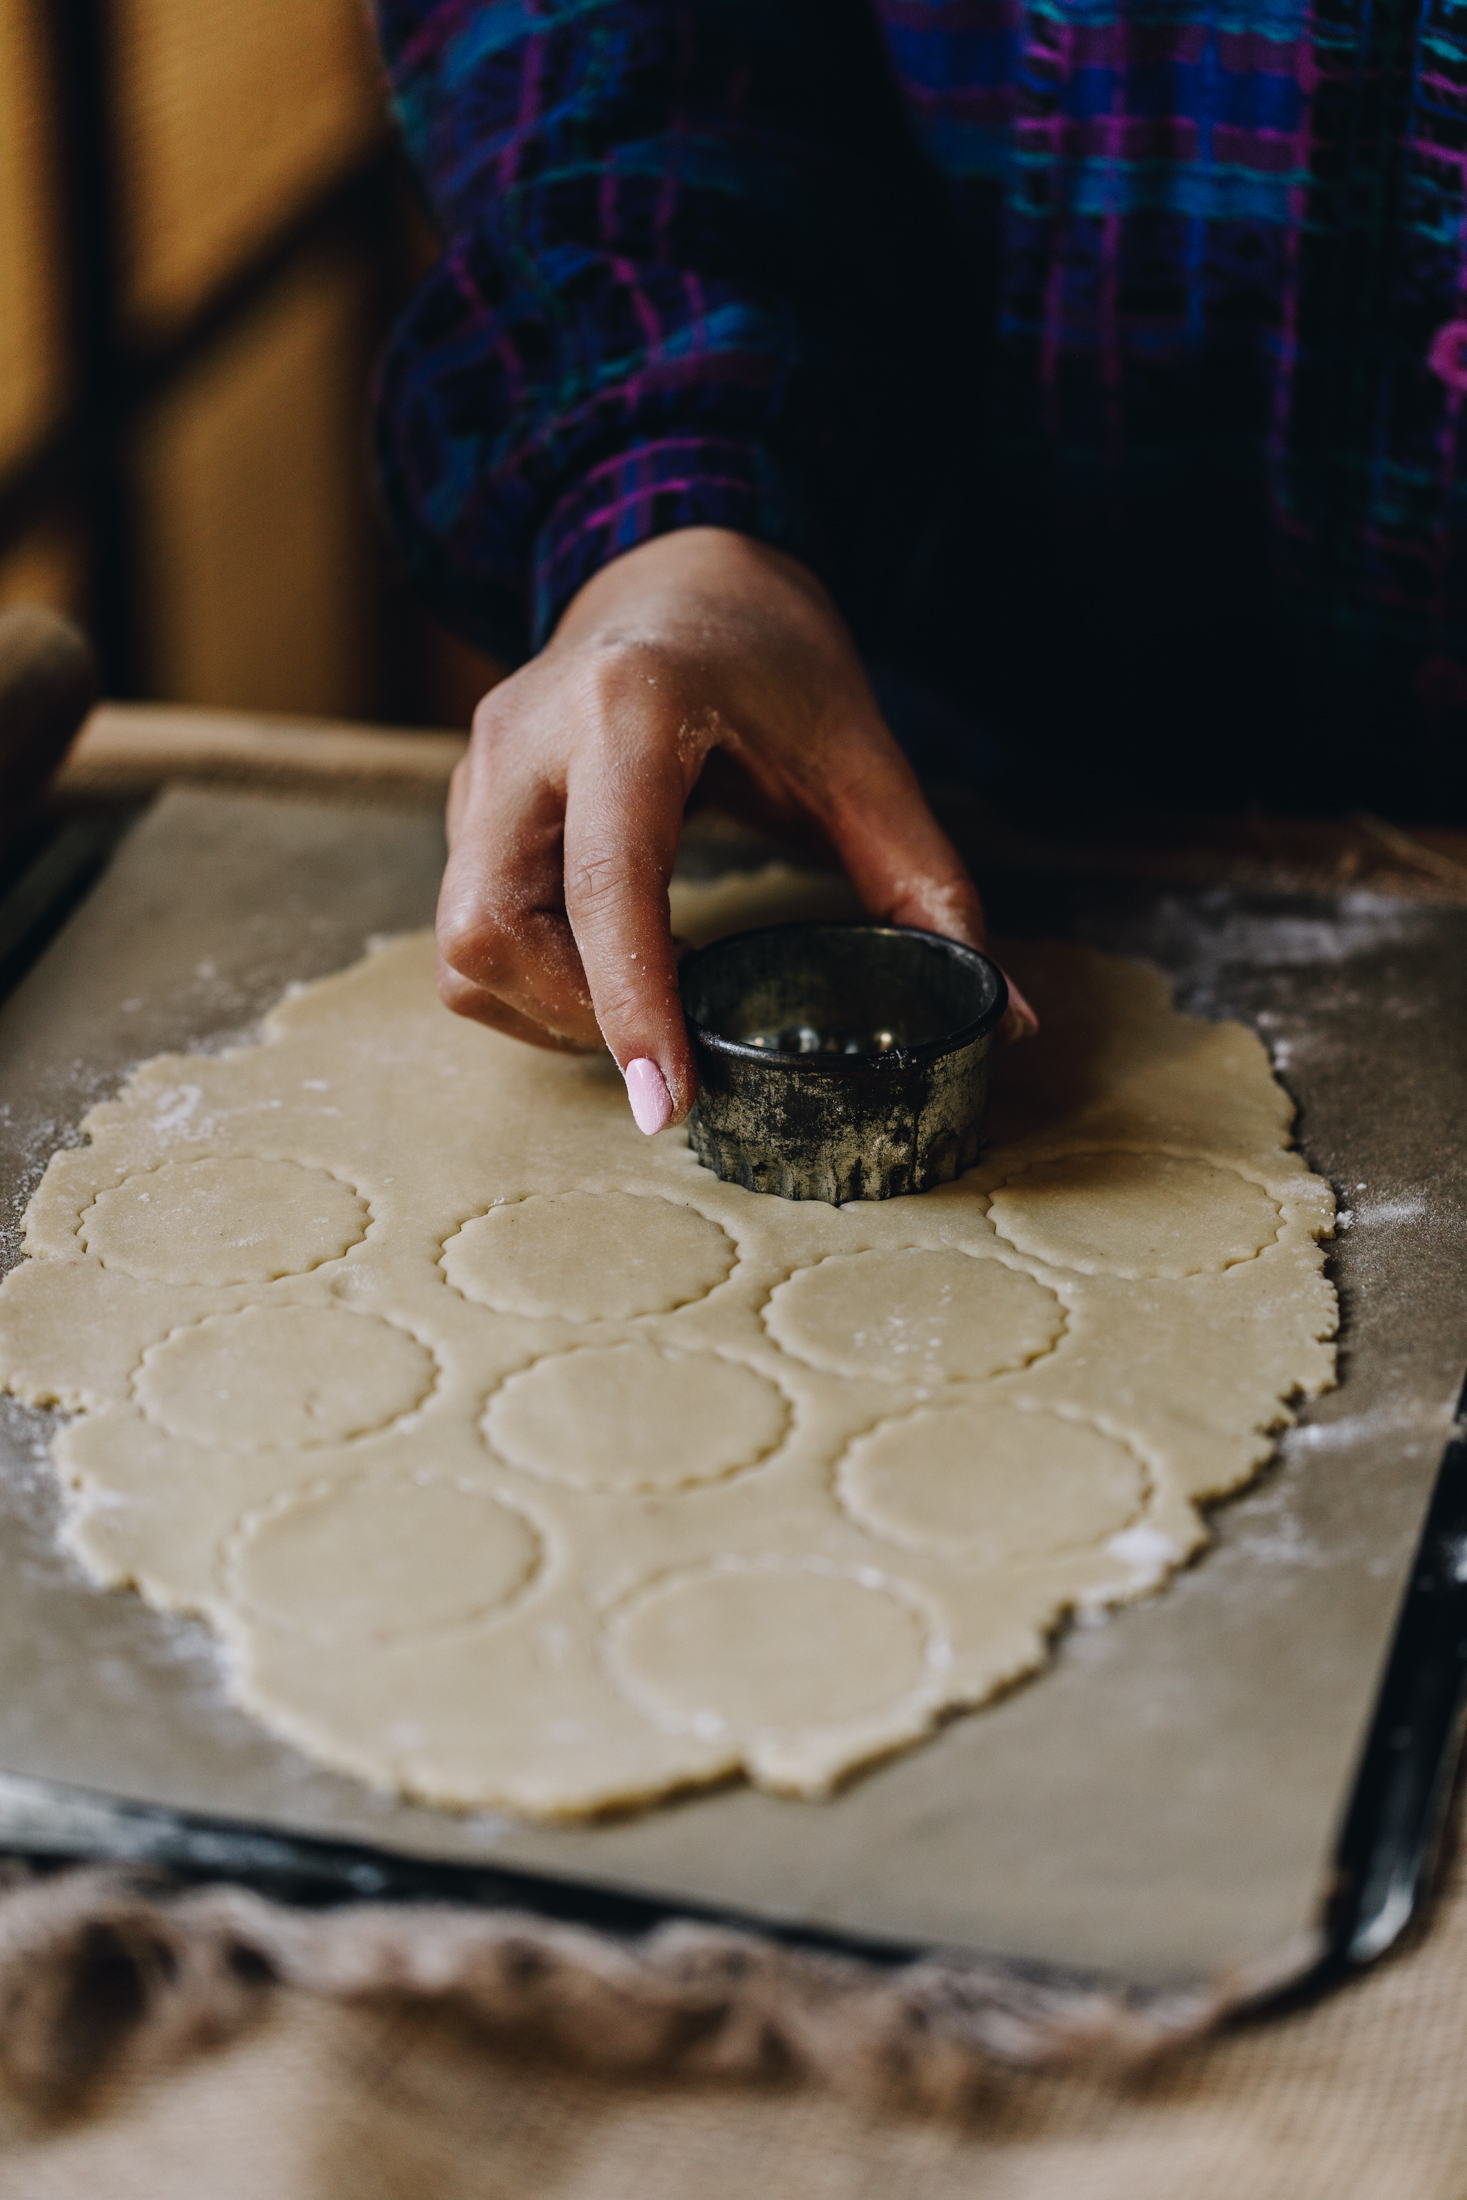
5. Cut out the Cookies:
Using a 5 cm cookie cutter (with a crinkle edge if you want the true squiggle shape), cut out the cookie shapes. These biscuit don't spread too much so they only need 2 cm in between each one.
Once you have used up the dough, remove the excess and set that tray aside. Prepare another flat tray with baking paper and flour.
Roll the excess dough out to 0.3 cm thick and cut them out too. You should get around 25-30 cookies in total.
Whakamātaohia (refrigerate) the pihikete (cookies) on the trays for 20 minutes.
6. Bake the Cookies:
Bake each tray of cookies for 12 minutes and then leave them aside to cool as you prepare the filling.
7. Whip the Buttercream:
Add the pata kūteretere (softened butter), puehu huka (icing sugar) mīere koura (golden syrup), wanira (vanilla) and tote (salt) into a bowl.
Whip for five minutes on high speed until light and fluffy in colour and texture.
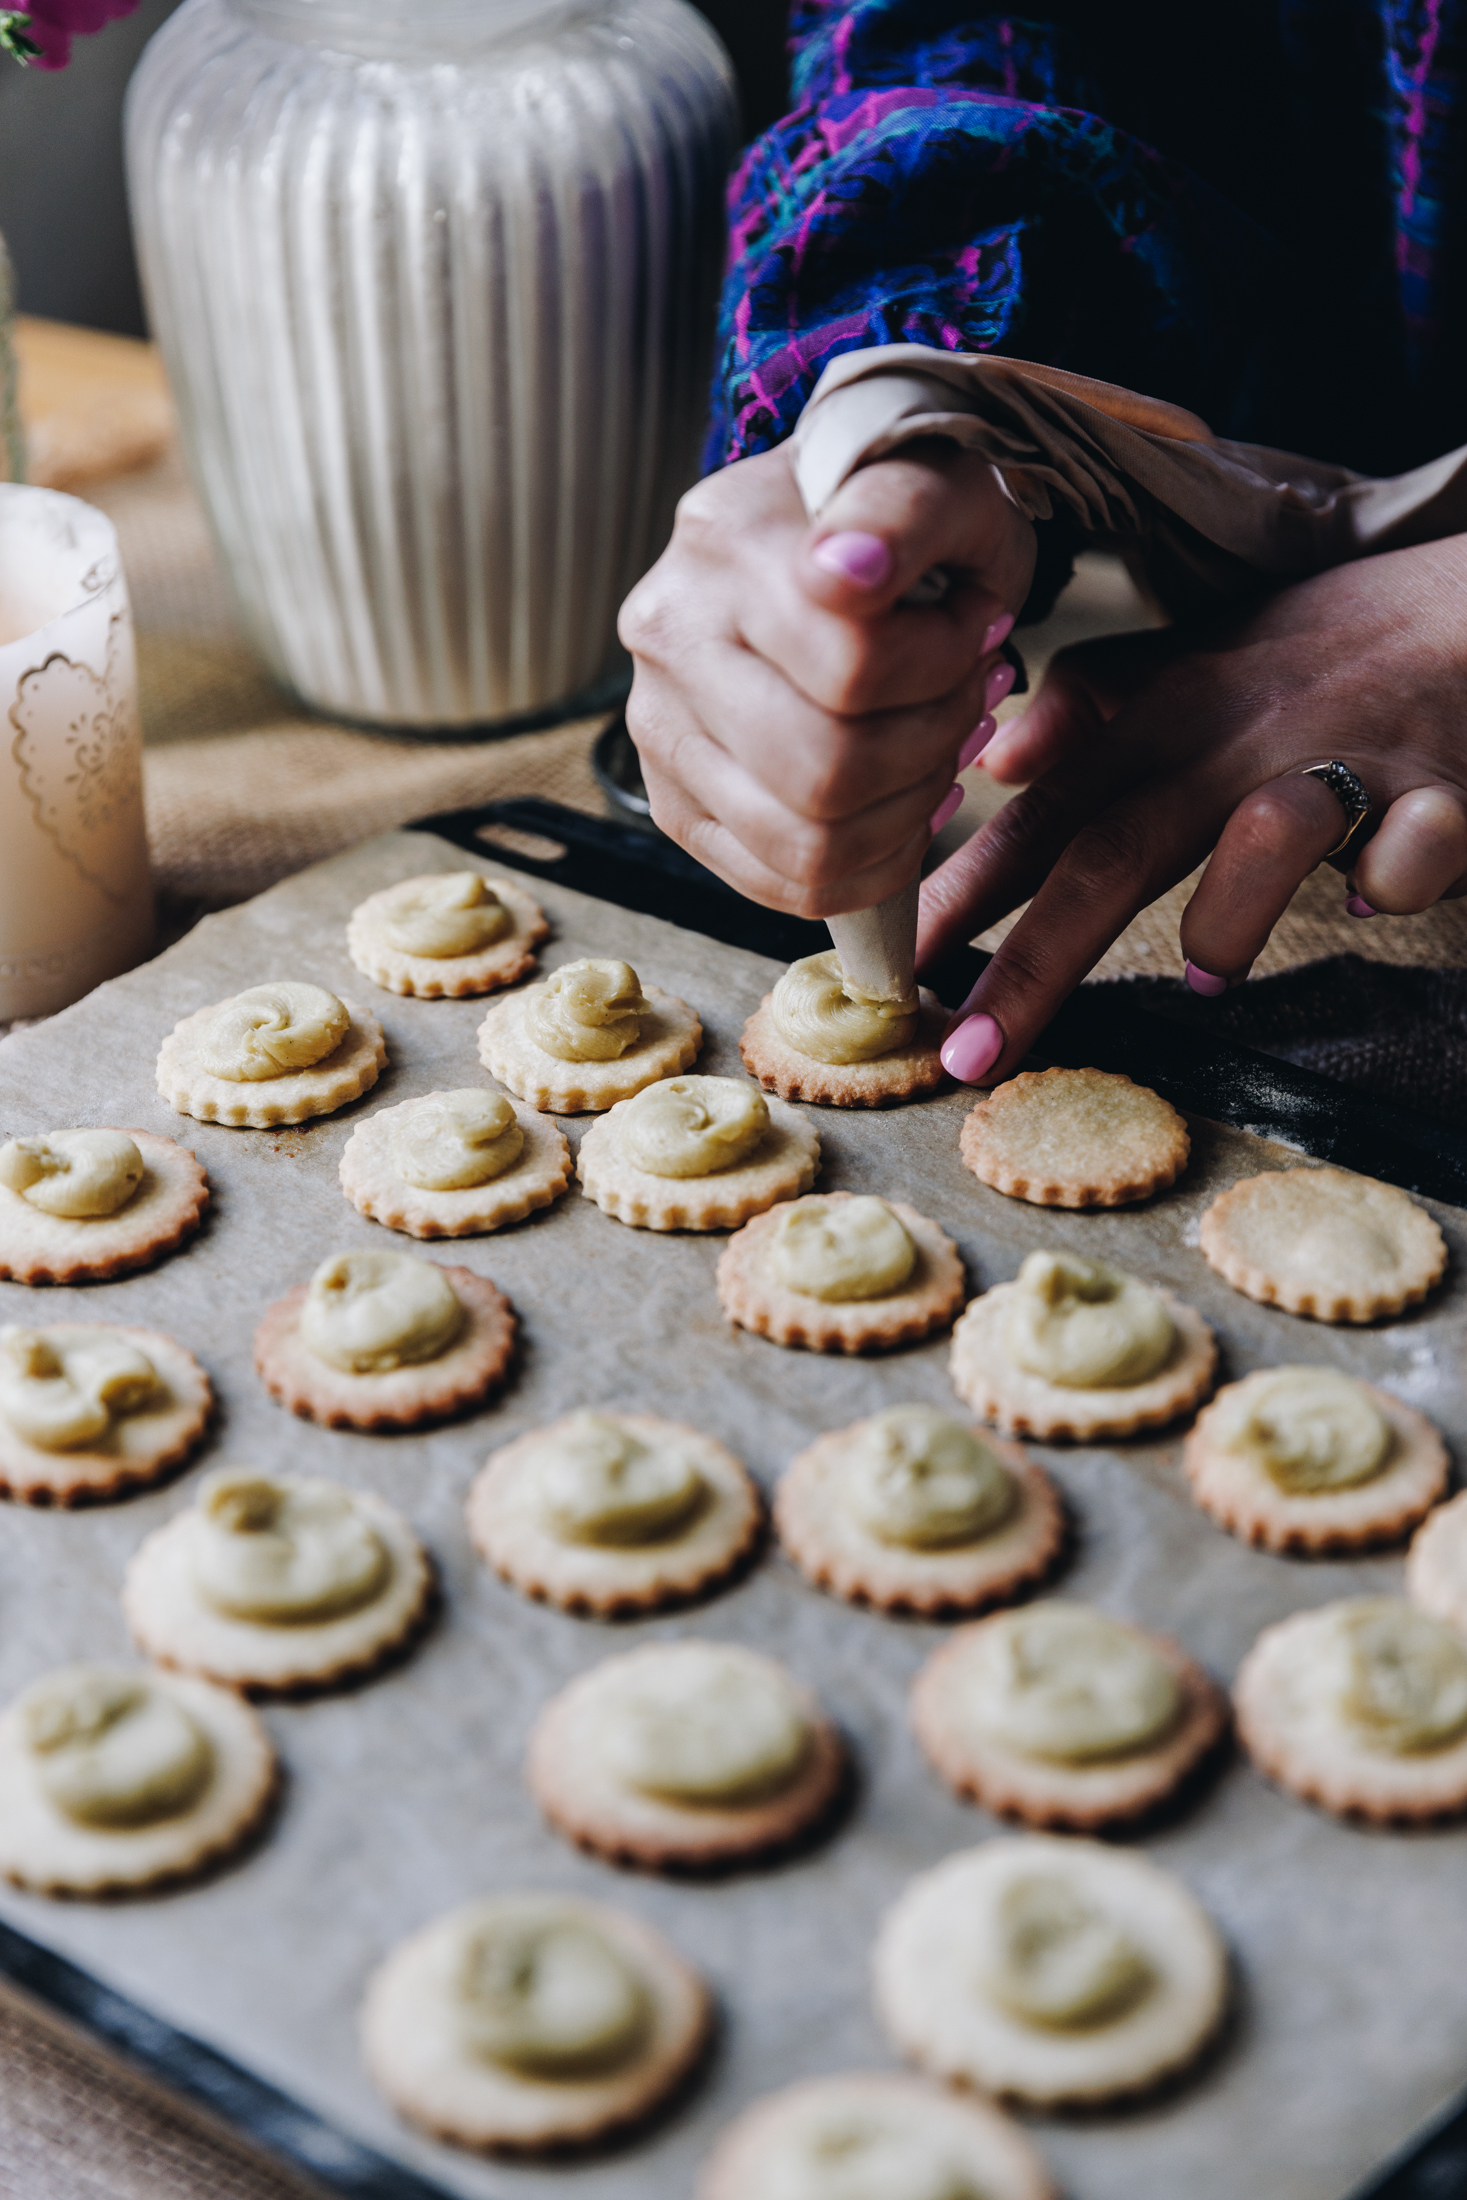
8. Add the Buttercream to the Cookies:
Pipe or spread a blob on to each of the 25 cooled pihikete (biscuits). Make sure it doesn't spill too much over the sides of the biscuits.
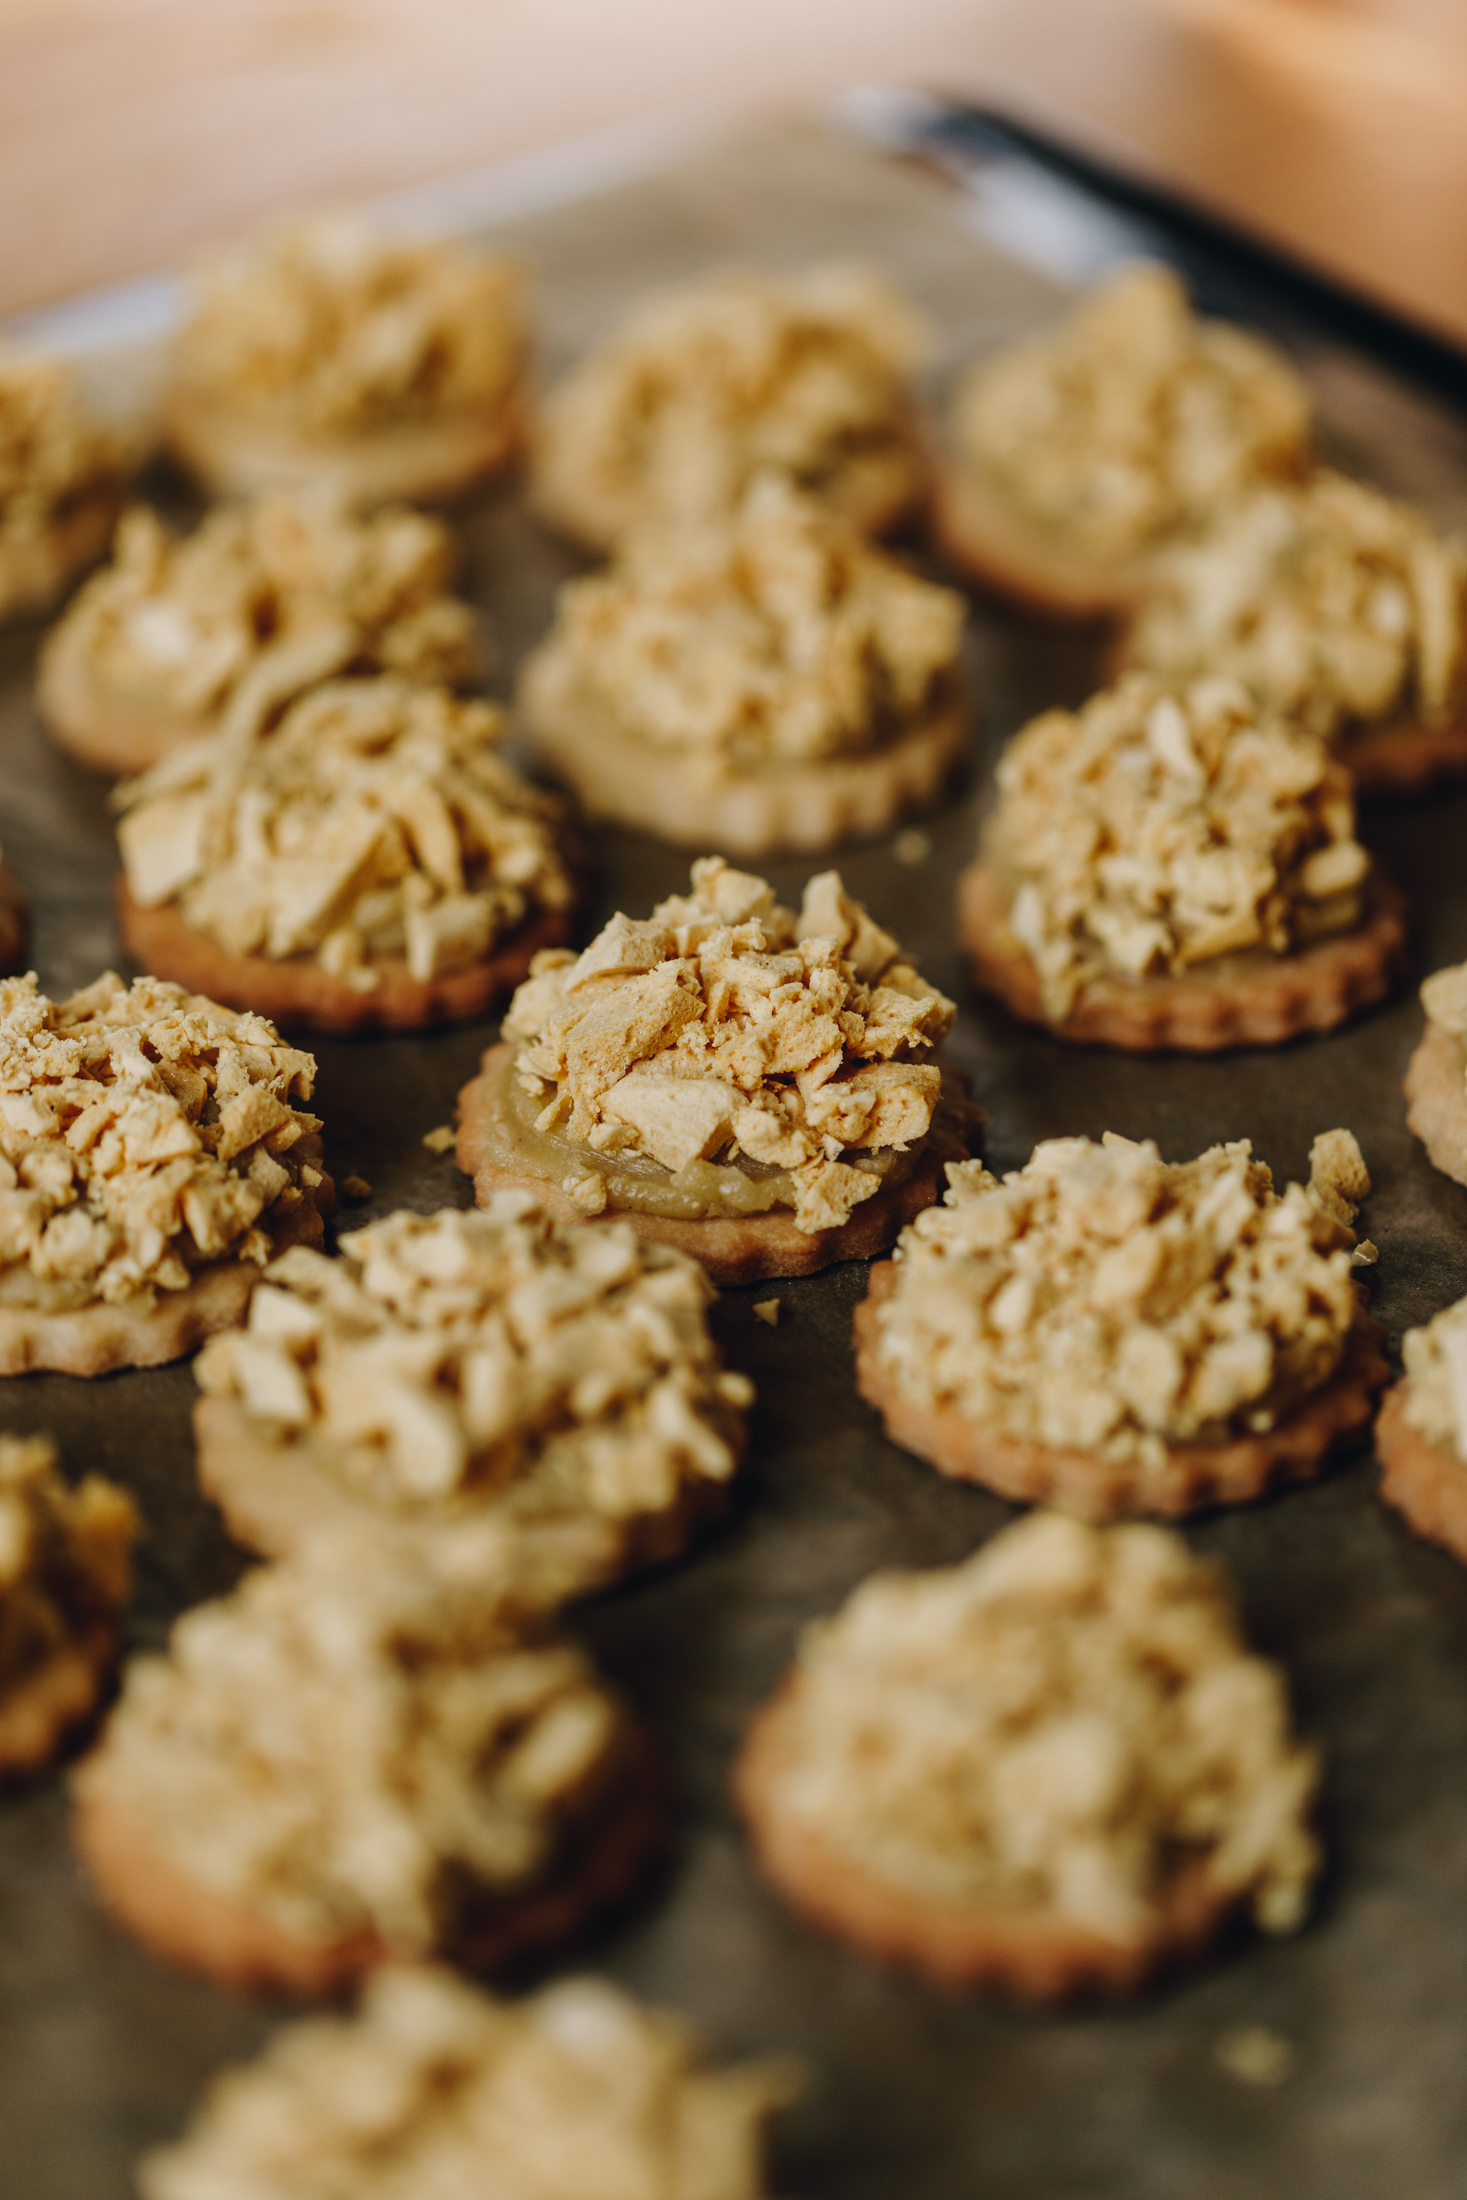
9. Prepare the Honeycomb:
Cut the honikoma into chunks and press in to butter filling on top of the biscuits. (See the video for a reference).
Press it in to all of the butter mix to make it nice and high.
Repeat the process until all of the cookies are piled with honikoma (honeycomb).
Return them to the trays with baking paper that they were baked on and set aside.
10. Melt the Chocolate:
Chop the tiakarete honikoma, (hokey pokey chocolate) and tiakarete parauri (dark chocolate) in to chunks.
Add the tiakarete (chocolate) along with the noni (oil) and kōkō (cocoa) in to a heat proof bowl.
Melt it all together gently in a heat-proof bowl that is sitting over a pot of barely simmering water (around 3cm deep). Make sure the base of the bowl is not touching the water.
You can also do this in 15 second bursts in the microwave, stir gently after each 15 seconds.
With both melting methods, only melt ¾'s of the tiakarete (chocolate) and then remove from the heat. Stir gently until it is all melted and smooth.
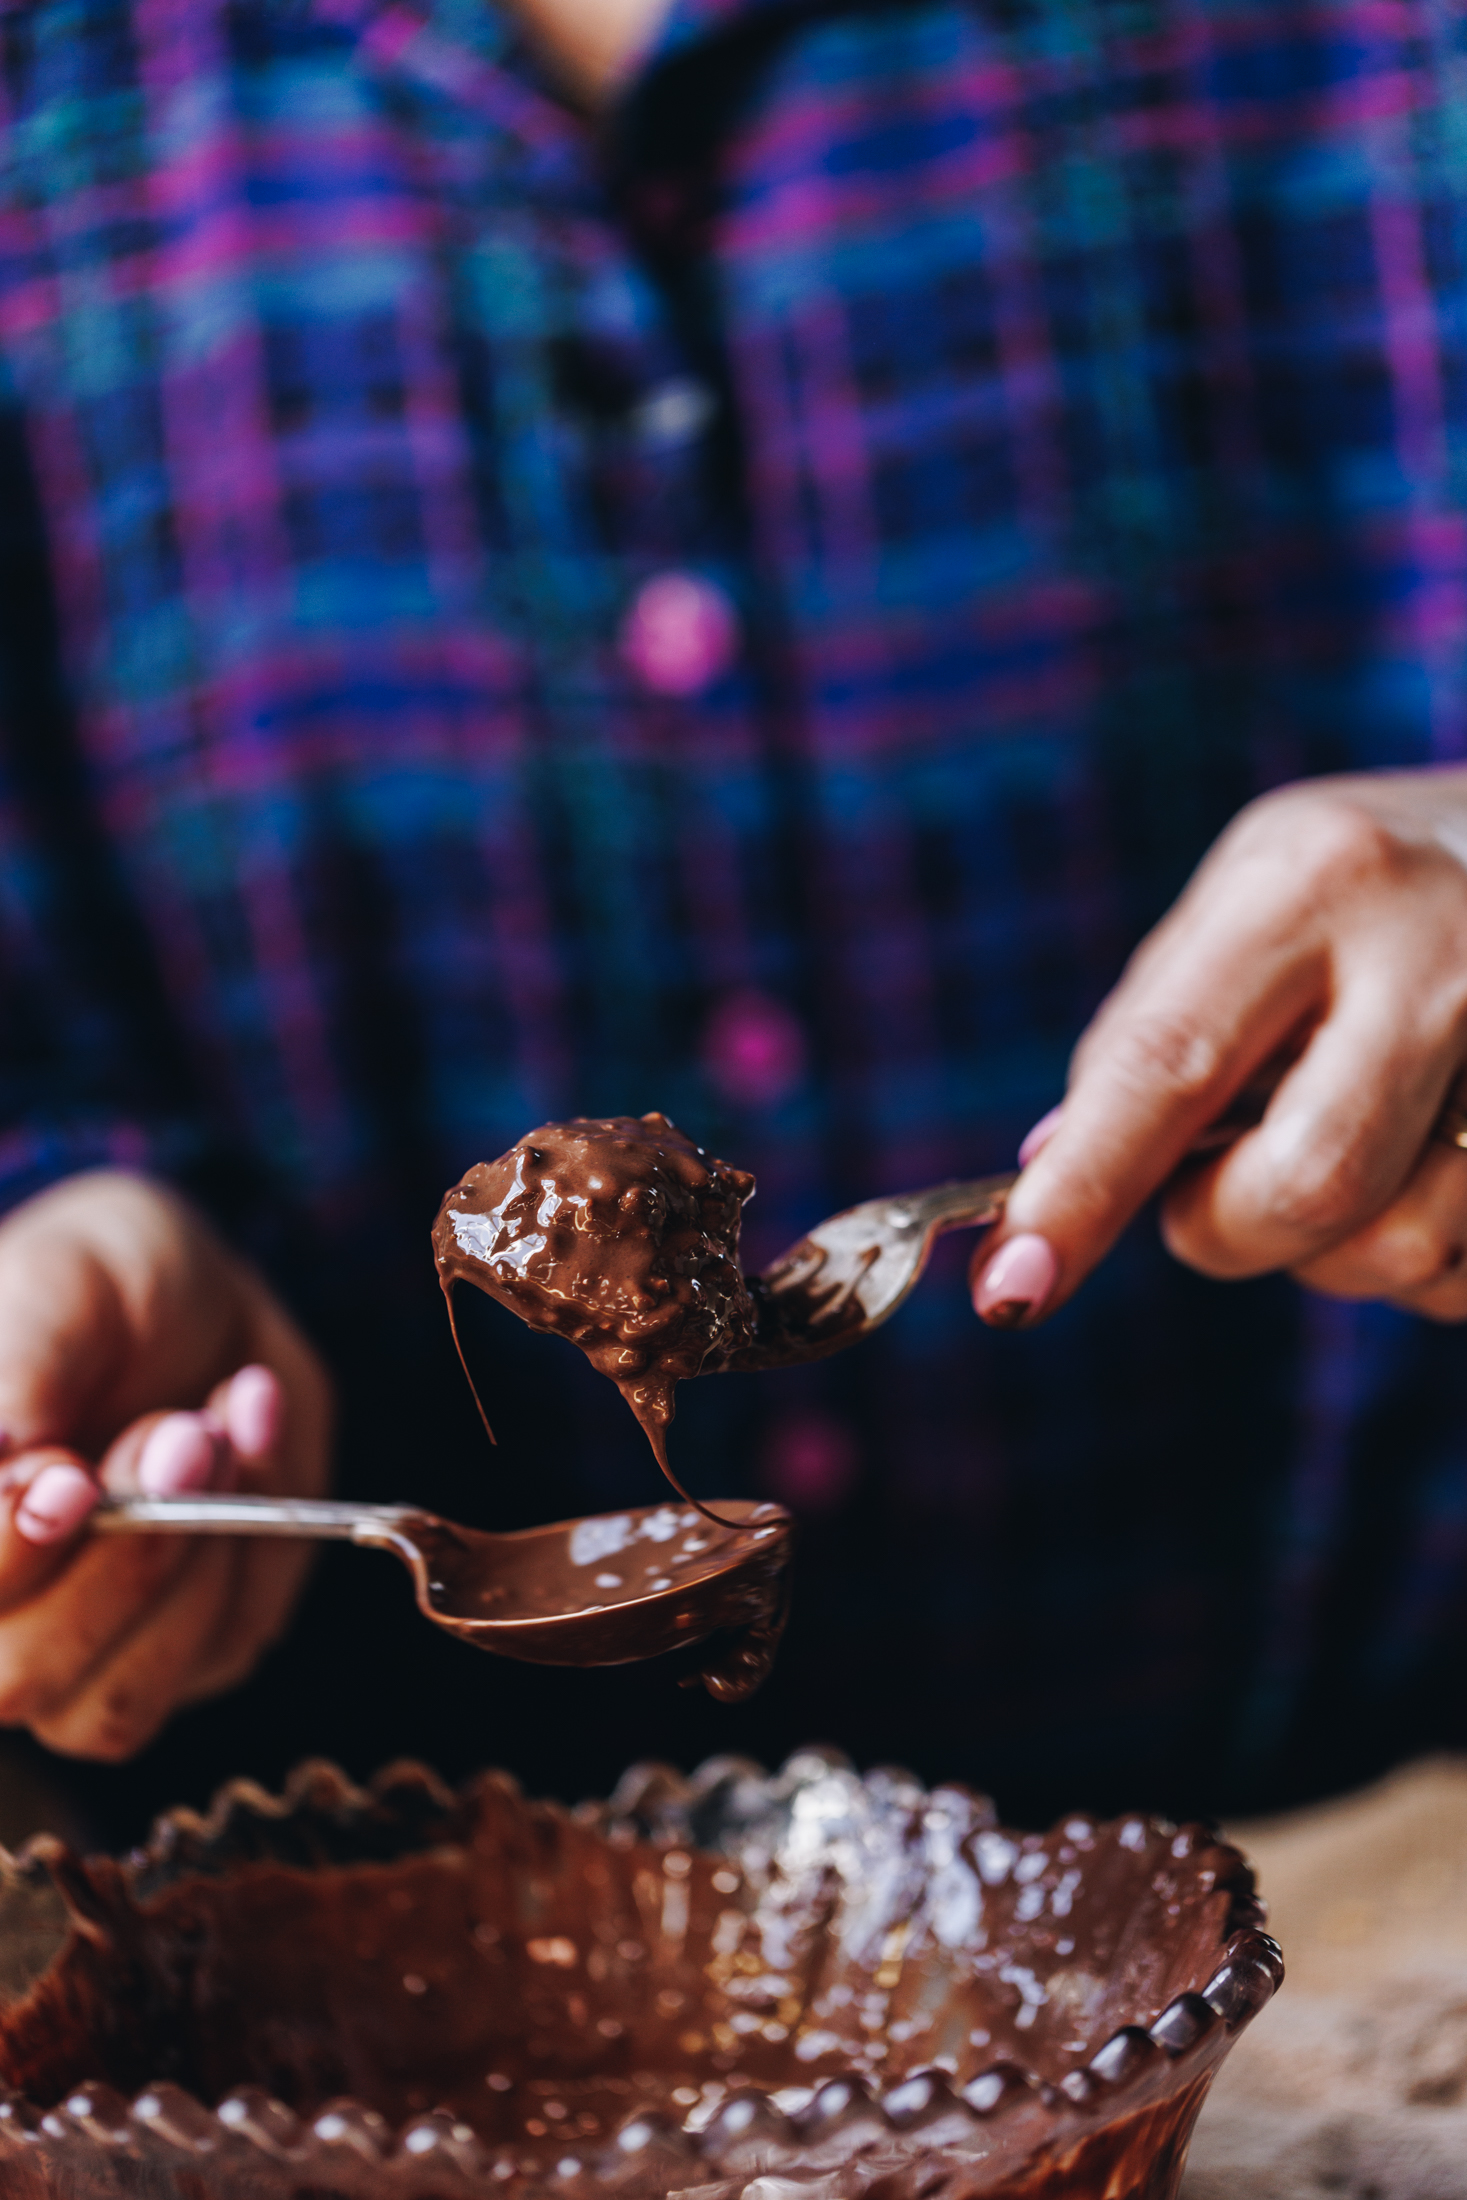
11. Dip the Homemade Squiggle Top Biscuits:
Use a fork and a spoon for this process. Keep the pihikete (cookie) on the fork the whole time, holding it upright.
Place a pihikete (cookie) on to the fork, dip the base of it in to the tiakarete (chocolate) and scoop it up. Now use the spoon to drizzle the chocolate liberally over the top.
Give the pihikete (biscuit) a good shake and then remove the excess from the bottom of the biscuit with the spoon.
Then place it on the tray lined baking paper to set on the bench with a little bit of space between each one so they don't stick to each other. Repeat the process with each one.
Once all of them are covered, allow them to set at room temperature for 20 minutes or so.

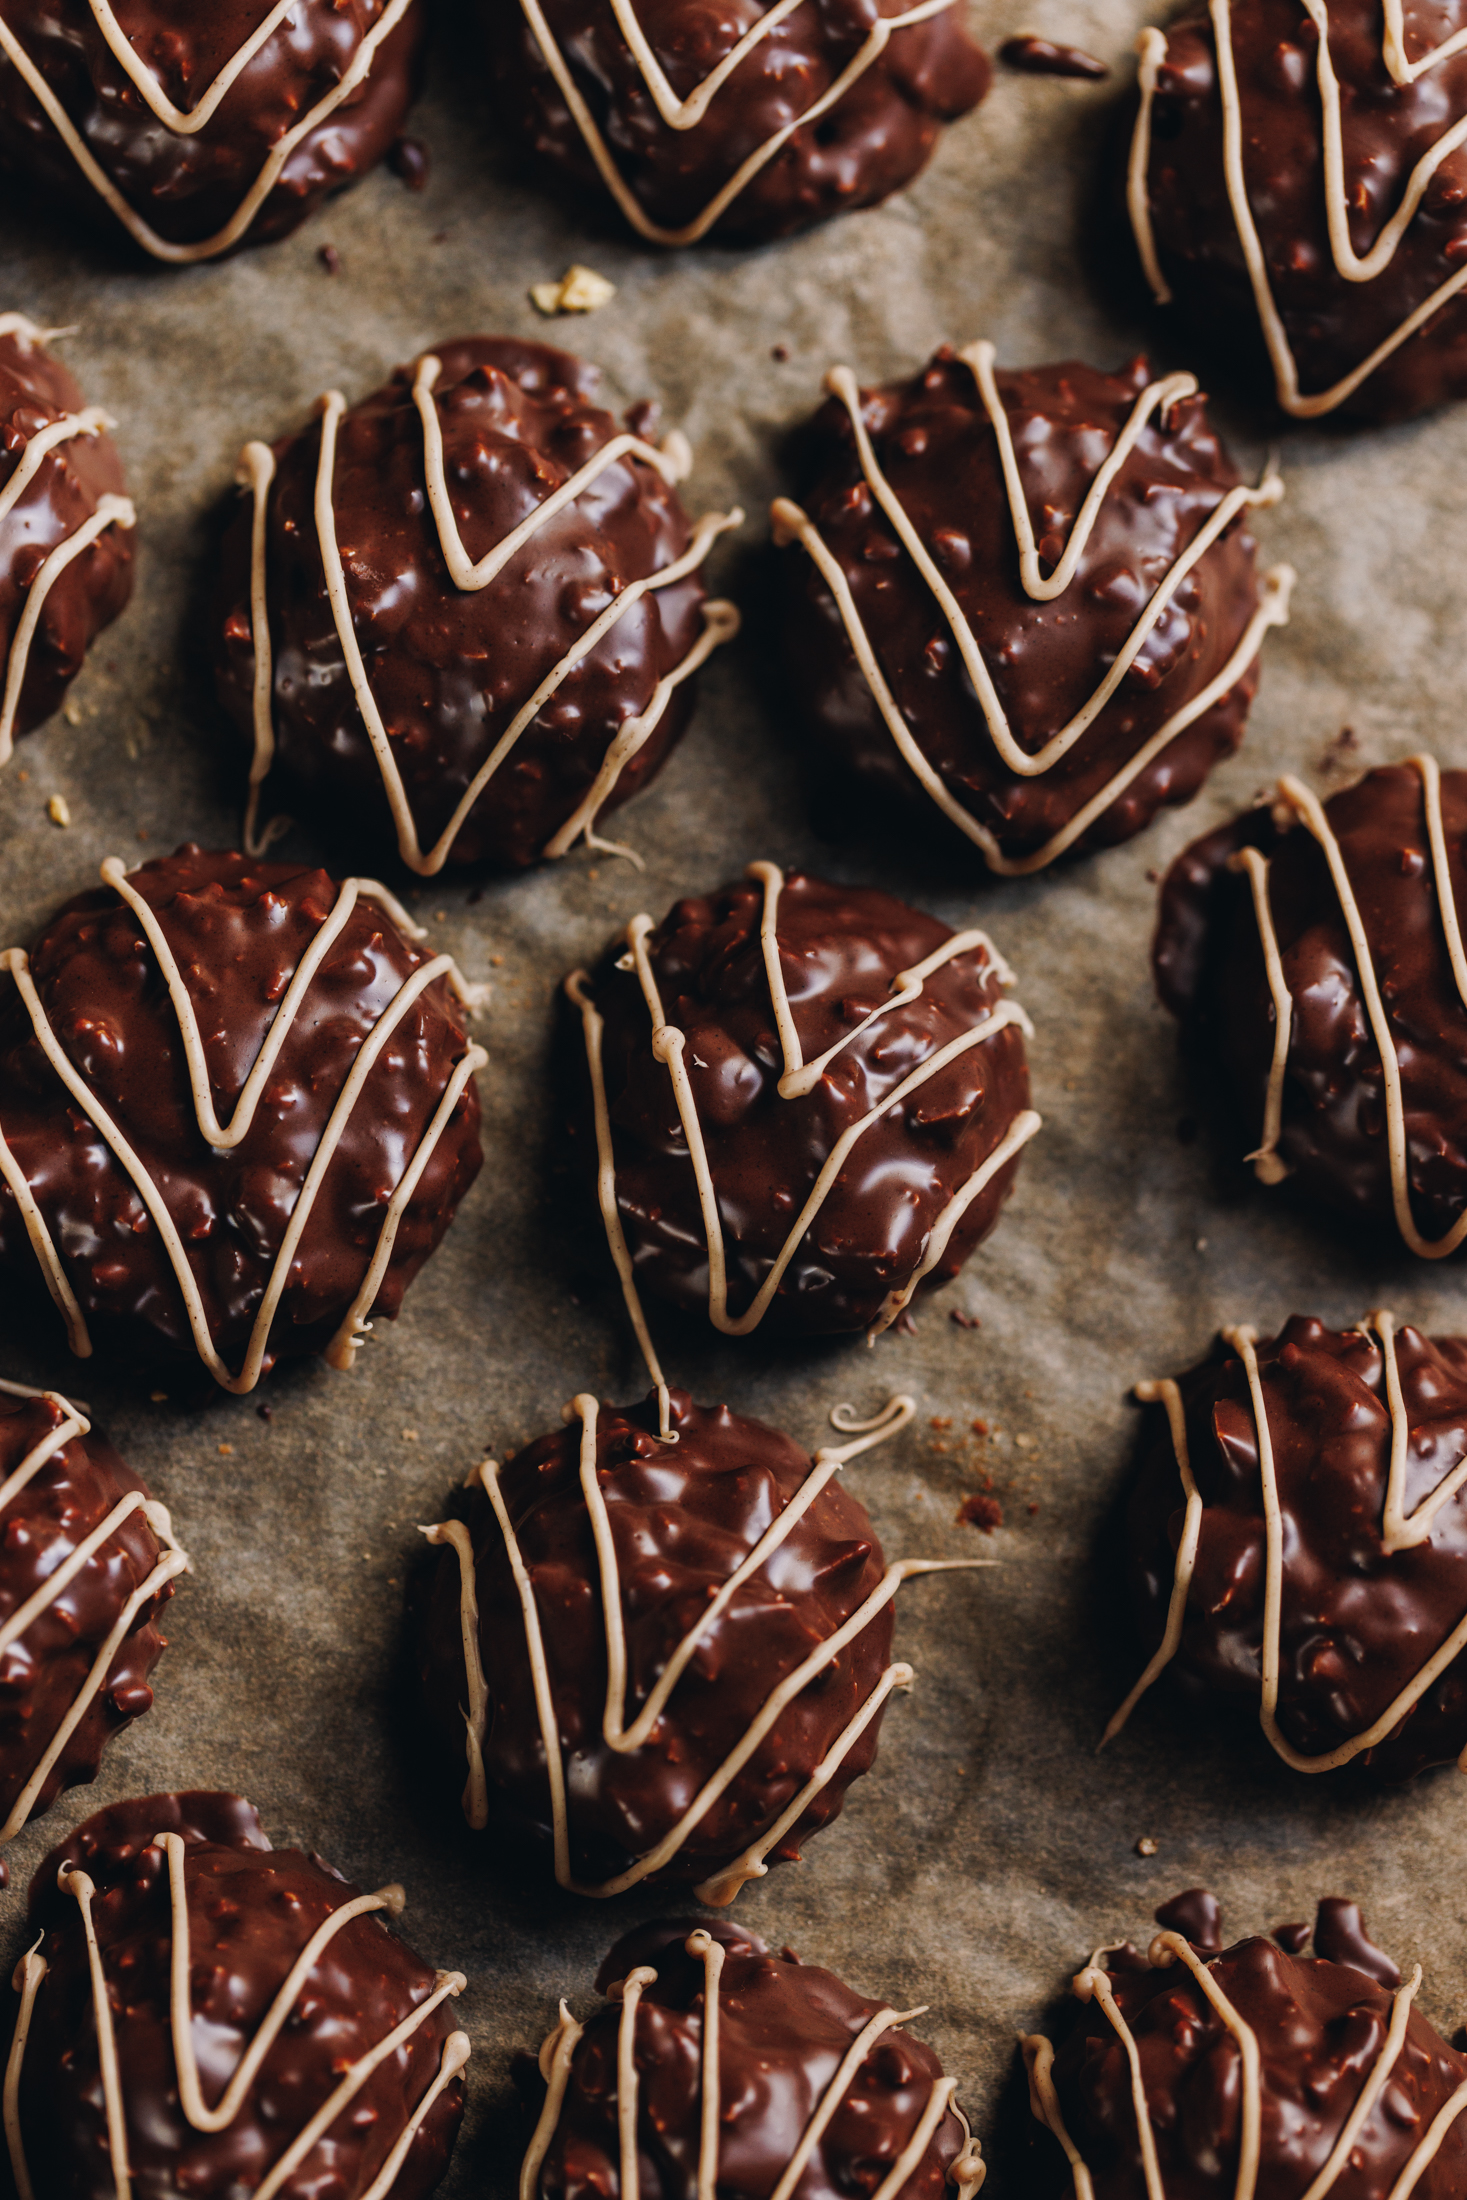
12. Decorate the Homemade Squiggle Top Biscuits:
Chop the tiakarete mā (white chocolate) in to fine pieces and add it to a small bowl. Very gently melt it in the microwave for 10 seconds, mixing after each 10 seconds until it is just melted. Then stir it until smooth.
Add it to a piping bag with a fine, round nozzle. This can also be done with a teaspoon but the accuracy will not be the same.
Pipe V's of the tiakarete mā (white chocolate) on to each pihikete (biscuit) to give that squiggle vibe and you are done.
13. Set the Homemade Squiggle Top Biscuits:
Allow the pihikete (biscuits) to completely set on the bench before storing in a sealed container in the fridge.
You could also buy a second hand cookie tin and deliver it to someone you love or who needs some extra care.

Storing the Squiggle Top Cookies:
Keep these pihikete (cookies) stored in a sealed container in the fridge or in a cool cupboard.
They will keep for a good week if they are stored this way.
Need more
Pihikete (Biscuit) Recipes?
Then take a little squizz at these recipes, there is something for everyone.

DID YOU ENJOY THIS RECIPE?
It would be so awesome if you could please leave a review/comment by clicking the “leave a comment” section at the top of the page.
I love seeing you all make my creations, so send a whakaahua (photo) or kiriata (video) to my Instagram and show me what you made. Let me know if you have any pātai (questions) too, I would love to help.
Squiggle Top Cookies - Pihikete Honikoma me te Tiakarete
Ingredients
The Biscuits - Ngā Pihikete
- 80 g pata kūteretere (softened butter)
- ¼ C (20 g) puehu huka (icing sugar)
- He kini tote (a pinch of salt)
- 1 teaspoon (5 ml) iho hūperei (vanilla essence)
- 1 ¼ C (185 g) puehu parāoa noa (plain flour)
- 3 tablespoon (45 ml) miraka (milk)
The Golden Syrup Butter - Te Pata Mīere Koura
- 90 g pata kūteretere (softened butter)
- ¼ C (20 g) puehu huka (icing sugar)
- 3 tablespoon (60 g) mīere koura (golden syrup)
- 1 teaspoon (5 ml) wanira (vanilla)
- He kini tote - a pinch of salt
The Hokey Pokey/Honeycomb - Te Honikoma
- 80 g honikoma (honeycomb, store-bought). I used Kāpiti but Crunchie bars also work).
The Chocolate - Te Tiakarete
- 250 g tiakarete honikoma (hokeypokey chocolate)
- 100 g tiakarete (chocolate, I used sea salt and caramel brittle because I love the crunch but use what you have).
- 2 tablespoon (30 ml) 2 tablespoon noni (oil)
- 2 tablespoon (12 g) kōkō (cocoa)
- 50 g tiakarete mā (white chocolate, I used caramelised but use what you have).
Instructions
Preheat the Oven:
- Preheat the oven to 170 °C bake setting or 160 °C fan bake setting.
Whip the Butter and Sugar:
- Add the pata kūteretere (softened butter), puehu huka (icing sugar) and tote (salt) into a bowl and whip for a few minutes on high speed until light and fluffy.
Add the Remaining Ingredients:
- Add the iho hūperei (vanilla), puehu parāoa noa (plain flour) and miraka (milk) in to the butter mixture.
- Mix it all together with your hands for a couple of minutes until you get a smooth dough. Do not knead it too much here, you are just bringing the ingredients together. If you overwork the dough, the pihikete (biscuits) will be tough.
Roll out the Dough:
- Place a large piece of baking paper on to a flat baking tray. Sprinkle over a tablespoon of puheu parāoa (flour).
- Add the pokenga (dough) on to the baking paper and roll it out until it is around 0.3 cm thick.
- Using a 5 cm cookie cutter (with a crinkle edge if you want the true squiggle shape), cut out the cookie shapes. These biscuit don't spread too much so only need 2 cm in between each one.
- Once you have used up the dough, remove the excess and set that tray aside. Prepare another flat tray with baking paper and flour.
- Roll the excess dough out to 0.3 cm thick and cut them out too. You should get around 25-30 cookies in total.
- Whakamātaohia (refrigerate) the pihikete (cookies) on the trays for 20 minutes.
Bake the Cookies:
- Bake each tray of cookies for 12 minutes and then leave them aside to cool as you prepare the filling.
Whip the Buttercream:
- Add the pata kūteretere (softened butter), puehu huka (icing sugar) mīere koura (golden syrup), wanira (vanilla) and tote (salt) into a bowl.
- Whip for five minutes on high speed until light and fluffy in colour and texture.
Add the Buttercream to the Cookies:
- Pipe or spread a blob on to each of the 25 cooled pihikete (biscuits). Make sure it doesn't spill too much over the sides of the biscuits.
Prepare the Honeycomb:
- Cut the honikoma into chunks and press in to butter filling on top of the biscuits. (See the video for a reference). Press it in to all of the butter mix to make it nice and high.
- Repeat the process until all of the cookies are piled with honikoma (honeycomb). Return them to the trays with baking paper that they were baked on and set aside.
Melt the Chocolate:
- Chop the tiakarete honikoma, (hokey pokey chocolate) and tiakarete parauri (dark chocolate) in to chunks.
- Add the tiakarete (chocolate) along with the noni (oil) and kōkō (cocoa) in to a heat proof bowl.
- Melt it all together gently in a heat-proof bowl that is sitting over a pot of barely simmering water (around 3cm deep). Make sure the base of the bowl is not touching the water.You can also do this in 15 second bursts in the microwave, stir gently after each 15 seconds.
- With both melting methods, only melt ¾'s of the tiakarete (chocolate) and then remove from the heat. Stir gently until it is all melted and smooth.
Dip the Biscuits in Chocolate:
- Use a fork and a spoon for this process. Keep the pihikete (cookie) on the fork the whole time, holding it upright.
- Place a pihikete (cookie) on to the fork, dip the base of it in to the tiakarete (chocolate) and scoop it up. Now use the spoon to drizzle the chocolate liberally over the top.
- Give the pihikete (biscuit) a good shake and then remove the excess from the bottom of the biscuit with the spoon.
- Then place it on the tray lined baking paper to set on the bench with a little bit of space between each one so they don't stick to each other. Repeat the process with each one.
- Once all of them are covered, allow them to set at room temperature for 20 minutes or so.
Prepare the Squiggle Chocolate:
- Chop the tiakarete mā (white chocolate) in to fine pieces and add it to a small bowl. Very gently melt it in the microwave for 10 seconds, mixing after each 10 seconds until it is just melted and then stir it until smooth.
- Once it is melted, add it to a piping bag with a fine, round nozzle. This can also be done with a teaspoon but the accuracy will not be the same.
- Pipe V's of the tiakarete mā (white chocolate) on to each pihikete (biscuit) to give that squiggle vibe and you are done.
Set the Cookies:
- Allow the pihikete (biscuits) to completely set on the bench before storing in a sealed container in the fridge. You could also buy a second hand cookie tin and send it to someone you love!
Storing the Squiggle Top Cookies:
- Keep these pihikete (cookies) stored in a sealed container in the fridge or in a cool cupboard. They will keep for a good week if they are stored this way.If you are travelling these anywhere, place them in the freezer for an hour before hand so everything holds well.


Leave a Review