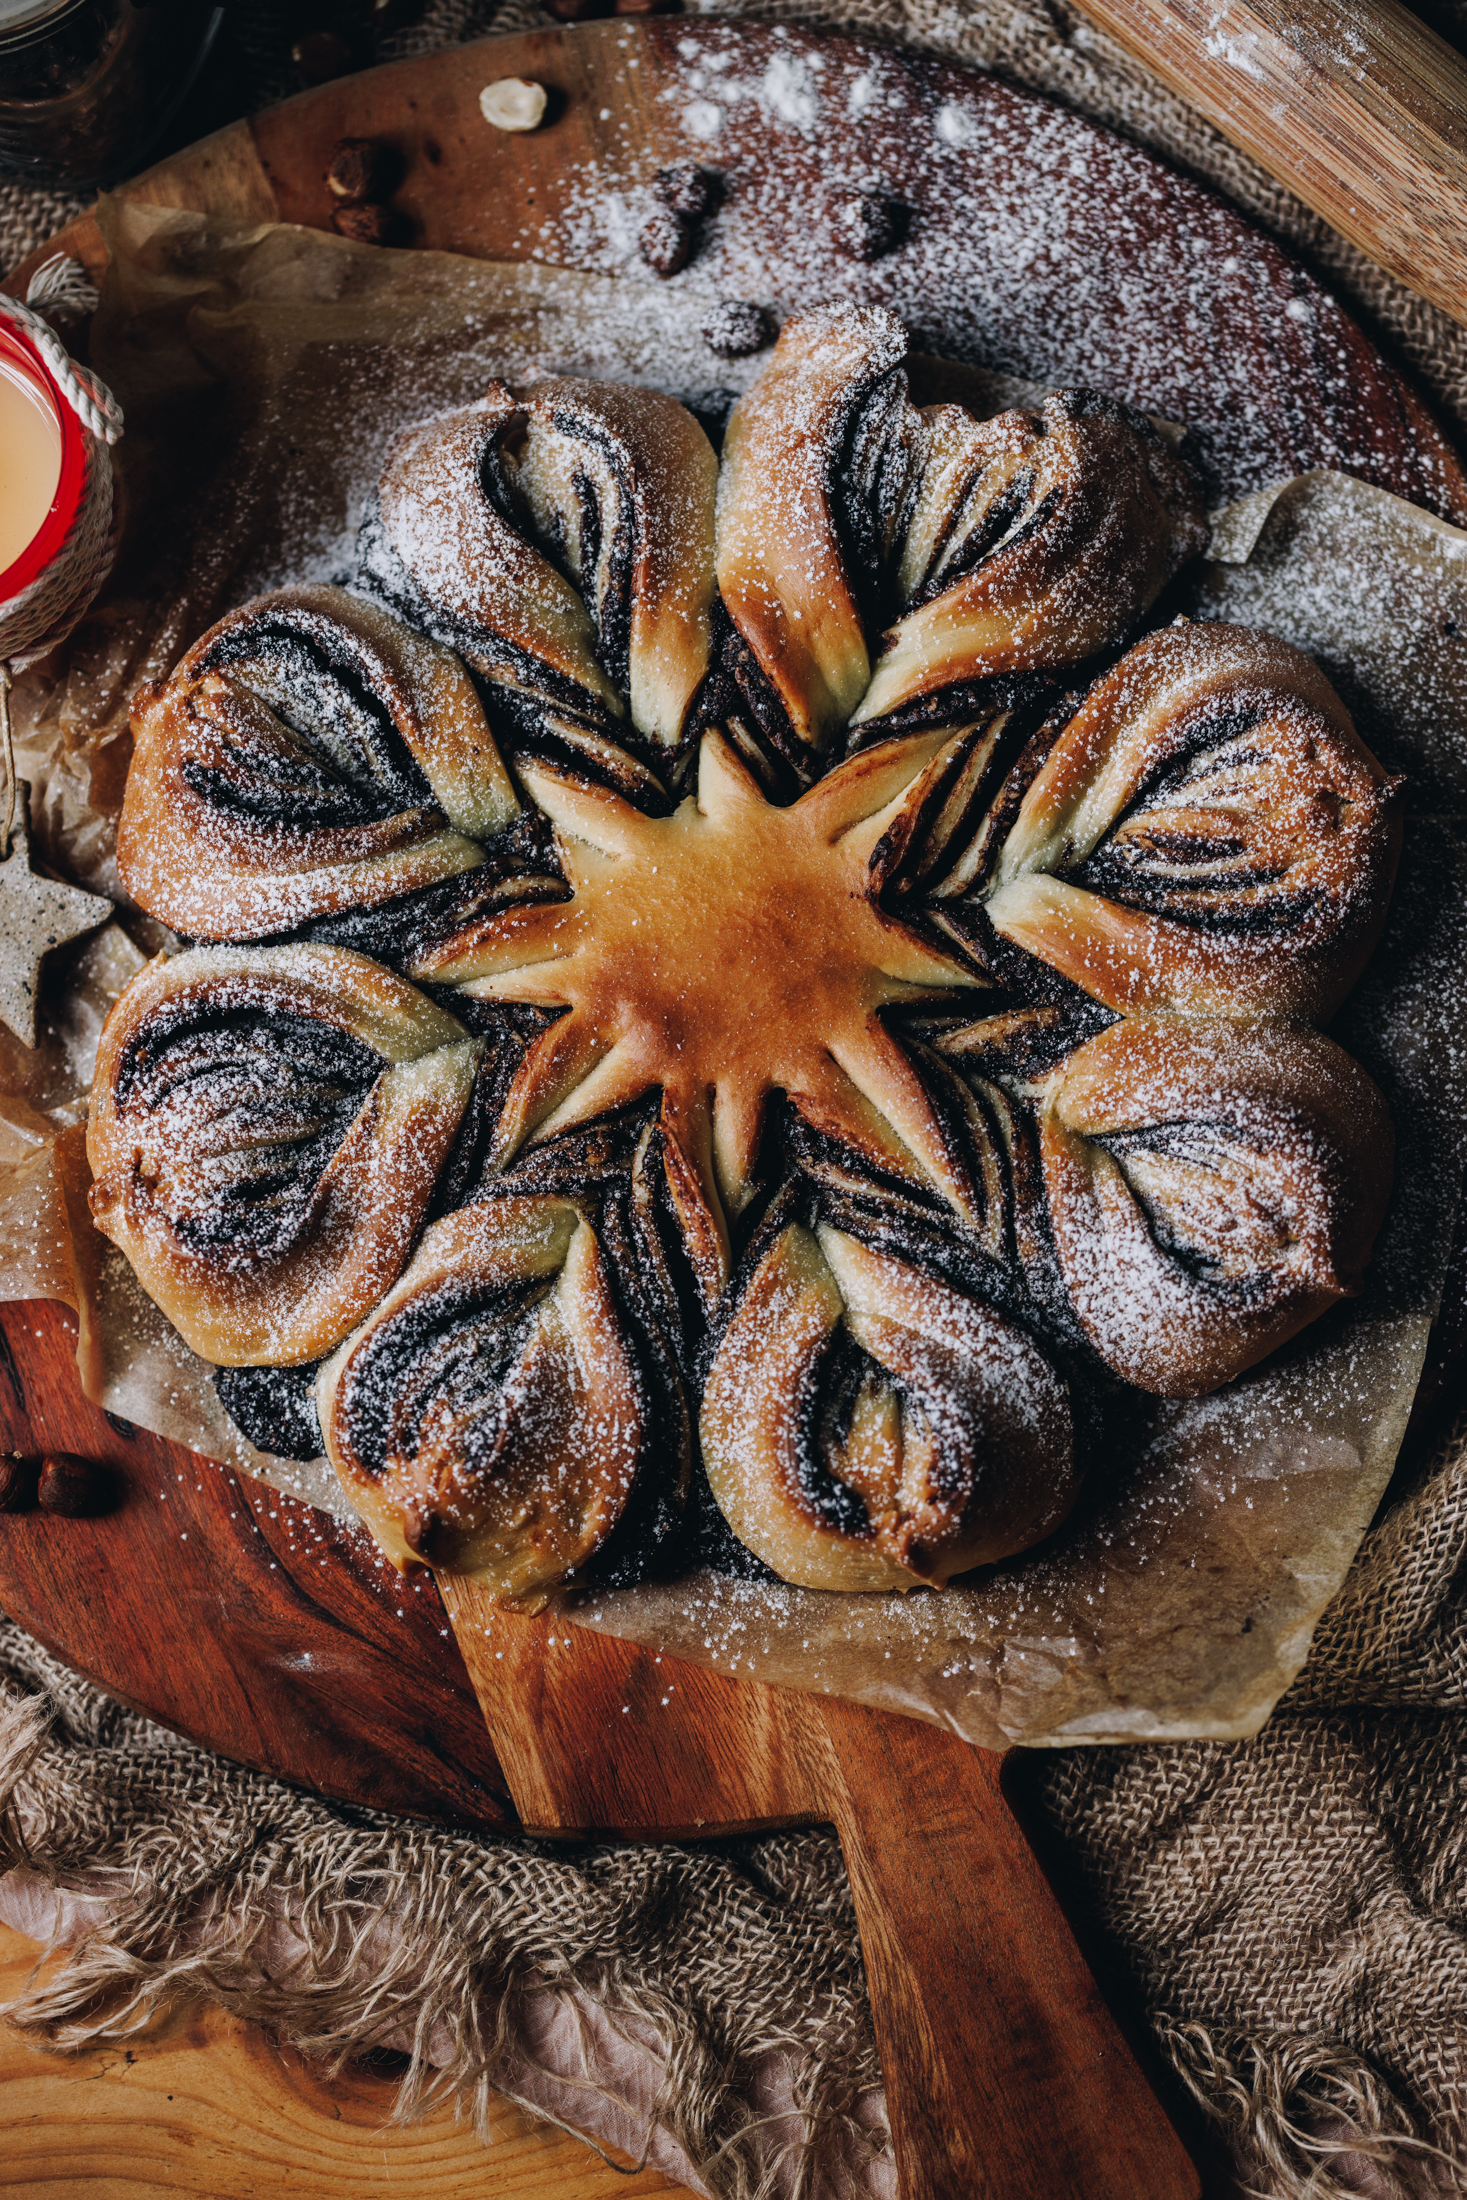
Twinkle, twinkle chocolate star… how I wonder how delicious you are! If you haven’t made this Chocolate Star Bread yet, it’s time to change that. ⭐️ Soft, slightly sweetened dough is filled with rich chocolate hazelnut spread, then shaped into a beautiful pull-apart star that looks far more impressive than it actually is.
Don’t be put off by the shape—I’ll guide you step by step, and you’ll be surprised at how simple it really is. This is the kind of bake that feels special, tastes incredible warm from the oven, and always gets people asking for seconds.
Why you will love Chocolate Star Bread:
My Chocolate Star Bread has serious wow factor—expect plenty of “oooohs” and “ahhhs” when you bring it to the table. It looks impressive, tastes incredible, and is always a crowd favourite.
This recipe is from my cookbook, but it once had an issue with the miraka (milk) ratio, which was a tough lesson at the time. Otirā (however), it’s now been corrected so you can bake it with confidence and get perfect results every time.
More parāoa (bread) recipes to try:
Looking for another sweet bread recipe? Try my Sticky Maple and Pecan Scrolls or Samoa Coconut Buns (Pani Popo).
If you’re after something savoury instead, you might enjoy my No-knead Bread Buns or their cheesy cousin, the Cheesy No-knead Bread Buns.
Videography and photography by Sarah Henderson.
INGREDIENTS:
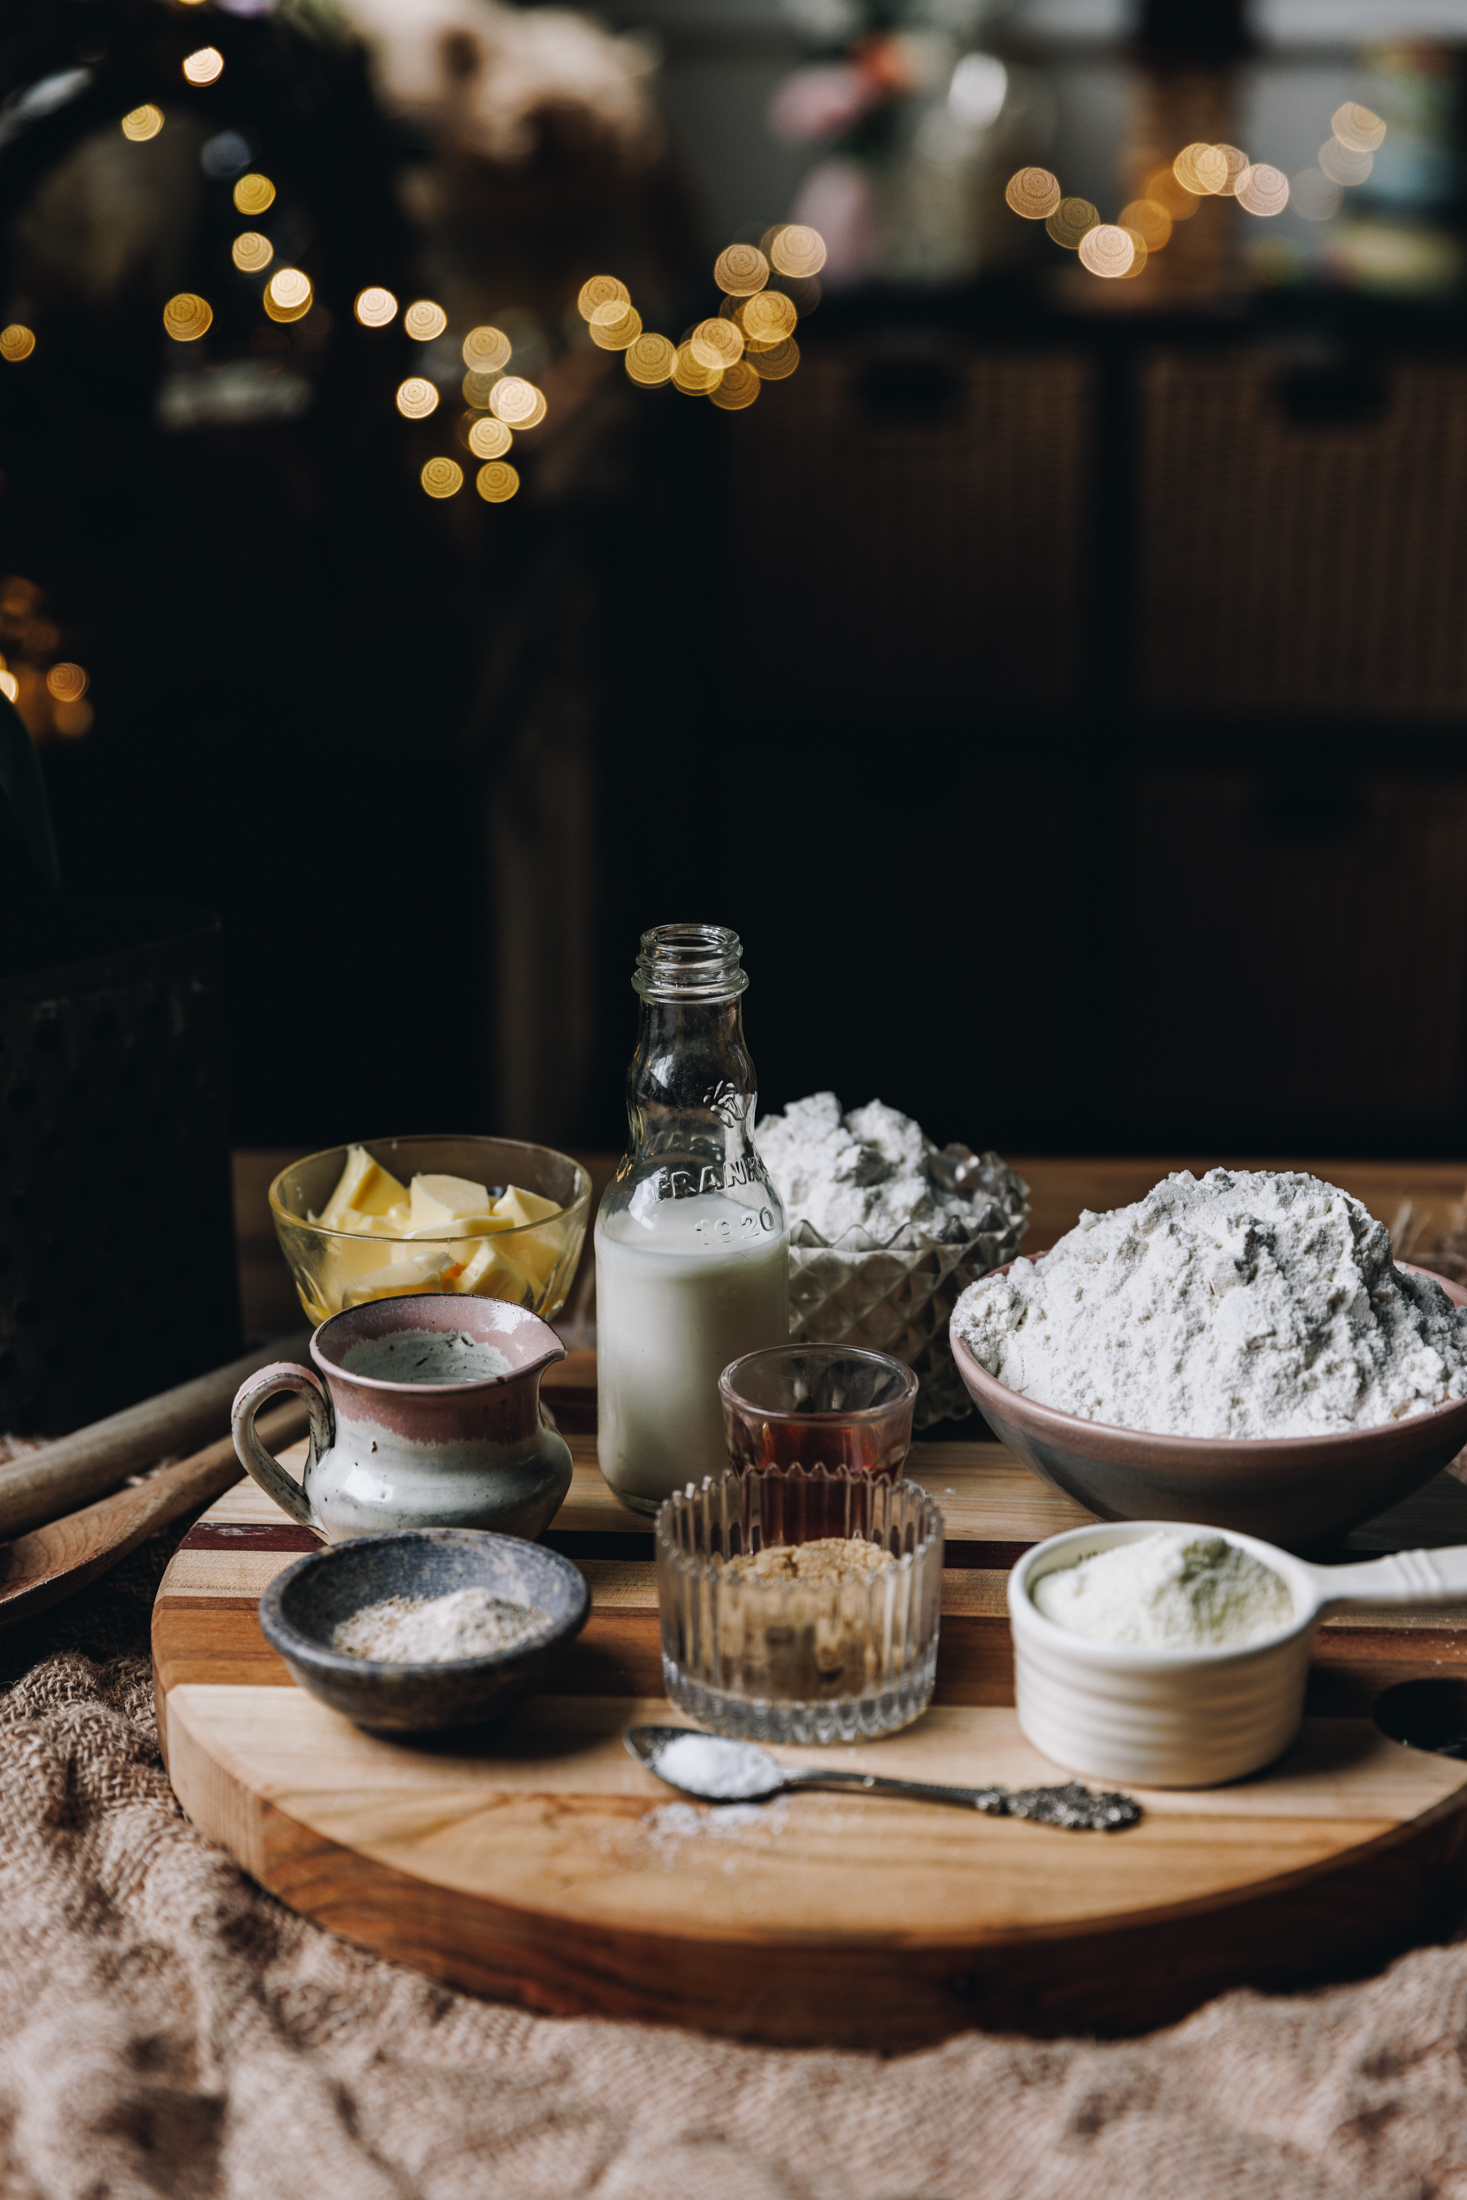
- Yeast: I use Surebake/Breadmakers yeast in this recipe. If you are using īhi horo (instant yeast), half the amount.
- Brown sugar: Use huka hāura (brown sugar) in the dough and the pani tiakarete (chocolate spread) for its caramel goodness.
- Milk powder: Paura miraka (milk powder) gives a lovely richness to the dough but you can swap it for a ¼ C of puehu parāoa (flour) if you want to.
- High grade flour: Always use puehu parāoa kounga (high grade flour) in bread recipes for the fluffiest result.
- Butter: I always use salted pata (butter) in my baking but use unsalted if you prefer.
- Chocolate: I like to use a hazelnut tiakarete (chocolate) in this recipe but you can swap it for the same amount of your favourite chocolate.
- Mixed spice: I love mixed spiced in this recipe as it just gives a warming back note but it can be swapped for your favourite spice or omitted all together.
How to make this Star Bread:
Note: The full recipe card with the full list of ingredients, instructions and step by step video are found at the bottom of this page.
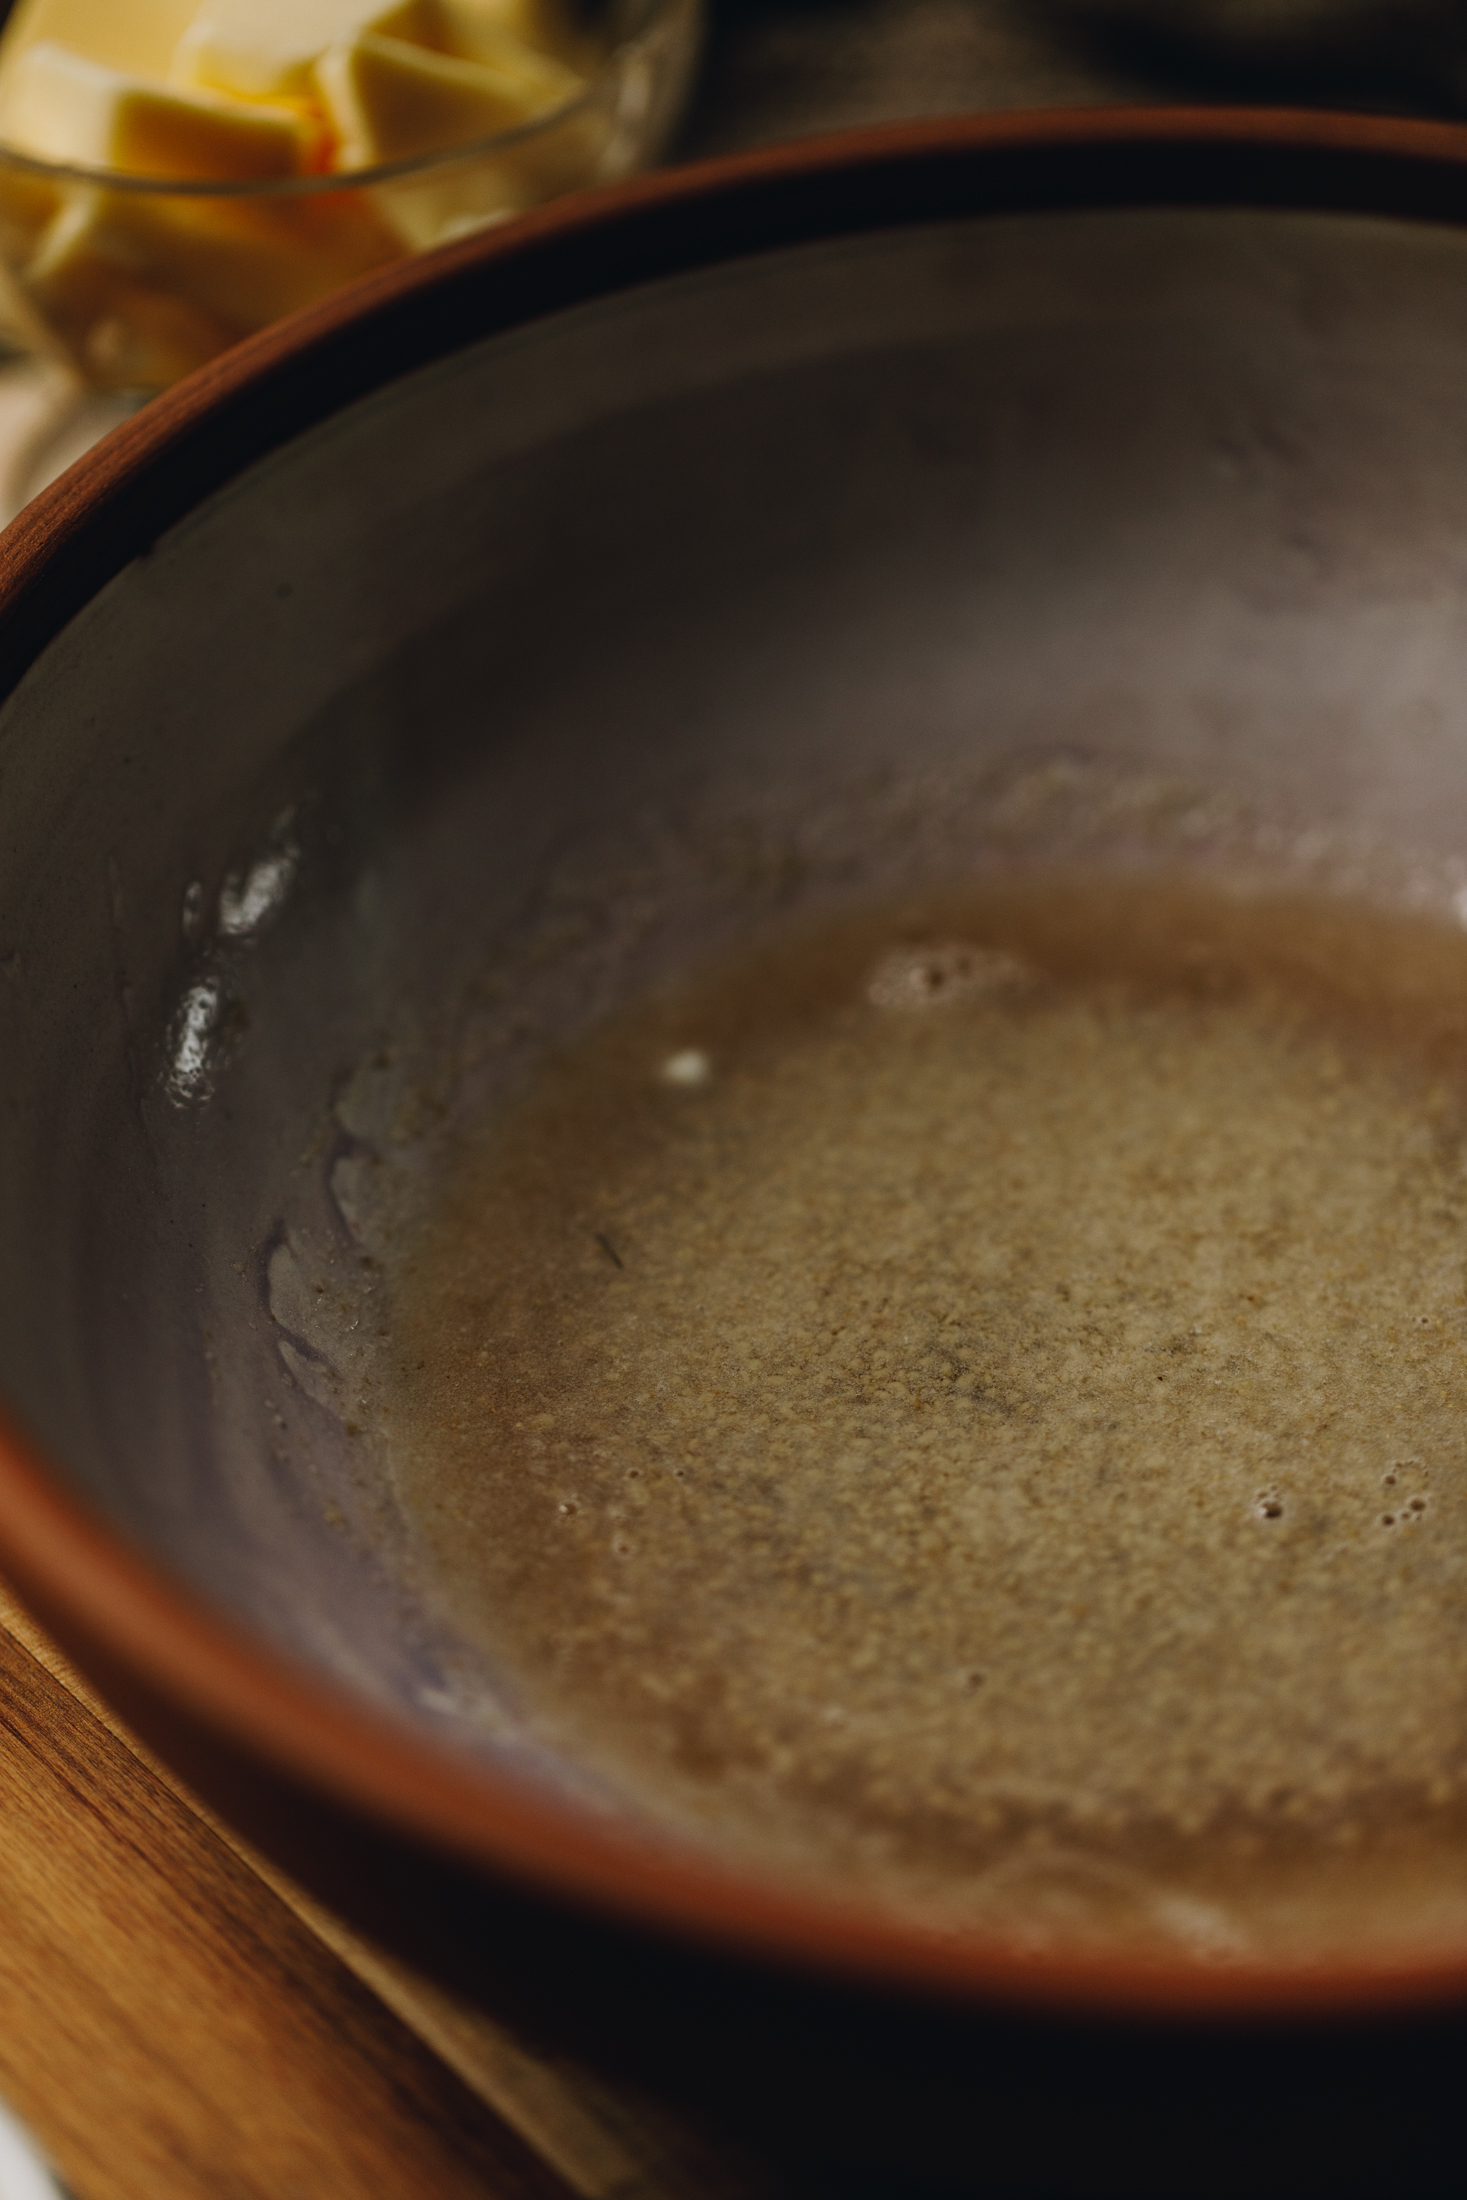
1. Activate the Yeast:
Add the wai aromahana (lukewarm water), huka hāura (brown sugar) and īhi (yeast) in to a large bowl.
Stir and leave it for 5 - 10 minutes until the yeast has risen to the top and is slightly foamy.
Note: Surebake or Breadmaker's yeast will always take slightly longer to activate.
2. Add the remaining Ingredients:
Add all of the remaining ingredients in to the activated yeast.
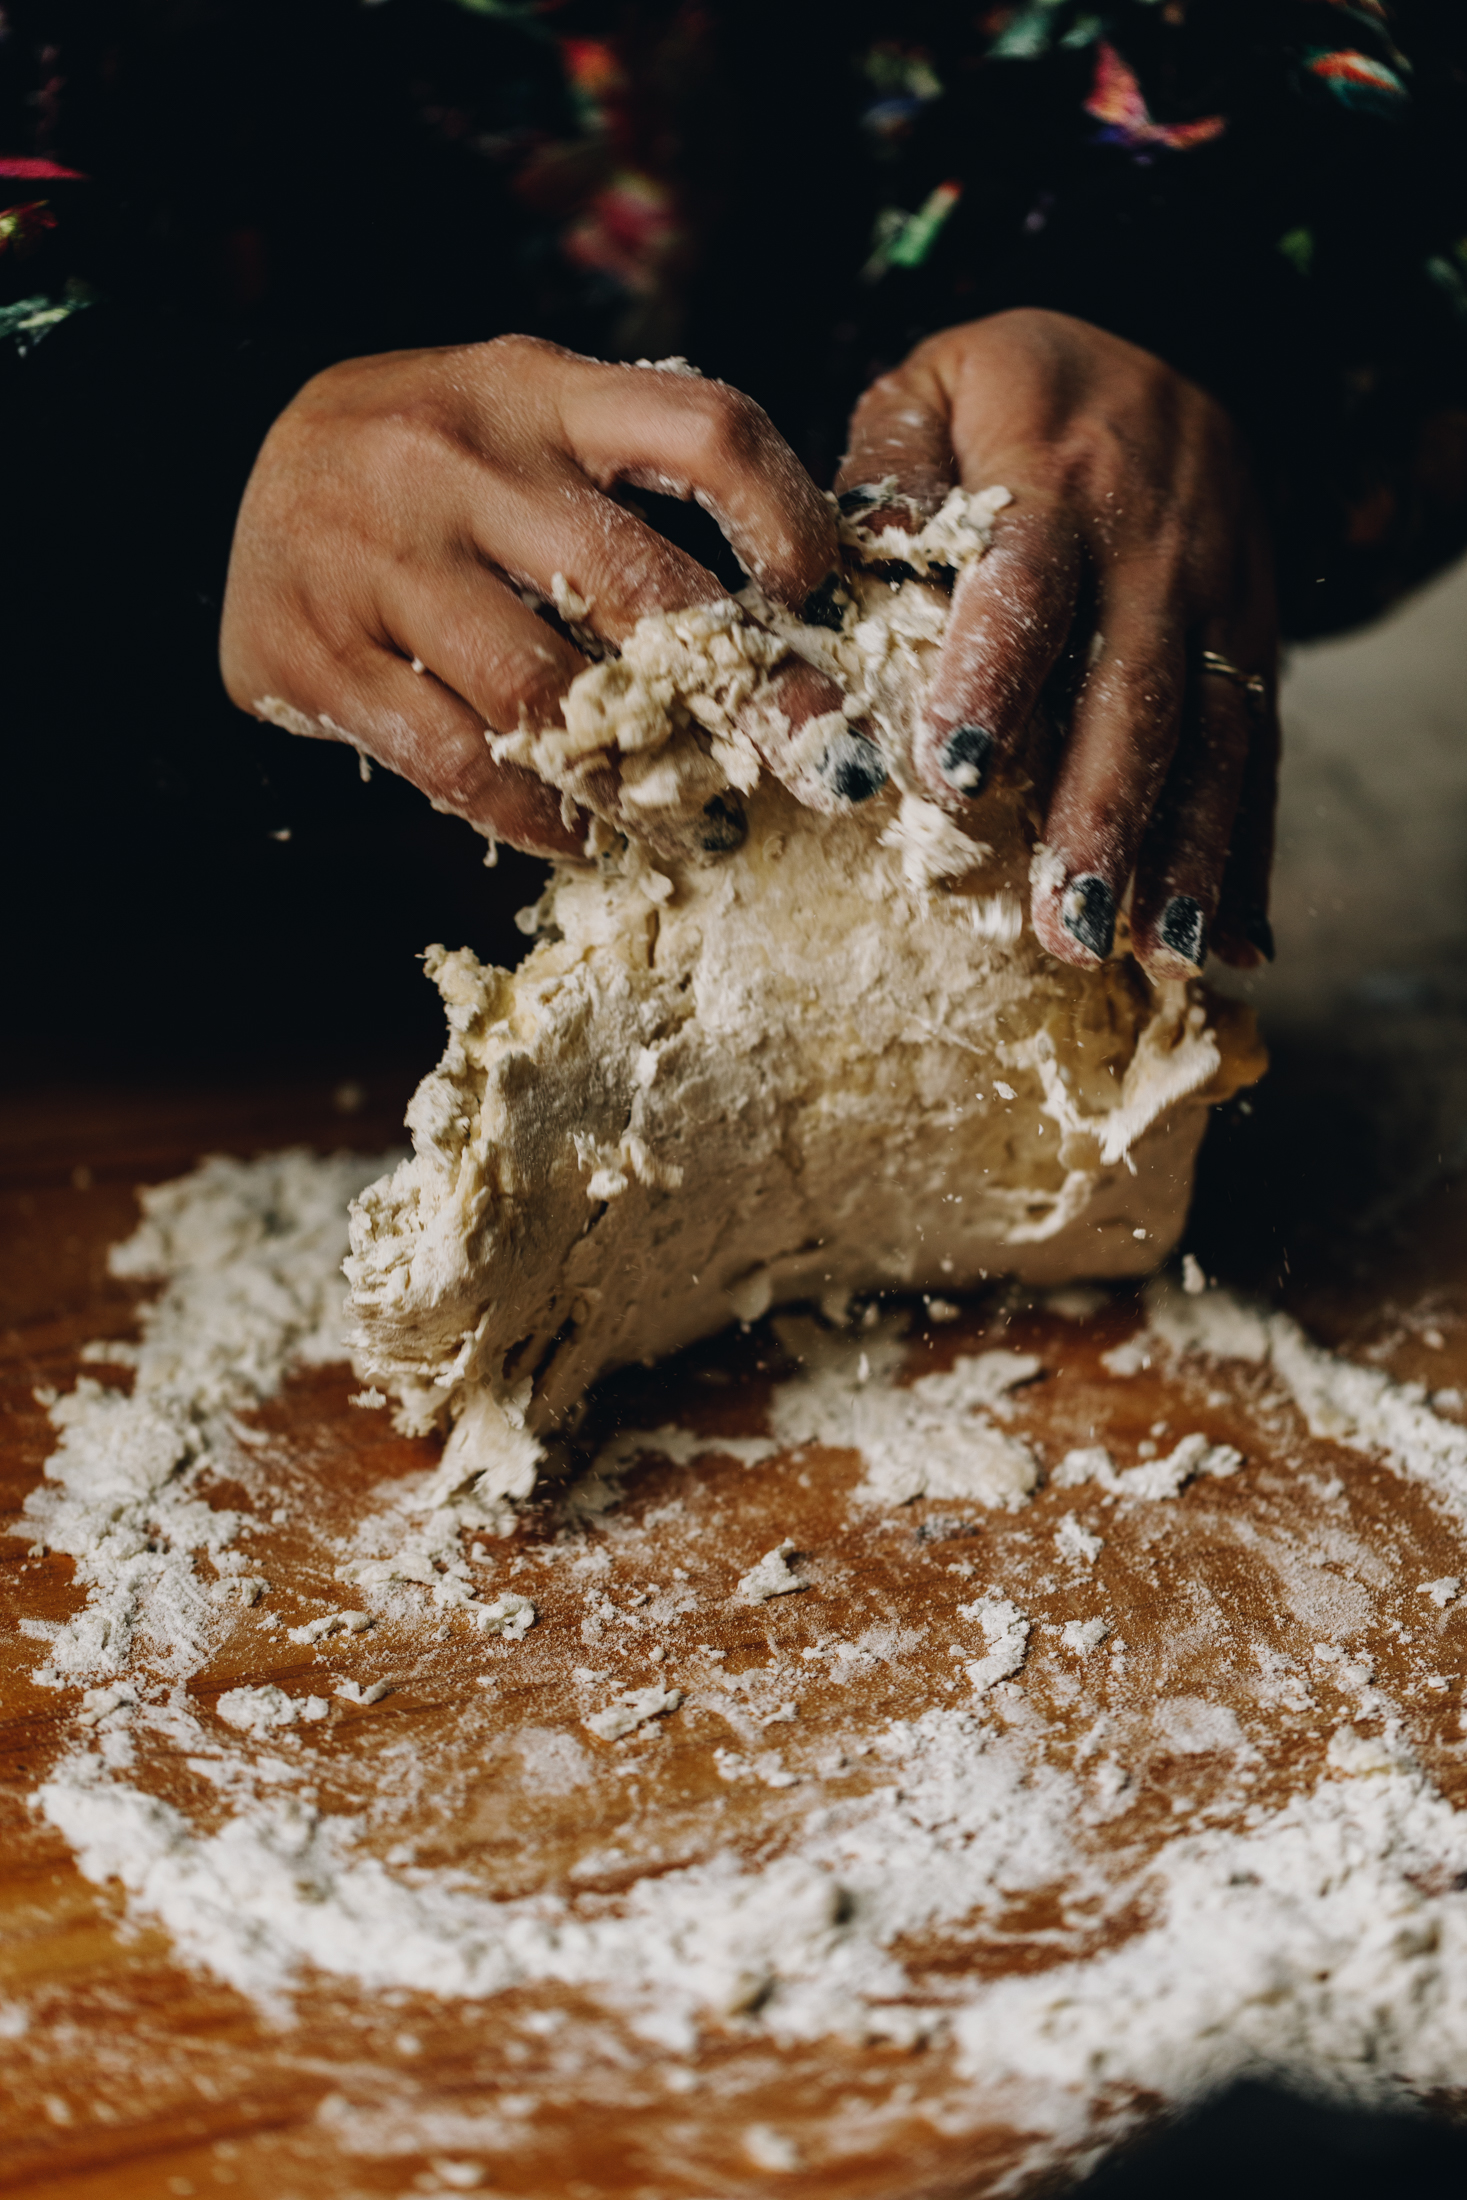
3. Knead the Dough:
Stir it until a rough forms. Then pokepokea te pokenga (knead the dough).
If you are using a stand mixer, add it to a mixing bowl and knead it for 5 - 7 minutes with a dough hook on medium speed.
If you are kneading by hand, knead it for 7 - 9 minutes on a lightly floured bench until soft and stretchy.
4. First Rise:
Place the dough in a lightly oiled bowl and cover with a bowl cover or a tea towel.
Leave the dough to rise for 1 ¼ - 1 ½ hours. It is ready when the dough has doubled in size.
5. Prepare the Chocolate for the Filling:
As the dough rises, grate the tiakarete hānati (hazelnut chocolate) in to a medium, heat-proof bowl. No need to grate it if your tiakarete (chocolate) does not have whole hānati (hazelnuts) in it, just chop it finely.
Gently melt it in the microwave in 20 second bursts, stirring well between each time. This should take a minute or just over.
You can also melt it gently in a heat-proof bowl that is sitting over a pot of barely simmering water (around 3cm deep). Make sure the bowl is not touching the water. Stir it occasionally until it is melted.
Once completely melted and smooth, remove from the heat and leave the tiakarete (chocolate) to cool for 5 minutes.

6. Whip the Butter and Sugar:
Add the pata kūteretere (softened butter) and huka hāura (brown sugar) in to a medium bowl.
Tāwhiuwhiua (whip it) for 2 minutes until light in colour.
Add in the raukikini whakauruuru (mixed spice), kōkō (cocoa) and wanira (vanilla).
Whip for 30 seconds or so until it is all incorporated.
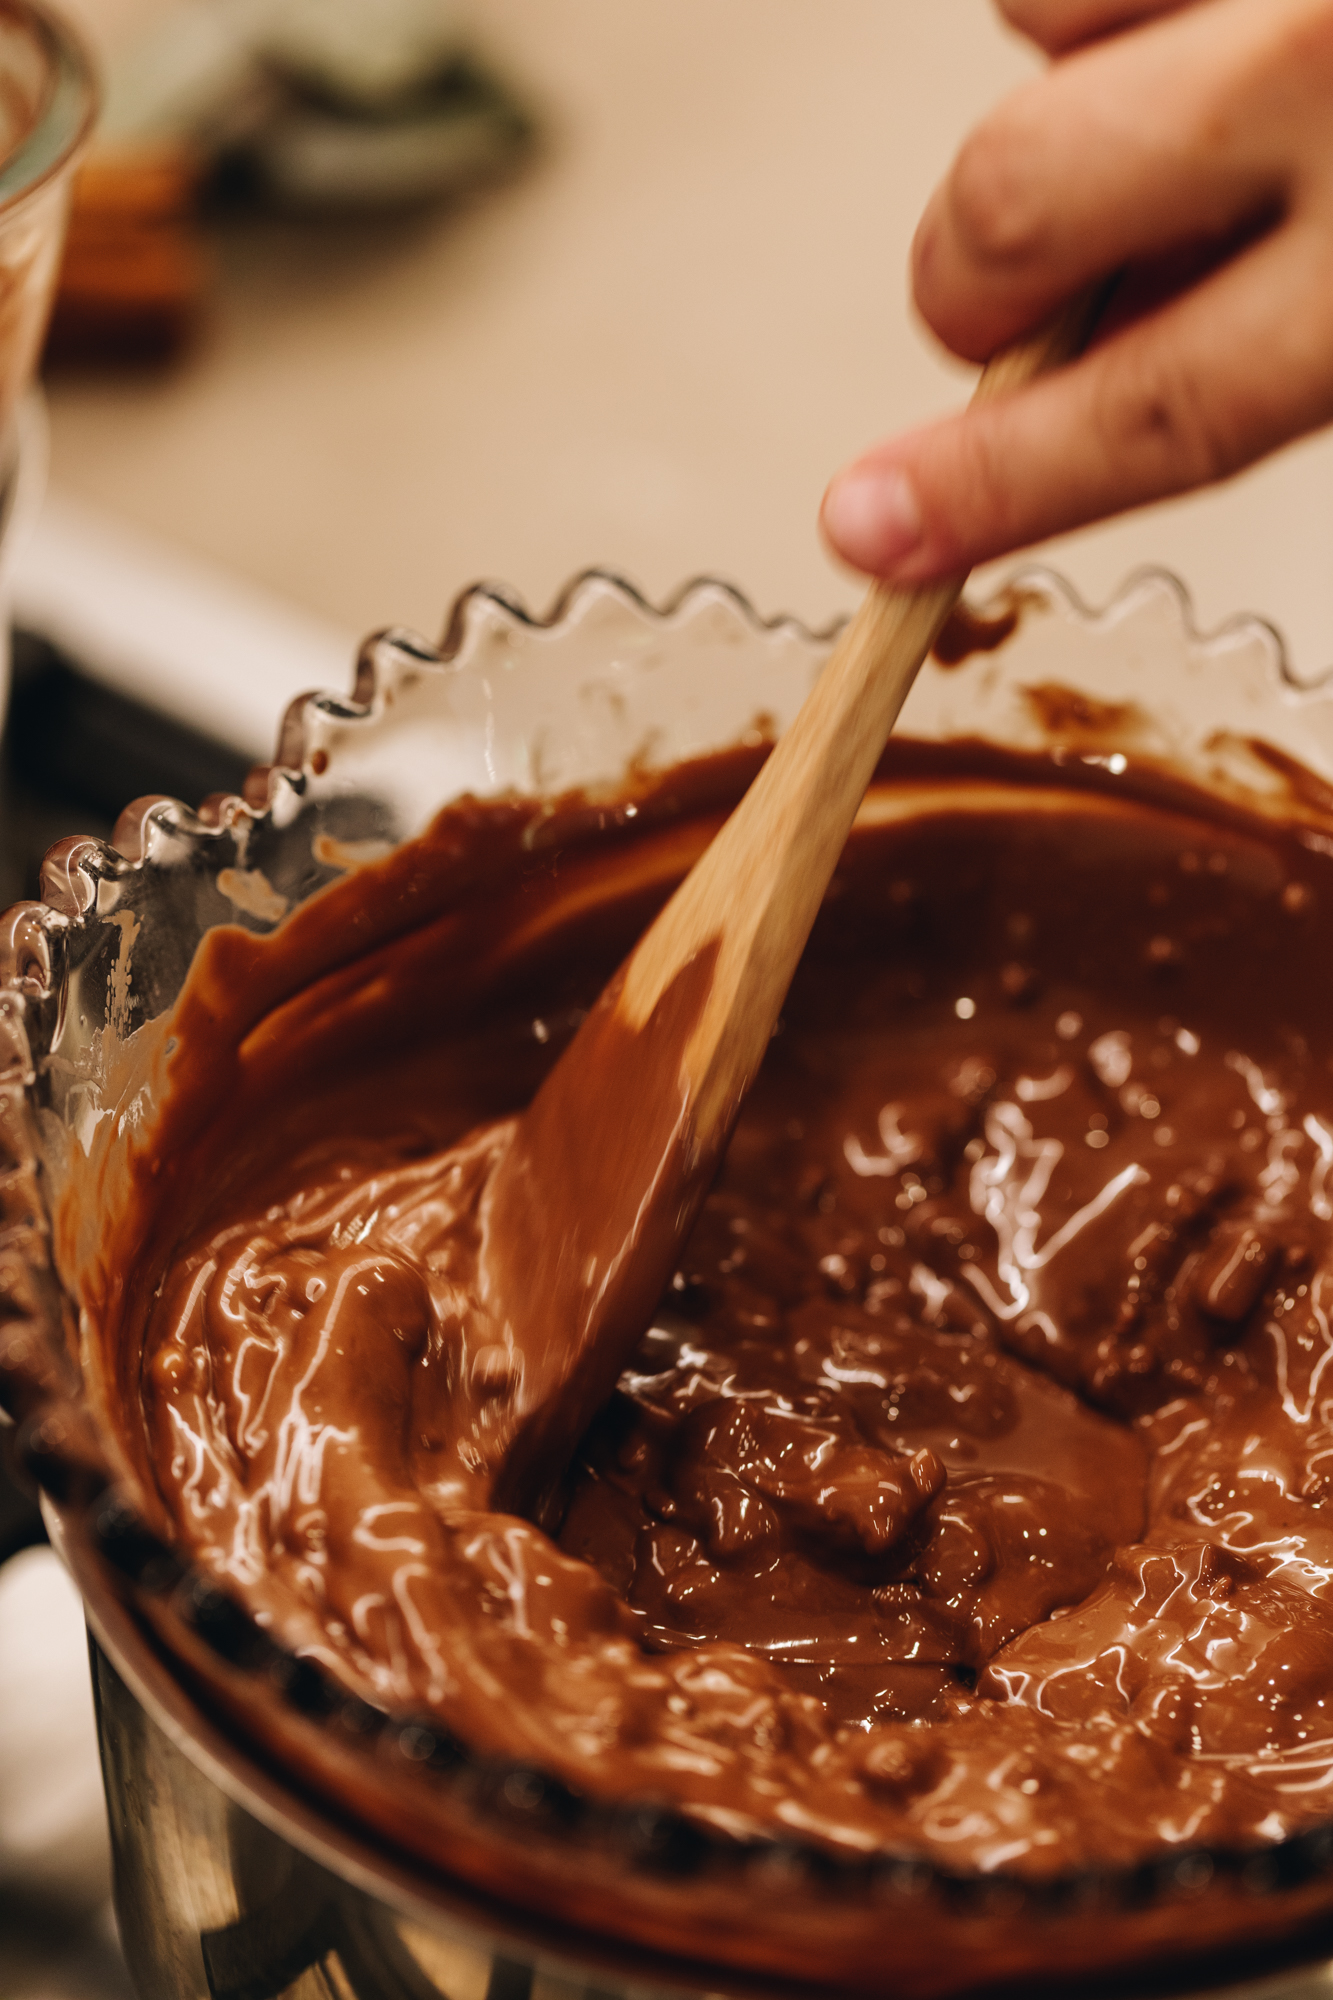
7. Add the Chocolate:
Fold through the tiakarete hānatai kua rewaina (melted hazelnut chocolate) and the filling is ready.
8. Prepare the Baking Tray:
Trace a 26 cm plate on to baking paper and flip it over as a guide for how big the pieces of dough should be.
9. Divide the Dough:
Once the dough has risen, cut the dough in to four equal pieces. I just eye-ball it but you can also weigh each piece if you want.
10. Add the First Layer of Dough and Filling:
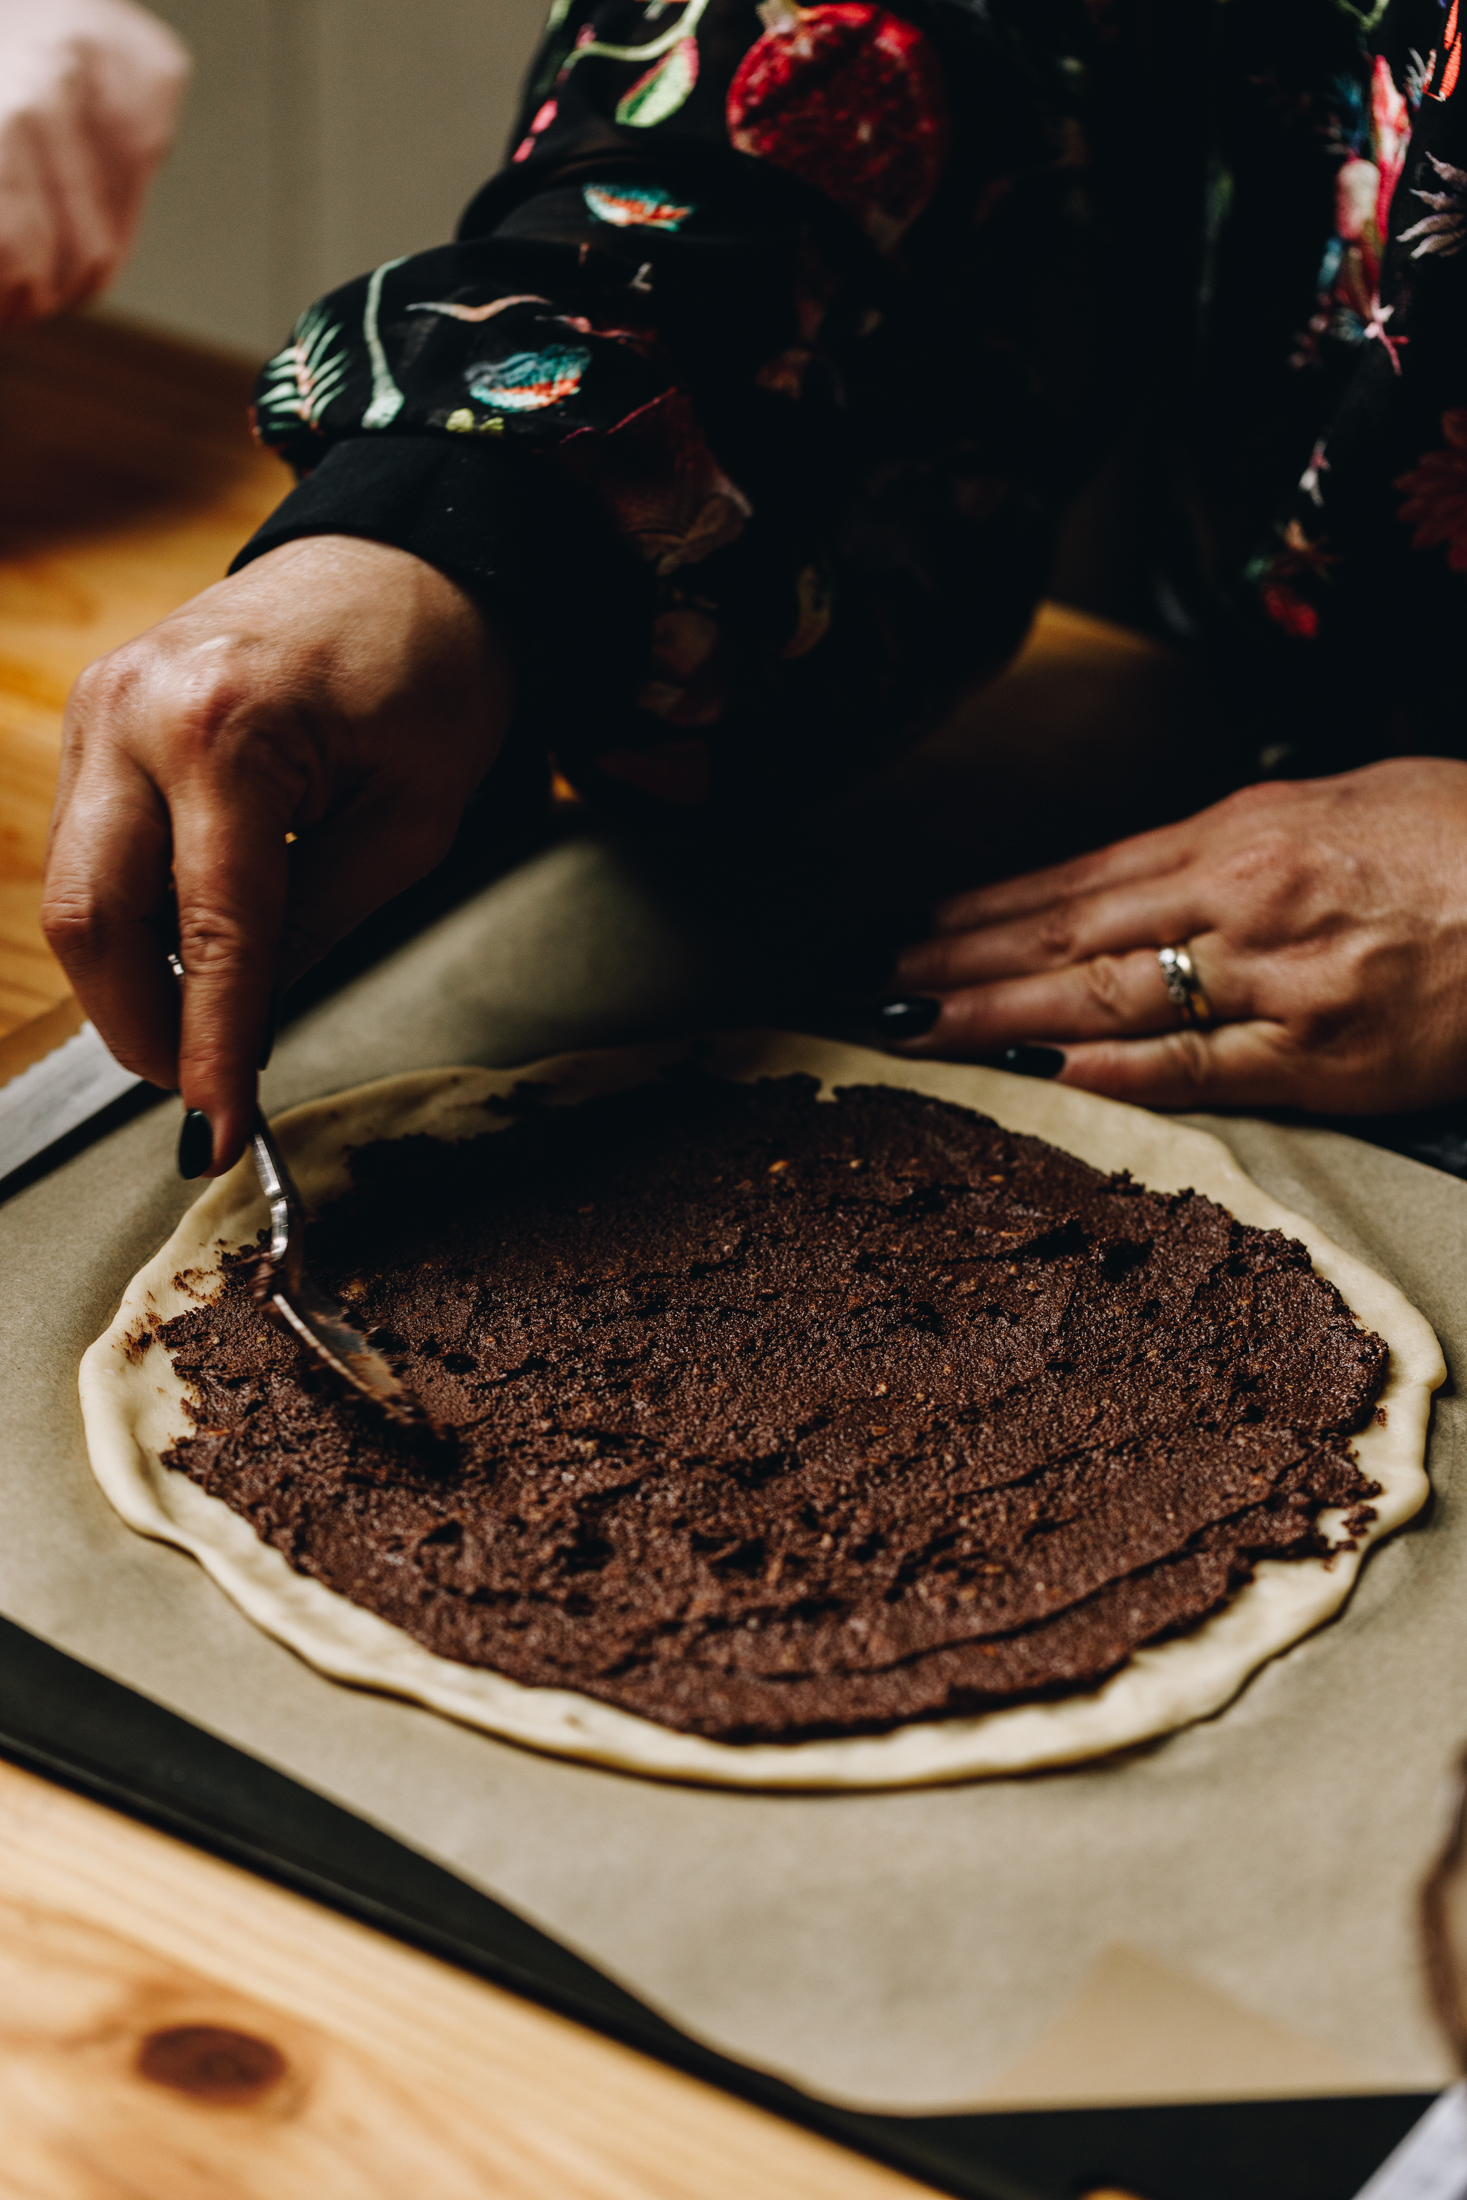
Roll out the first piece of dough and place it on the baking paper, stretching the dough to be the same size as the guide line.
Spread a third of the chocolate hazelnut mixture on to the circle, leave the outer 1 cm edge free from any spread.
11. Add the Second, Third and Fourth Layer:
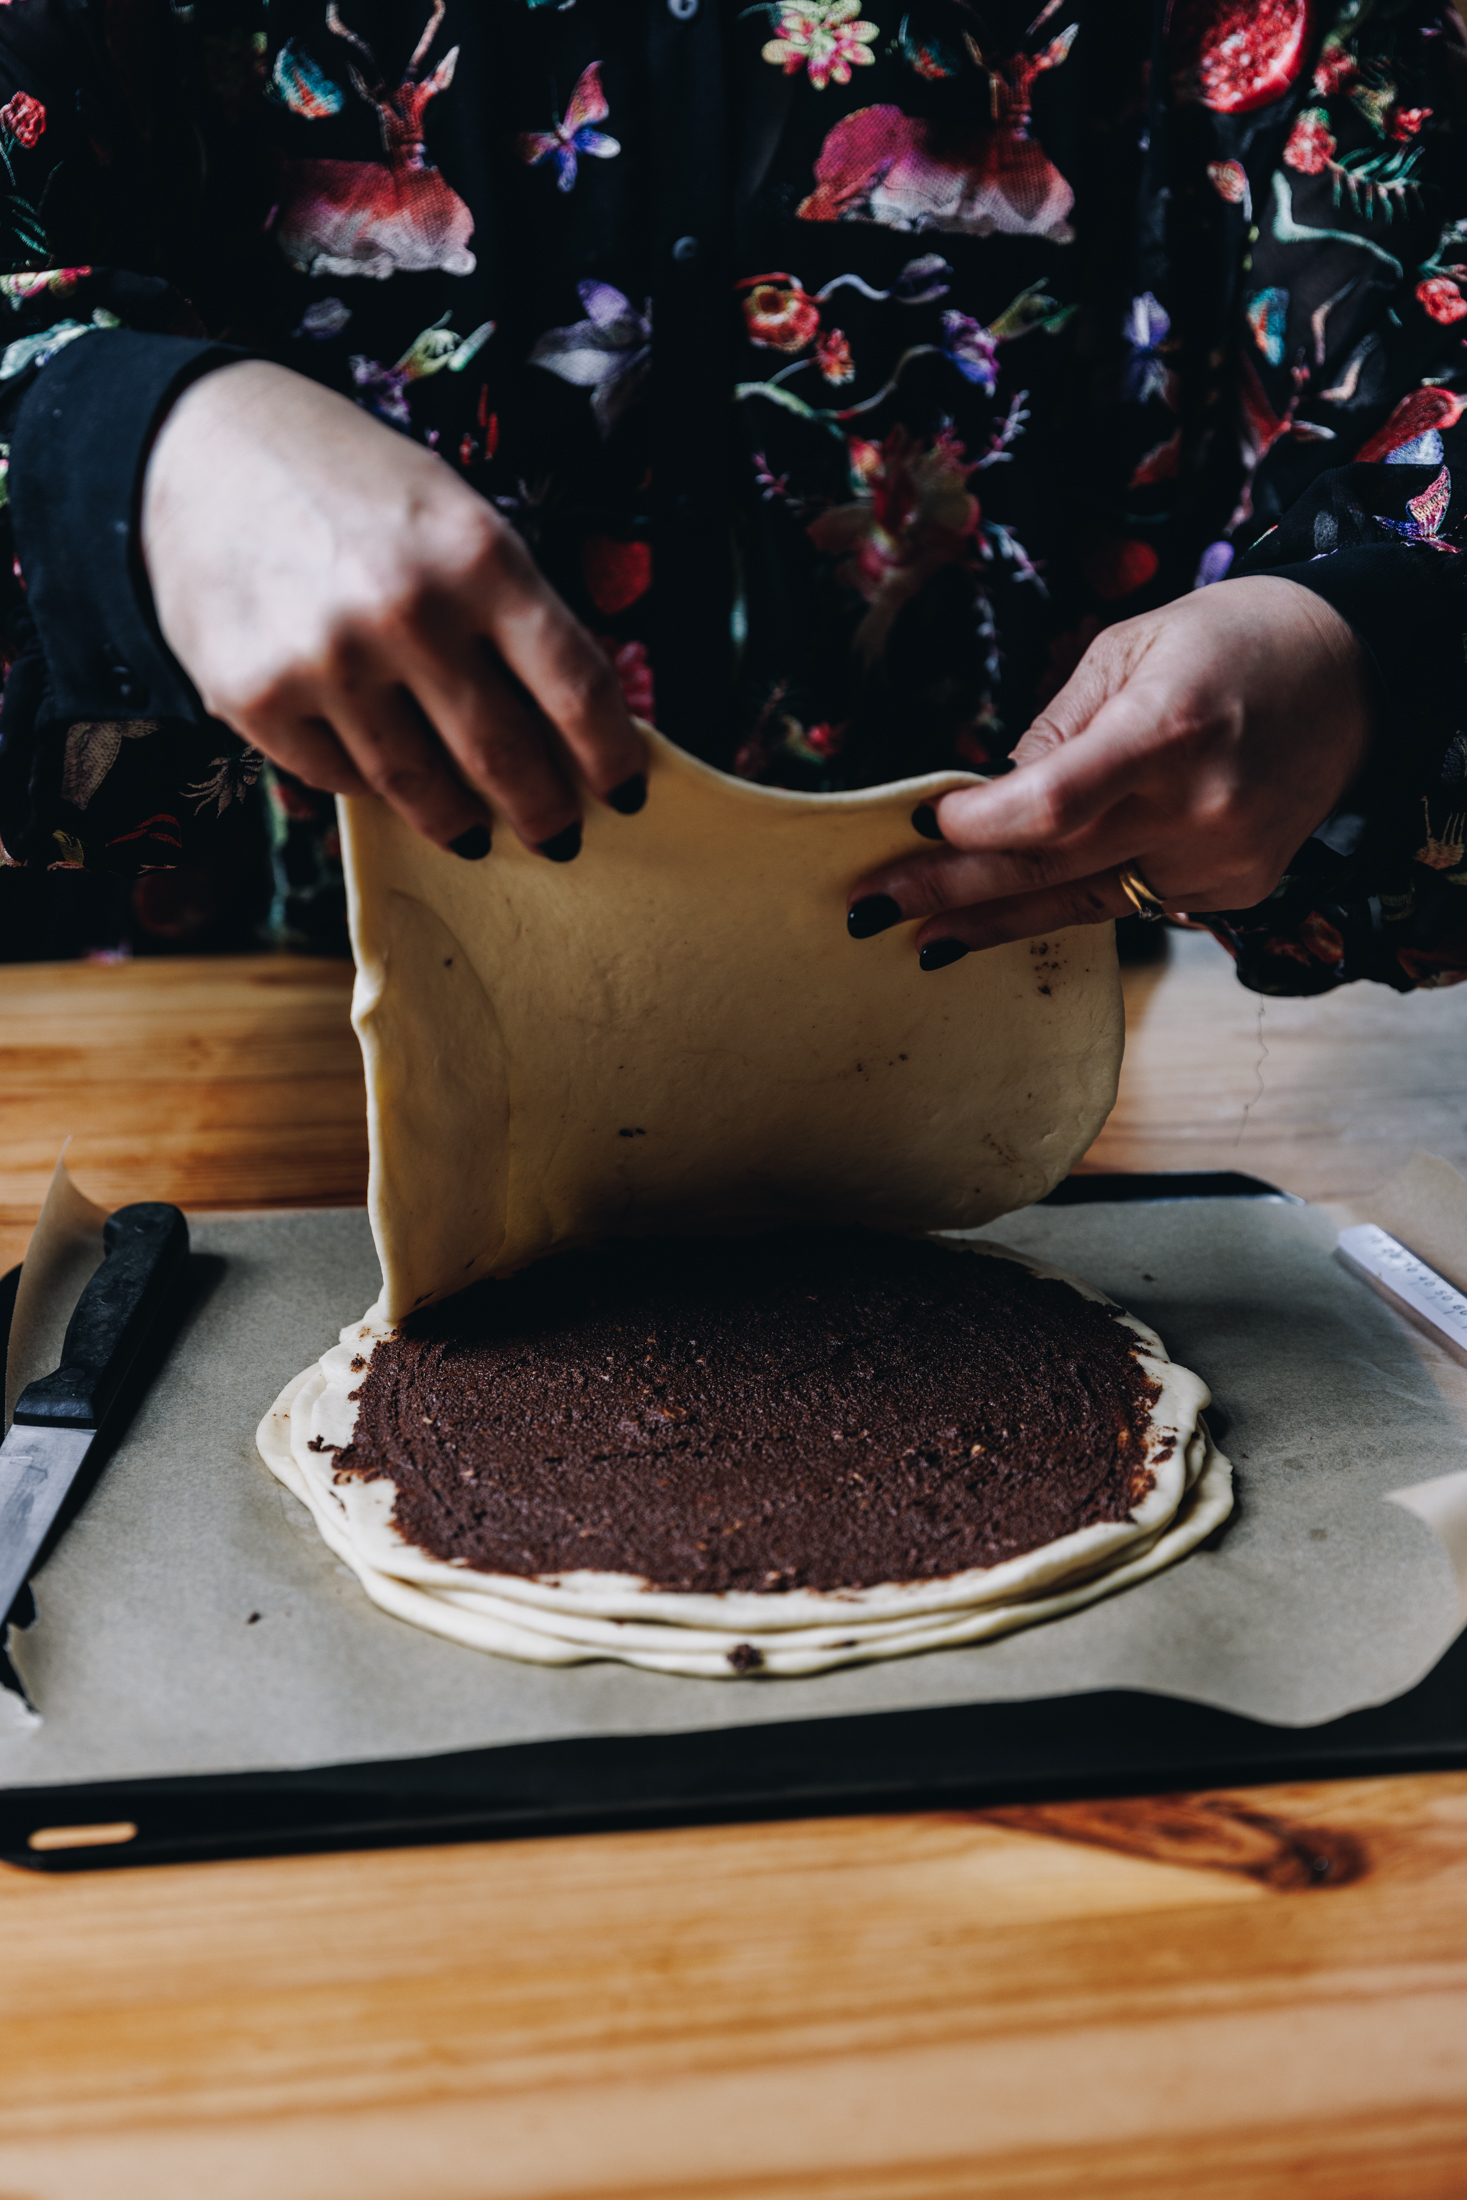
Roll out and lay the next circle of dough on top and spread over another third of the filling.
Repeat this process with the remaining two pieces but keep the fourth circle of dough clear of filling.
12. Cut the Dough:
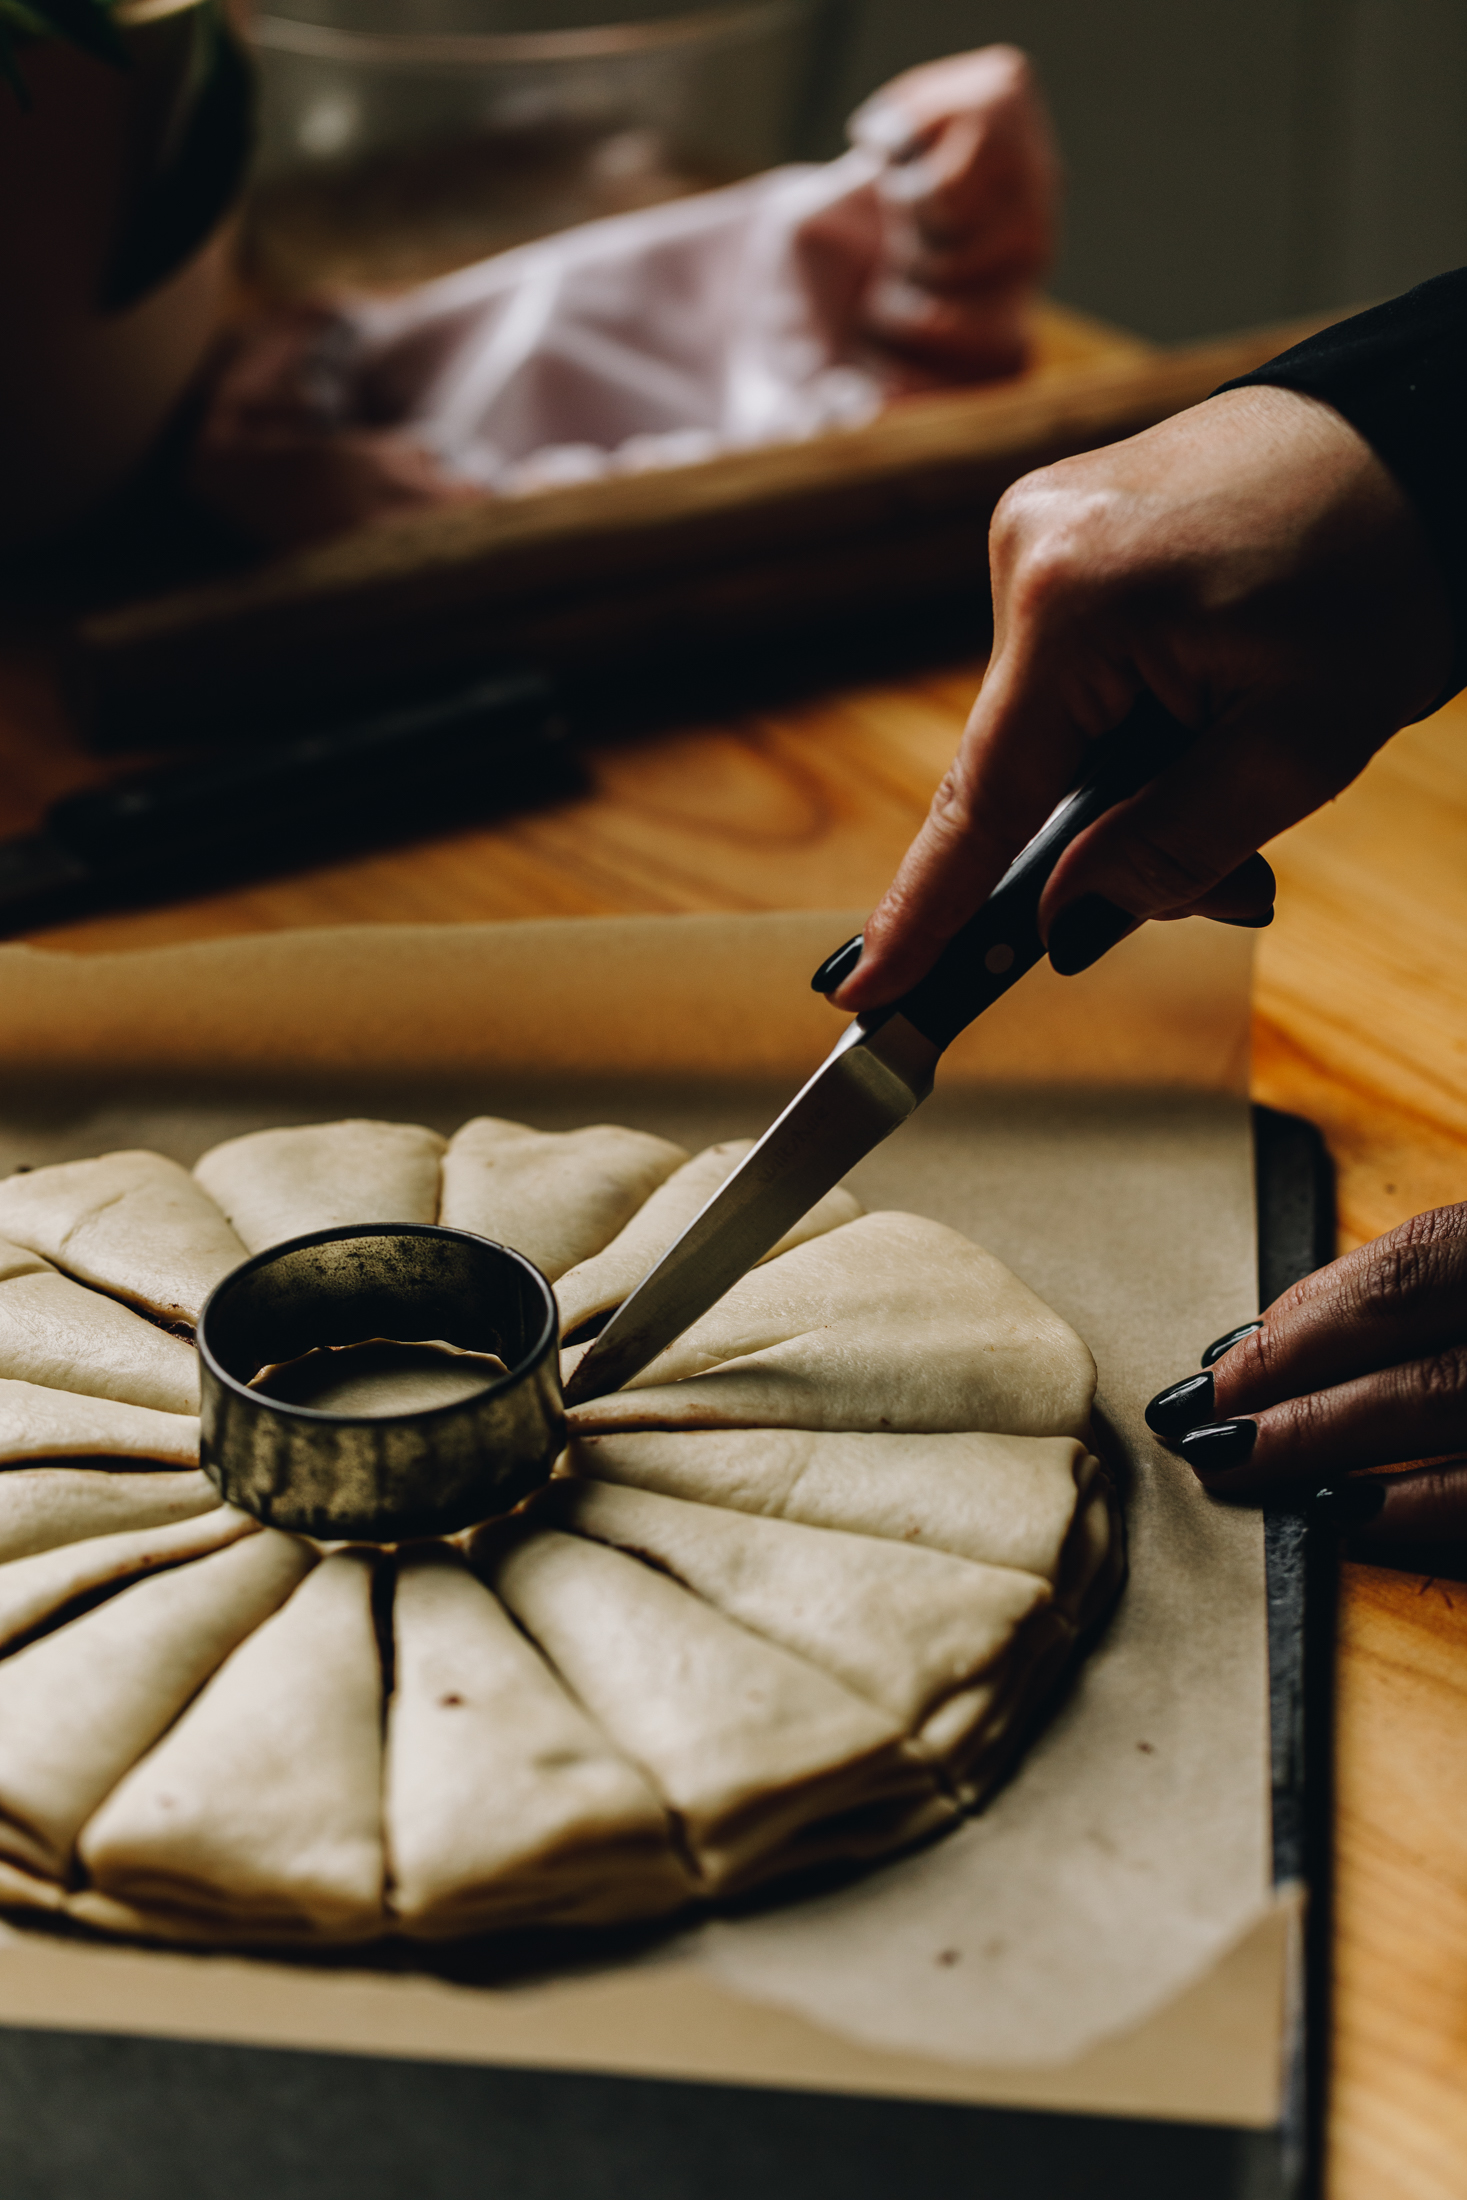
Place a 6 cm cup in the middle of the circle.
Cut the dough in to 16 equal pieces, cutting from the edge of the cup to the outer edge.
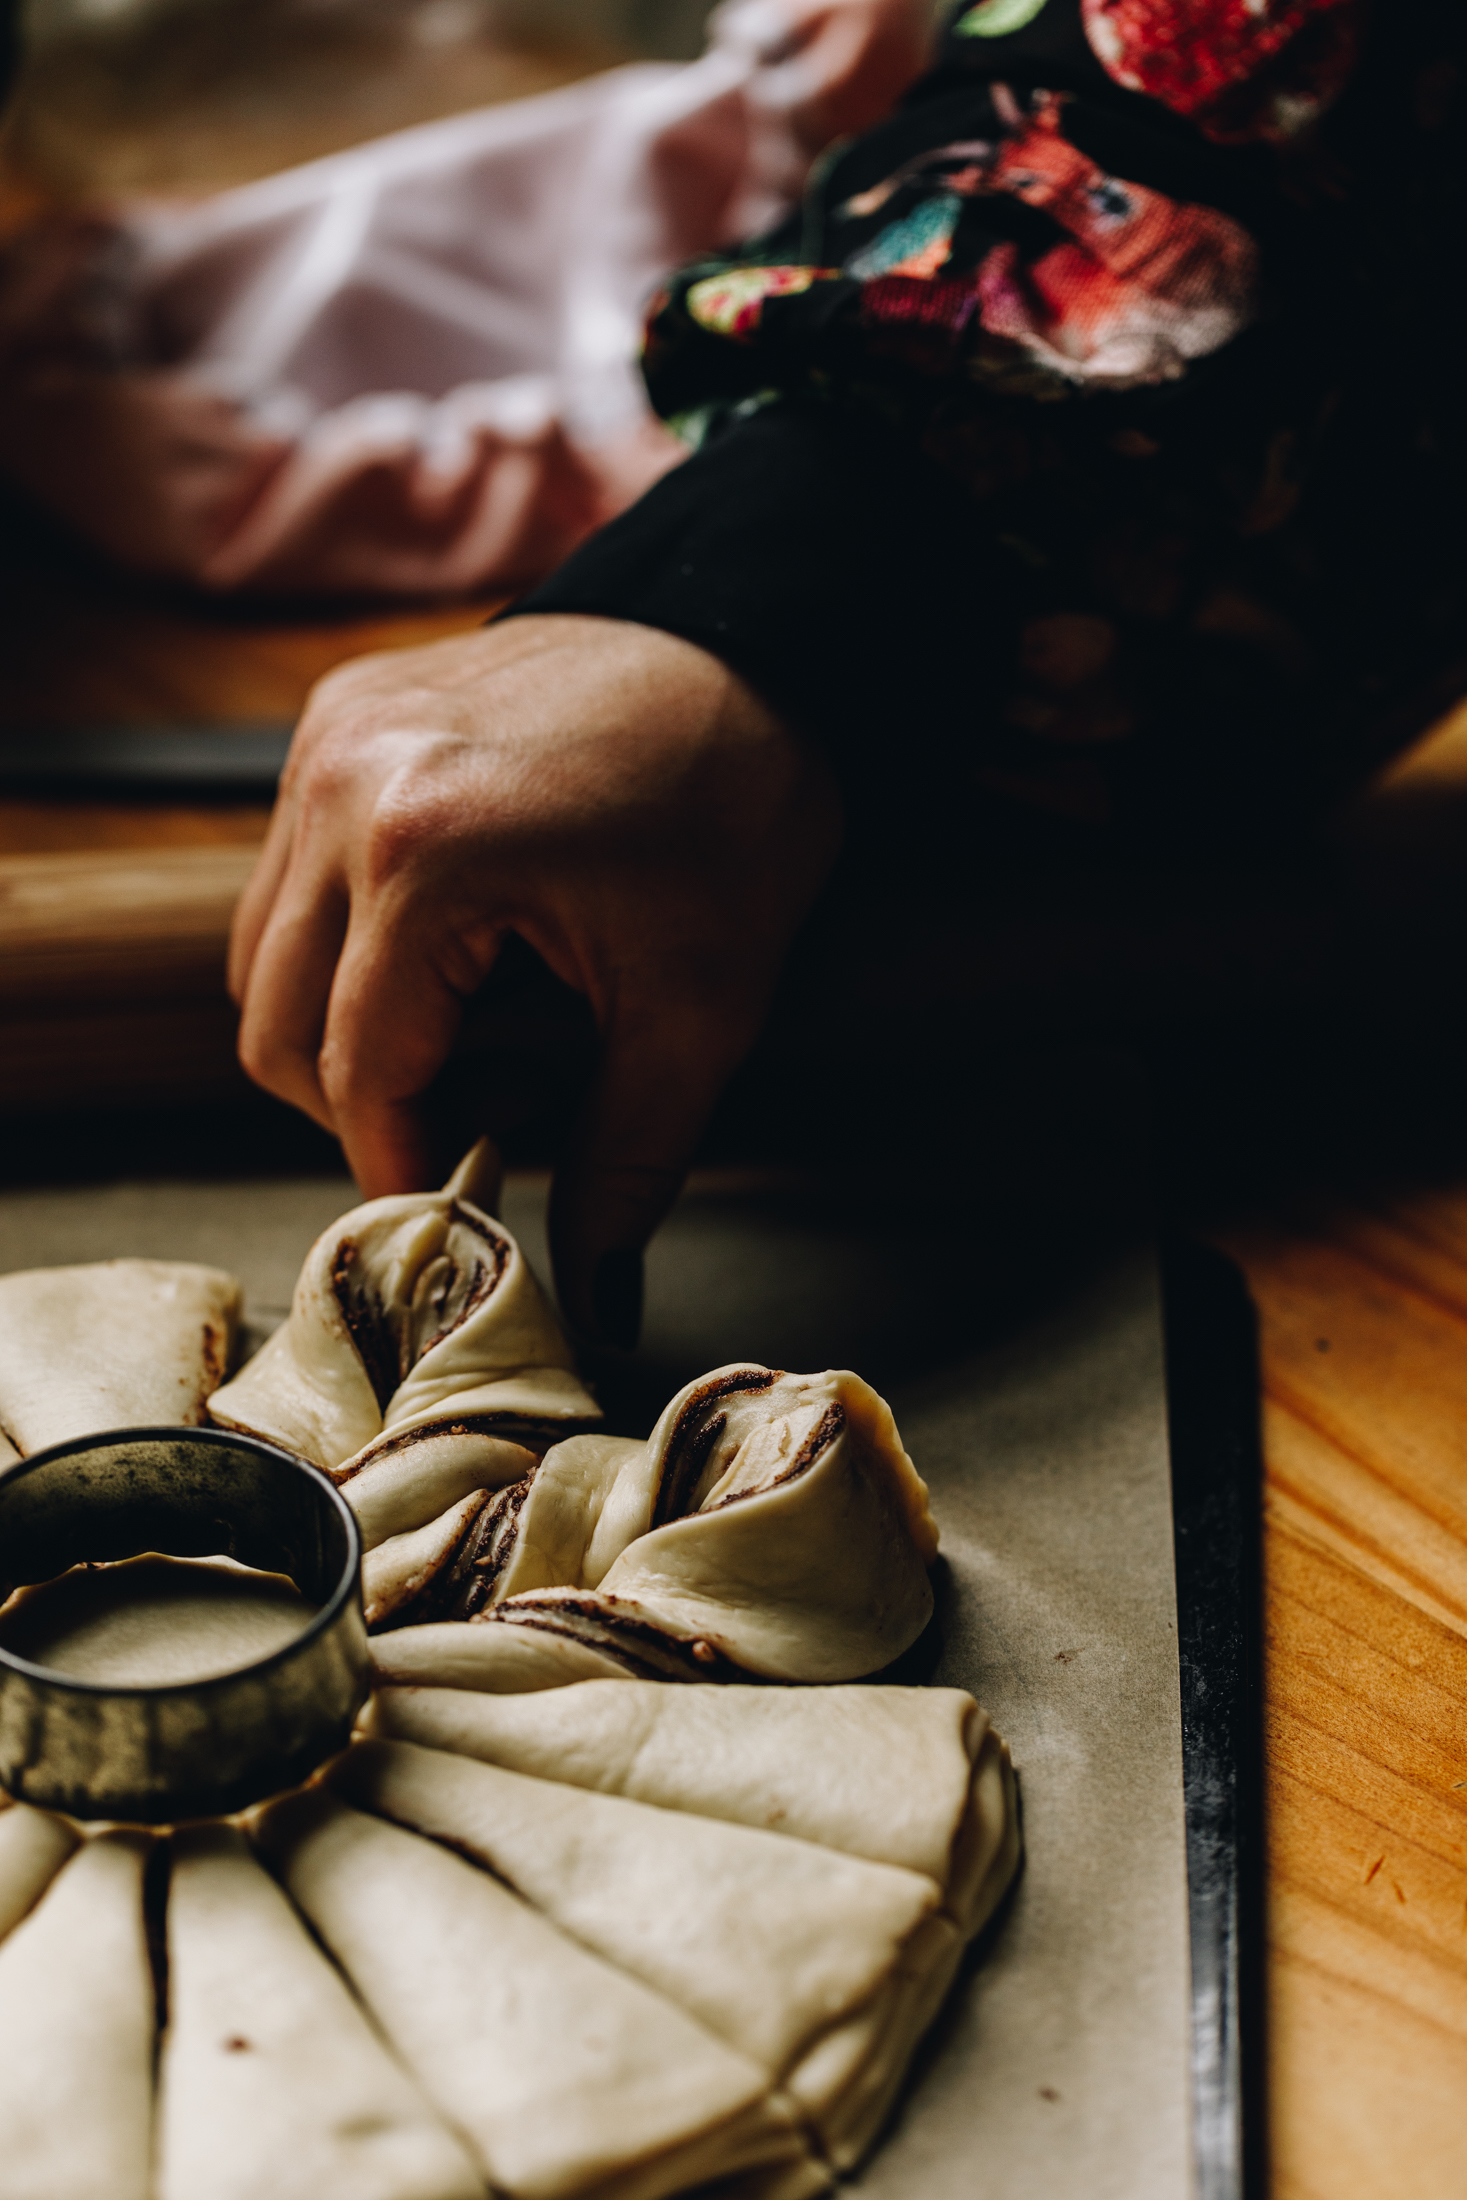
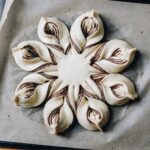
13. Twist the Dough:
Take two pieces of dough, twist them outwards two times and squeeze the ends together.
Repeat this with the remaining strands, creating eight twisted points.
A star is created! Take a moment to step back and look at what you have made! Te mutunga mai o te ātaahua - how beautiful!
14. Second Rise:
Cover the tray with a tea towel and leave it on the bench to rise for 30 minutes.
15. Preheat the Oven:
Preheat the oven to 180 °C, bake setting or 170 °C, bake setting.
Once the dough has risen, pinch together any of the ends that have opened up and place the tray in to the oven.
Bake for 20 - 25 minutes until golden.
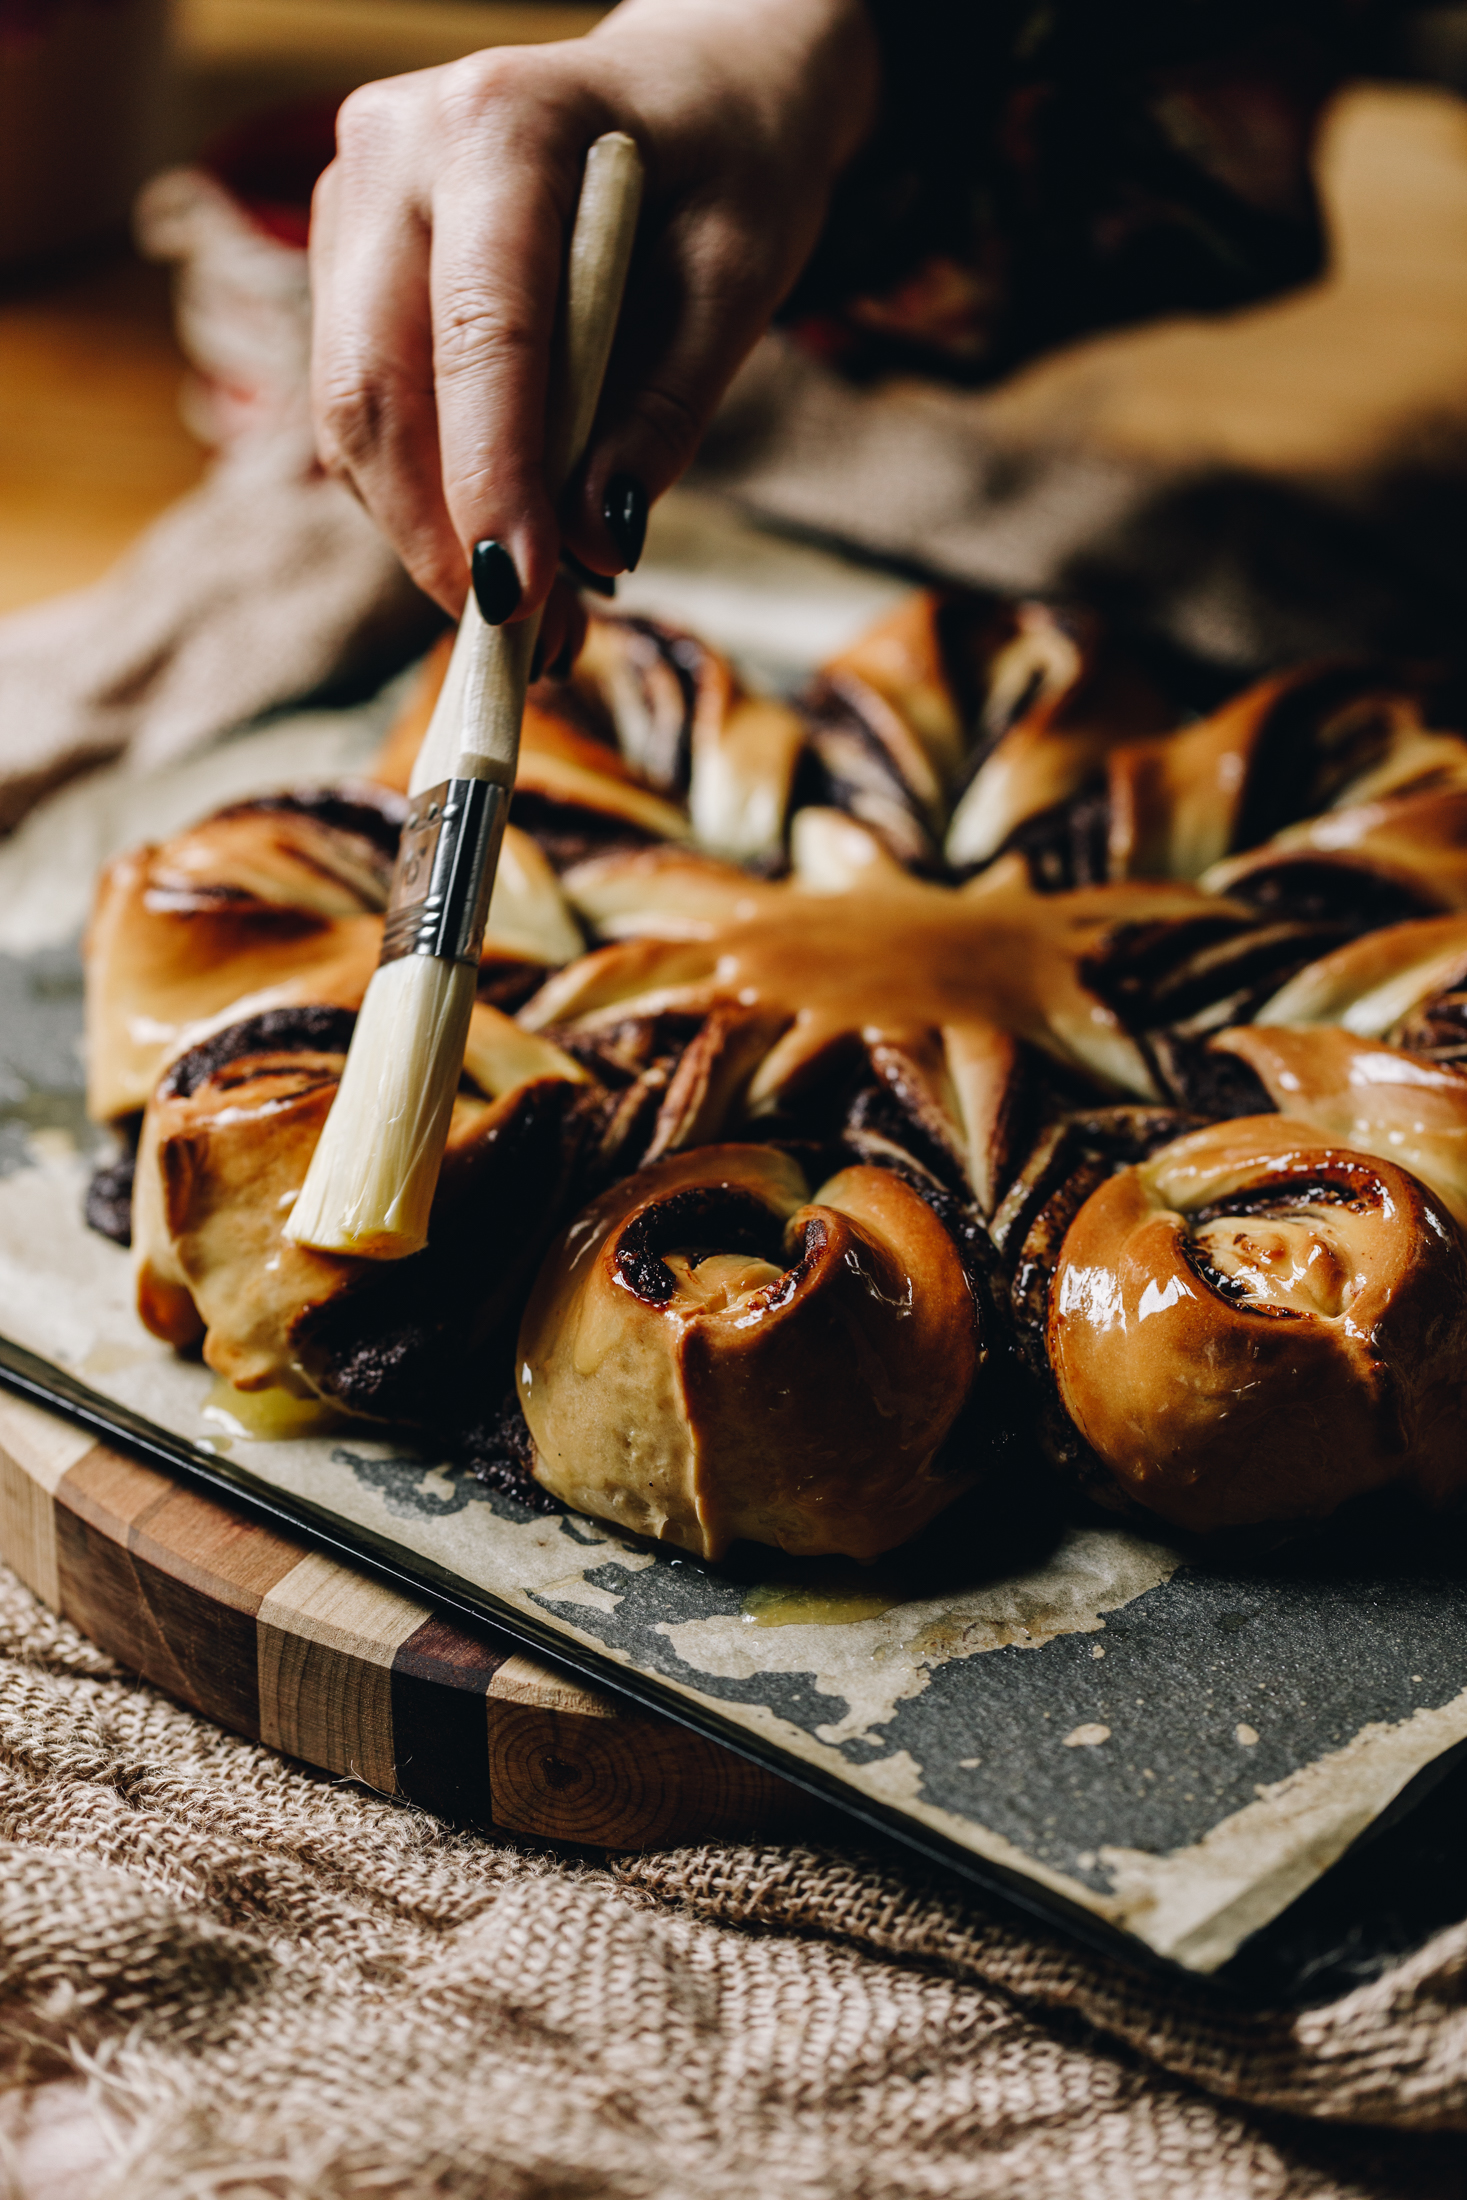
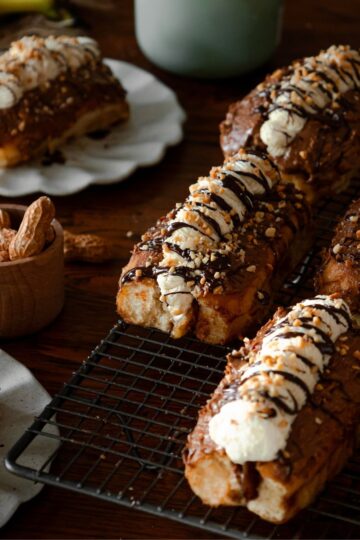
16. Add the Finishing Touches:
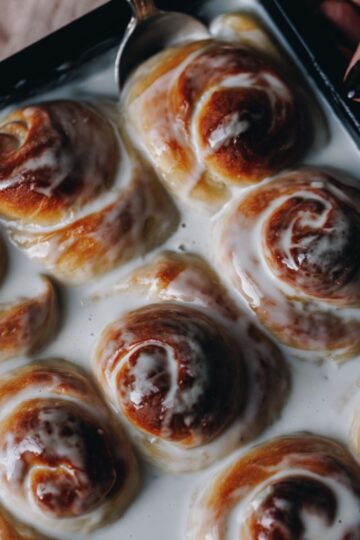
Brush the parāoa whetū (star bread) with pata kua rewaina (melted butter) and sift over the puehu huka (icing sugar).
Or if you want a more glossy finish, mix the pata (butter) and marahihi māpere (maple syrup) together and brush it over the hot bread.
Eat warm!

Storing the Chocolate Star Bread:
This parāoa (bread) is always going to be at its best fresh from the oven.
Store in an airtight container at room temperature for 1–2 days.
Freeze for longer storage.
Thaw and warm in the oven or air fryer to serve
Take a moment to explore all of our
Parāoa (Bread) Recipes
Fresh parāoa (bread) shared with your loved ones is a special moment indeed.

DID YOU ENJOY THIS RECIPE?
It would be so awesome if you could please leave a review/comment by clicking the “leave a comment” section at the top of the page.
I love seeing you all make my creations, so send a whakaahua (photo) or kiriata (video) to my Instagram and show me what you made. Let me know if you have any pātai (questions) too, I would love to help.
Star Bread - Parāoa Whetū
Ingredients
Sweet Dough - Pokenga Reka
- ⅓ C (85 ml) wai aromahana (lukewarm water)
- 2 tablespoon (30 g) huka hāura (brown sugar)
- 2 ½ teaspoon īhi Surebake (Surebake/Breadmakers yeast) OR use 1 ¼ teaspoon īhi tere (instant yeast)
- ¾ C (185 ml) miraka (milk)
- ¼ C (35 g) paura miraka (milk powder OR swap it for ¼ C of puehu parāoa (flour)
- 2 teaspoon wanira (vanilla)
- ½ teaspoon tote (salt, fine)
- 2 ¾ C (410 g) puehu parāoa kounga (high grade flour)
- 60 g pata kūteretere (softened butter)
Hazelnut Spread - Pani Hānati
- 100 g tiakarete hānati (hazelnut chocolate, this can be swapped for any other flavoured chocolate)
- 50 g pata kūteretere (softened butter)
- ¼ C (50 g) huka hāura (brown sugar)
- 1 teaspoon raukikini whakauruuru (mixed spice)
- 2 tablespoon kōkō (cocoa)
- 1 teaspoon wanira (vanilla)
Decorations - Ngā Whakarākei (optional)
- 20 g pata kua rewaina (melted butter)
- 2 tablespoon puehu huka (icing sugar) or the same amount of marahihi māpere (maple syrup)
Instructions
Activate the Yeast:
- Add the wai aromahana (lukewarm water), huka hāura (brown sugar) and īhi (yeast) in to a large bowl. Stir and leave it for 5 - 10 minutes until the yeast has risen to the top and is slightly foamy.
Add the remaining Ingredients:
- Add all of the remaining ingredients in to the activated yeast.
Knead the Dough:
- Stir it until a rough forms and then pokepokea te pokenga (knead the dough).
- If you are using a stand mixer, add it to a mixing bowl and knead it for 5 - 7 minutes with a dough hook on medium speed.
- If you are kneading by hand, knead it for 7 - 9 minutes on a lightly floured bench until soft and stretchy.
First Rise:
- Place the dough in a lightly oiled bowl and cover with a bowl cover or a tea towel.
- Leave the dough to rise for 1 ¼ - 1 ½ hours. It is ready when the dough has doubled in size.
Prepare the Chocolate for the Filling:
- As the dough rises, grate the tiakarete hānati (hazelnut chocolate) in to a medium, heat-proof bowl. No need to grate it if your tiakarete (chocolate) does not have whole hānati (hazelnuts) in it, just chop it finely.
- Gently melt it in the microwave in 20 second bursts, stirring well between each time. This should take a minute or just over.
- You can also melt it gently in a heat-proof bowl that is sitting over a pot of barely simmering water (around 3cm deep). Make sure the bowl is not touching the water. Stir it occasionally until it is melted.
- Once completely melted and smooth, remove from the heat and leave the tiakarete (chocolate) to cool for 5 minutes.
Whip the Butter and Sugar:
- Add the pata kūteretere (softened butter) and huka hāura (brown sugar) in to a medium bowl.
- Tāwhiuwhiua (whip it) for 2 minutes until light in colour.
- Add in the raukikini whakauruuru (mixed spice), kōkō (cocoa) and wanira (vanilla). Whip for 30 seconds or so until it is all incorporated.
Add the Chocolate:
- Fold through the tiakarete hānatai kua rewaina (melted hazelnut chocolate) and the filling is ready.
Prepare the Baking Tray:
- Trace a 26 cm plate on to baking paper and flip it over as a guide for how big the pieces of dough should be.
Divide the Dough:
- Once the dough has risen, cut the dough in to four equal pieces. I just eye-ball it but you can also weigh each piece if you want.
Add the First Layer of Dough and Filling:
- Roll out the first piece of dough and place it on the baking paper, stretching the dough to be the same size as the guide line.
- Spread a third of the chocolate hazelnut mixture on to the circle, leave the outer 1 cm edge free from any spread.
Add the Second, Third and Fourth Layer:
- Roll out and lay the next circle of dough on top and spread over another third of the filling. Repeat this process with the remaining two pieces but keep the fourth circle of dough clear of filling.
Cut the Dough:
- Place a 6 cm cup in the middle of the circle.
- Cut the dough in to 16 equal pieces, cutting from the edge of the cup to the outer edge.
Twist the Dough:
- Take two pieces of dough, twist them outwards two times and squeeze the ends together.
- Repeat this with the remaining strands, creating eight twisted points.
- A star is created! Take a moment to step back and look at what you have made! Te mutunga mai o te ātaahua - how beautiful!
Second Rise:
- Cover the tray with a tea towel and leave it on the bench to rise for 30 minutes.
Preheat the Oven:
- Preheat the oven to 180 °C, bake setting or 170 °C, bake setting.
- Once the dough has risen, pinch together any of the ends that have opened up and place the tray in to the oven.
- Bake for 20 - 25 minutes until golden.
Add the Finishing Touches:
- Brush the parāoa whetū (star bread) with pata kua rewaina (melted butter) and sift over the puehu huka (icing sugar). Or if you want a more glossy finish, mix the pata (butter) and marahihi māpere (maple syrup) together and brush it over the hot bread. Eat warm!
Storing the Chocolate Star Bread:
- This parāoa (bread) is always going to be at its best fresh from the oven.If you have any left, store in a plastic container or bag for a day or so. Warm it gently in the oven or air fryer to bring it back to life.
- Anything beyond a day, store the parāoa (bread) in a plastic bag and freeze it. Gently toast or reheat it when you are ready.
Video
Pro Tips:
Yeast activation timing:
If you are using Surebake or Breadmaker’s yeast, note that it will take around twice as long to activate compared to īhi horo (instant yeast). Be patient and allow it enough time to bloom properly before continuing, it should be foamy and the īhi (yeast) should rise to the top.
Choosing the right chocolate:
When I first developed this recipe, I used chocolate with whole hazelnuts. These days, I prefer Whittaker’s Hazella, which has a smooth, melty hazelnut centre.
If you’re using chocolate with large hazelnut pieces, grate it for a better filling. If you’re using a smooth-filled chocolate, you can simply melt it instead—no grating needed.
Troubleshooting
How to know your yeast is ready:
Always give your yeast enough time to activate before adding dry ingredients. It should become foamy and float to the top when it’s ready. If there’s no foam, the yeast may be inactive and you’ll need to start again.
Don’t over-flour your dough:
Avoid adding too much extra puehu parāoa (flour) while kneading. The dough should remain soft and slightly tacky. Adding too much flour can result in dense, tough parāoa (bread) once baked.
Storage tips:
This parāoa (bread) is always going to be at its best fresh from the oven.
If you have any left, store in a plastic bag for a day or so. Anything beyond a day, store the parāoa (bread) in a plastic bag and freeze it. Gently toast or reheat it when you are ready.
Frequently Asked Questions:
Āe (yes), you can prepare the dough the night before. Prepare the dough, knead it and place it in a bowl and cover it with a plastic bag or bowl cover. Let it slowly rise in the fridge for up to 16 hours but no longer than that. Remove it from the fridge the next day and fill it per instructions. Double the second rising time to 1 hour before it is baked so the īhi (yeast) has time to wake up again.
Yes. Once baked, wrap tightly and freeze. Thaw at room temperature and warm in the oven or air fryer before serving.
Your dough should be soft, slightly elastic, and pass the “poke test” after it has been kneaded. It should slowly spring back when gently pressed.
This can be for a number of reasons. The first one is adding extra puehu parāoa (flour) in to the recipe, the more you add, the denser it will be. Try following the measurements exactly and I promise they won't be dense. Also, make sure the rising time is stuck to unless it is cold in your kitchen. If so, increase the rising times by 10 - 15 minutes to boost the rising of the dough.

Nat Pua
Loveeee this recipe! I made many mistakes along and the way and it still somehow turned out great! The fam loved it and it was an awesome way to share about Matariki with my kids. Hardest part was rolling the dough into circle shapes haha
Naomi Toilalo WhānauKai
Bahahaha Natty! I need to add you need to ROUGHLY flatten them in to circles and then use your hands to tell the dough what to do ha ha!
Miranda Shackell
This is a show stopper! Looks amazing and tastes just as good!
Naomi Toilalo WhānauKai
Oh yay! Thanks so much Miranda!
Anna
I made this today for our school Matariki celebration. My son named her Hiwa-i-te-rangi after the star he has been doing a project on. Such a beautiful recipe, the time and love that goes into it is so worth the final result. It's just gorgeous!!! To look at and eat. People thought it was too pretty to pull apart but then it was gone in minutes. Thank you so much for sharing this wonderful treat.
Naomi Toilalo WhānauKai
Kia ora Anna, this is so beautiful to read. Thanks so much for letting me know. What a wonderful thing to do for Matariki!
Jess
So delicious and easy to make. The perfect recipe to add to Matariki celebrations! Te reka hoki!
Naomi Toilalo WhānauKai
Tēnā koe e hoa - that is so wonderful to hear, we love it for Christmas and Matariki. Such a fun recipe aye!