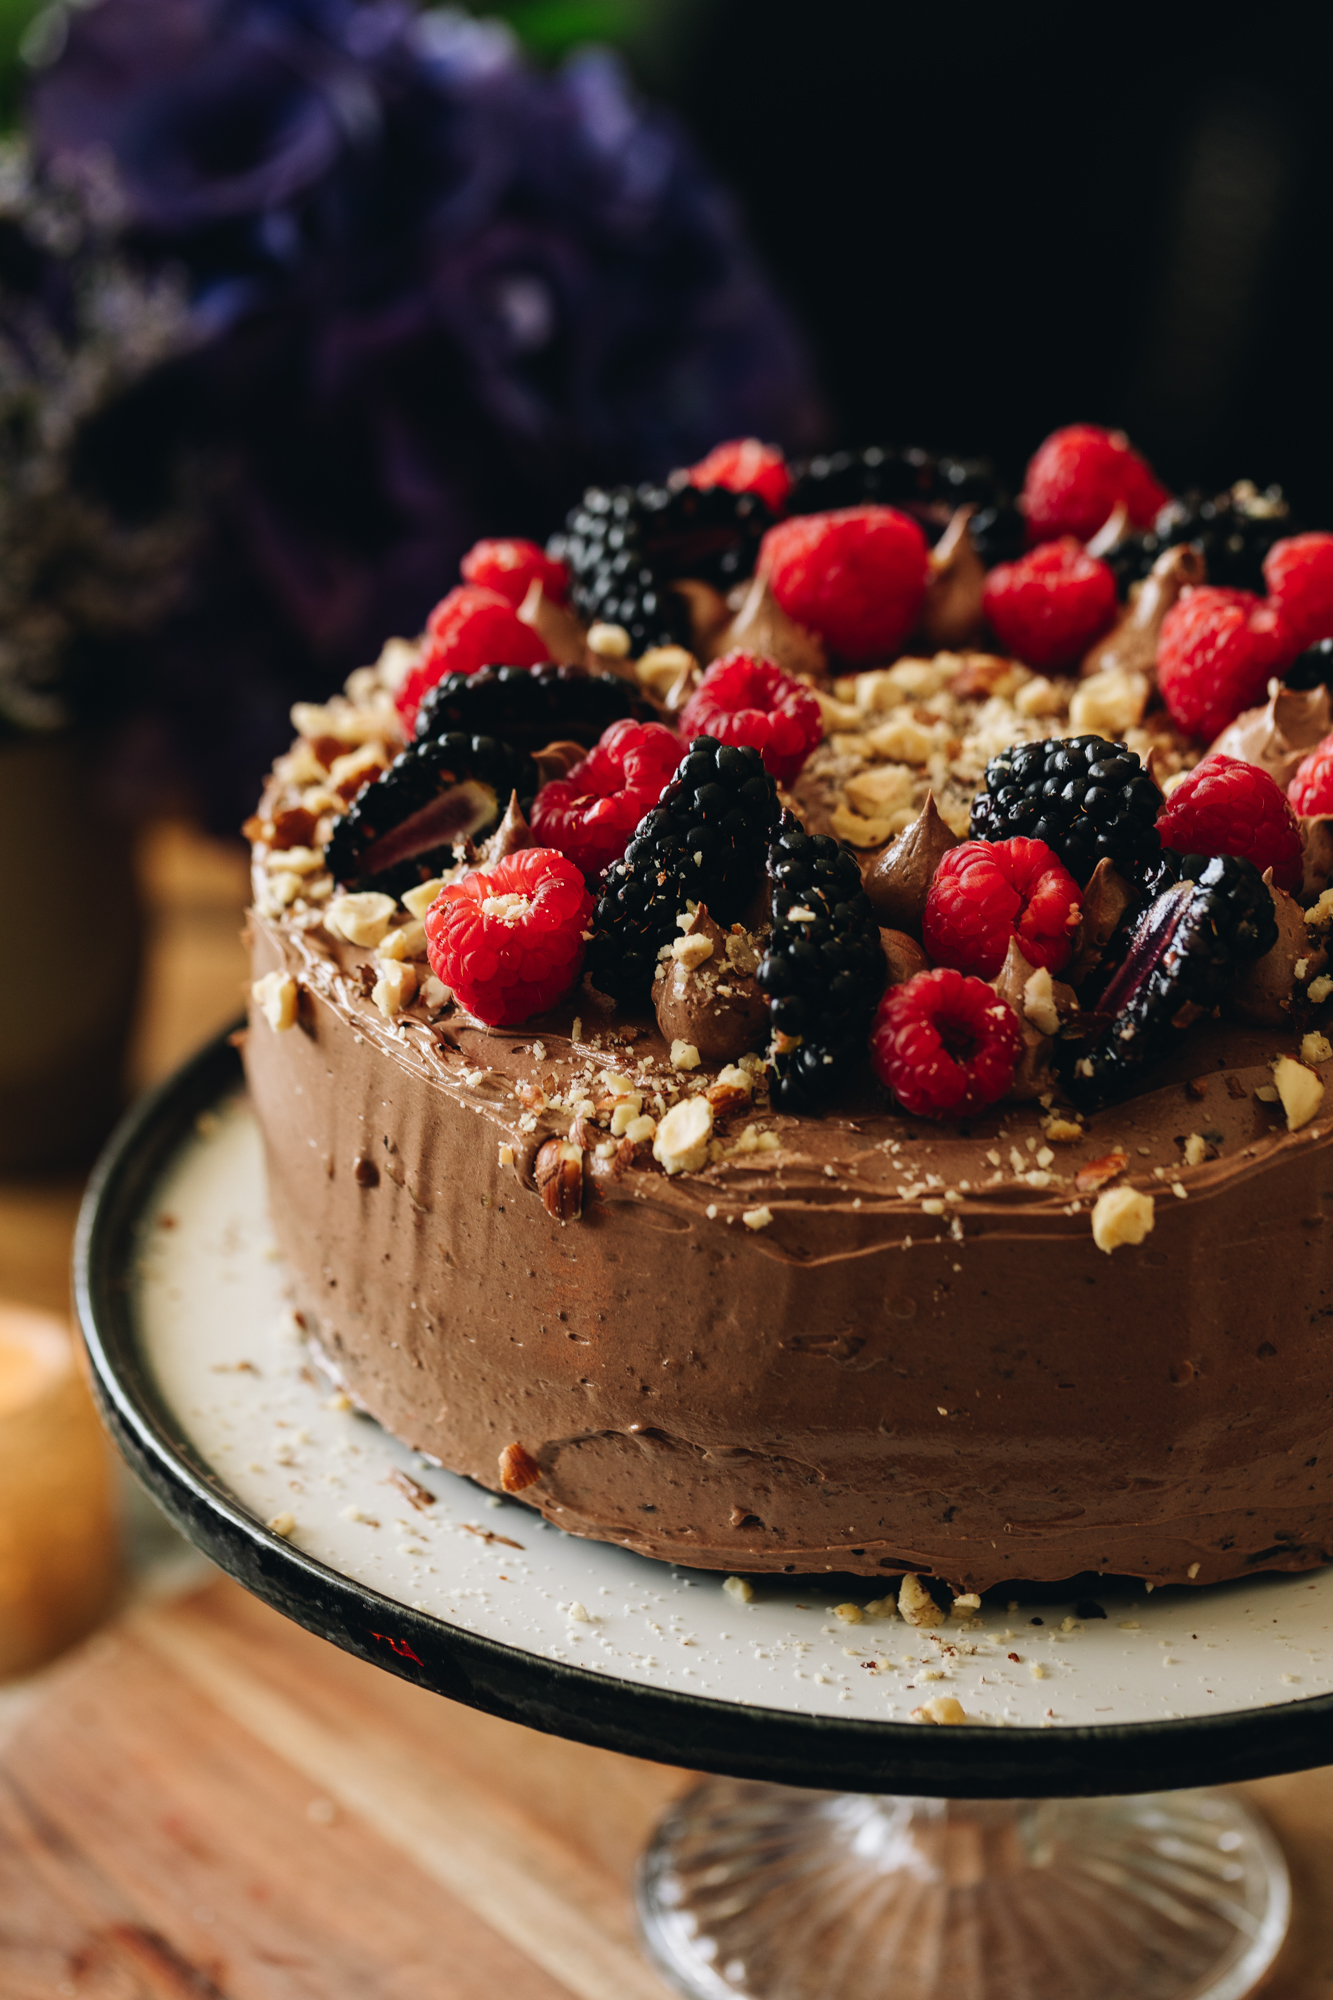
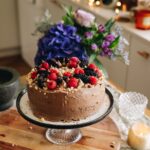
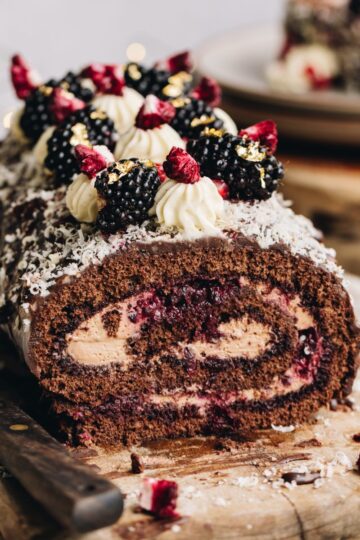
Meet my tried and tested Gluten-free Chocolate Hazelnut Cake that is both rich and delicate at the same time. Start with a chocolate hazelnut cake, spread it lovingly with hazelnut spread and add freshness with fruit. Cover it in a delicious chocolate buttercream and decorate how ever you want. Perfect for an easy morning tea or a celebration cake.
I love my chocolate hazelnut cake recipe for its perfect combination of flavours. Therefore, I wanted to make sure that there was a keke (cake) available to our gluten free whānau too. So what are we waiting for? :et’s bless someone with a delicious, homemade keke tiakarete me te hānati (chocolate and hazelnut cake).
More tiakarete (chocolate) inspired keke:
Do you love the sound of this keke but don't need it to be gluten-free? I am one step ahead of you, check out my Chocolate Hazelnut Cake - it is truly divine! Or does tiakarete (chocolate) and aramona (almond) with biscoff sound more like you? Then this Chocolate Almond Cake is the keke (cake) for you.
Videography and photography by Sarah Henderson.

- Vinegar: I add vinegar to milk to make buttermilk in this recipe. Any vinegar will do but lemon juice works as well. If you want to replace homemade buttermilk with the store bought version, go for it!
- Cocoa: I prefer to use dutch cocoa in all of my cakes but this can be expensive so use what you have.
- Coffee powder: This helps lift the flavour of the cocoa in the cake. Use caffeinated or decaf, it really doesn't matter which one.
- Oil: I use a neutral flavoured olive oil in this cake but again, use what you have. As long as it is neutral flavoured, it will work.
- Hazelnuts: I have given you options to keep the hānati (hazelnuts) raw or toast them for a deeper flavour in the keke (cake). You choose which vibe you are going for.
- Dark chocolate: I like the richness that dark chocolate brings to this buttercream but you can use any chocolate you like.
Expert Tips:
Bake the cake gently on 150 degrees celsius, this gentle heat creates an even bake of the cakes with no doming. This means the keke (cakes) do not need to be trimmed after baking.
If your oven naturally runs hot or only has a fan bake setting, turn the oven down by 20 degrees.
These keke (cakes) can be made ahead of time and develop a delicious flavour this way: Up to 3 days before decorating, bake the cakes and allow them to completely cool. Wrap the cakes in plastic wrap and store for a few days in a sealed container, in a cool cupboard.
I always use two cake tins when I am baking a layered cake, this helps bake the cakes evenly and also cuts down on baking time.
If you want to inject even more moisture into the keke (cake) then poke holes in to the freshly baked cakes with a chopstick. Then add 4 tablespoons of the juice from the canned poihanapere (boysenberries) on to each one.
When decorating this cake, use my decorations as a guide but use whatever makes you happy. Decorating is all about experimenting and just giving it a go. Whatever you do, it will taste delicious.
You can also cover this keke (cake) in my dairy-free chocolate frosting and make this a dairy-free, gluten-free keke (cake) due to the absence of pata (butter) in the cake itself.
Step by step instructions for the Chocolate Hazelnut Cake:
Note: The full recipe card with the full list of ingredients, instructions and step by step video are found at the bottom of this page.

1. TOAST THE HAZLENUTS (OPTIONAL):
If you want a more pronounced hānati (hazelnut) flavour in this keke (cake), toast the hānati (hazelnuts) before making the batter.
Add the whole nuts in to a dry frying pan and over medium heat, toast the nuts until fragrant. Once they are toasted, add them to a tea towel and rub off the skins. Then allow them to cool as you make the cake batter.
2. PREHEAT THE OVEN:
Grease and line 2 x 19 cm or 20 cm cake tins with baking paper on the base and sides.
Preheat the oven to 150 °C, bake setting or 140 °C fan bake setting.

3. MAKE THE BUTTERMILK:
Combine the miraka (milk) and winika (vinegar) in a glass. Stir to create a simple buttermilk and leave it to the side.
Note: This can be swapped for the same amount of buttermilk if you want, without the vinegar added of course.
4. MAKE THE COCOA MIXTURE:
To a jug or medium bowl, add the kōkō (cocoa), huka hāura (brown sugar), tote (salt) and paura kawhe (coffee powder). Whakawhenumia (combine it together).
Boil the jug and pour the wai wera (hot water) in to the cocoa mix. Kaurorihia (stir it). When the ranunga kōkō (cocoa mixture) is smooth and free of lumps, pour in the miraka pata (buttermilk) and stir it in. Leave it to the side.

5. WHIP THE EGGS:
In to a large bowl, add the hēki (eggs), huka one (caster sugar) and wanira (vanilla). Using a whisk, whip for a minute or so until smooth.
Slowly drizzle in the noni (oil) as you whisk it in to a smooth batter.
Continue whisking as you pour in the cocoa mixture until it is all incorporated.

6. PREPARE THE HAZELNUTS:
Add the hānati (hazelnuts) in to a blender or food processor and turn them in to a crumb. Be careful not to take them too far as they will start to turn in to hazelnut butter so just pulse them until a crumb forms. Reference the video for a visual cue.
7. Mix IN THE DRY INGREDIENTS:
Add the kongakonga hānati (hazelnut crumb) in to the egg and cocoa mixture along with puehu parāoa (flour), pēkana paura (baking powder) and pēkana houra (baking soda).
Whisk it all together for a minute or so until the batter is smooth.

8. BAKE THE CAKES:
Divide the mixture evenly between the two prepared cake tins and then smooth it out.
Bake for 35 minutes or until they spring back in the centre when pressed
9. ADD THE BOYSENBERRY SYRUP (OPTIONAL):
Once the cakes are baked, remove them from the oven and poke holes all over them with a chopstick. Then drizzle 4 tablespoons of the juice from the canned poihanapere (boysenberries) on to each cake.
Allow them to cool in the tin to soak up the juices for 10 minutes and then flip the cakes on to a cooling rack to completely cool.
10. COOL THE CAKES:
If you are not using the syrup, remove the cakes from the oven and flip them straight on to a cooling rack. This helps them stay flat so you don't have to trim them.
Leave the baking paper on the cakes until you are ready to decorate them. Allow them to completely cool before decorating.
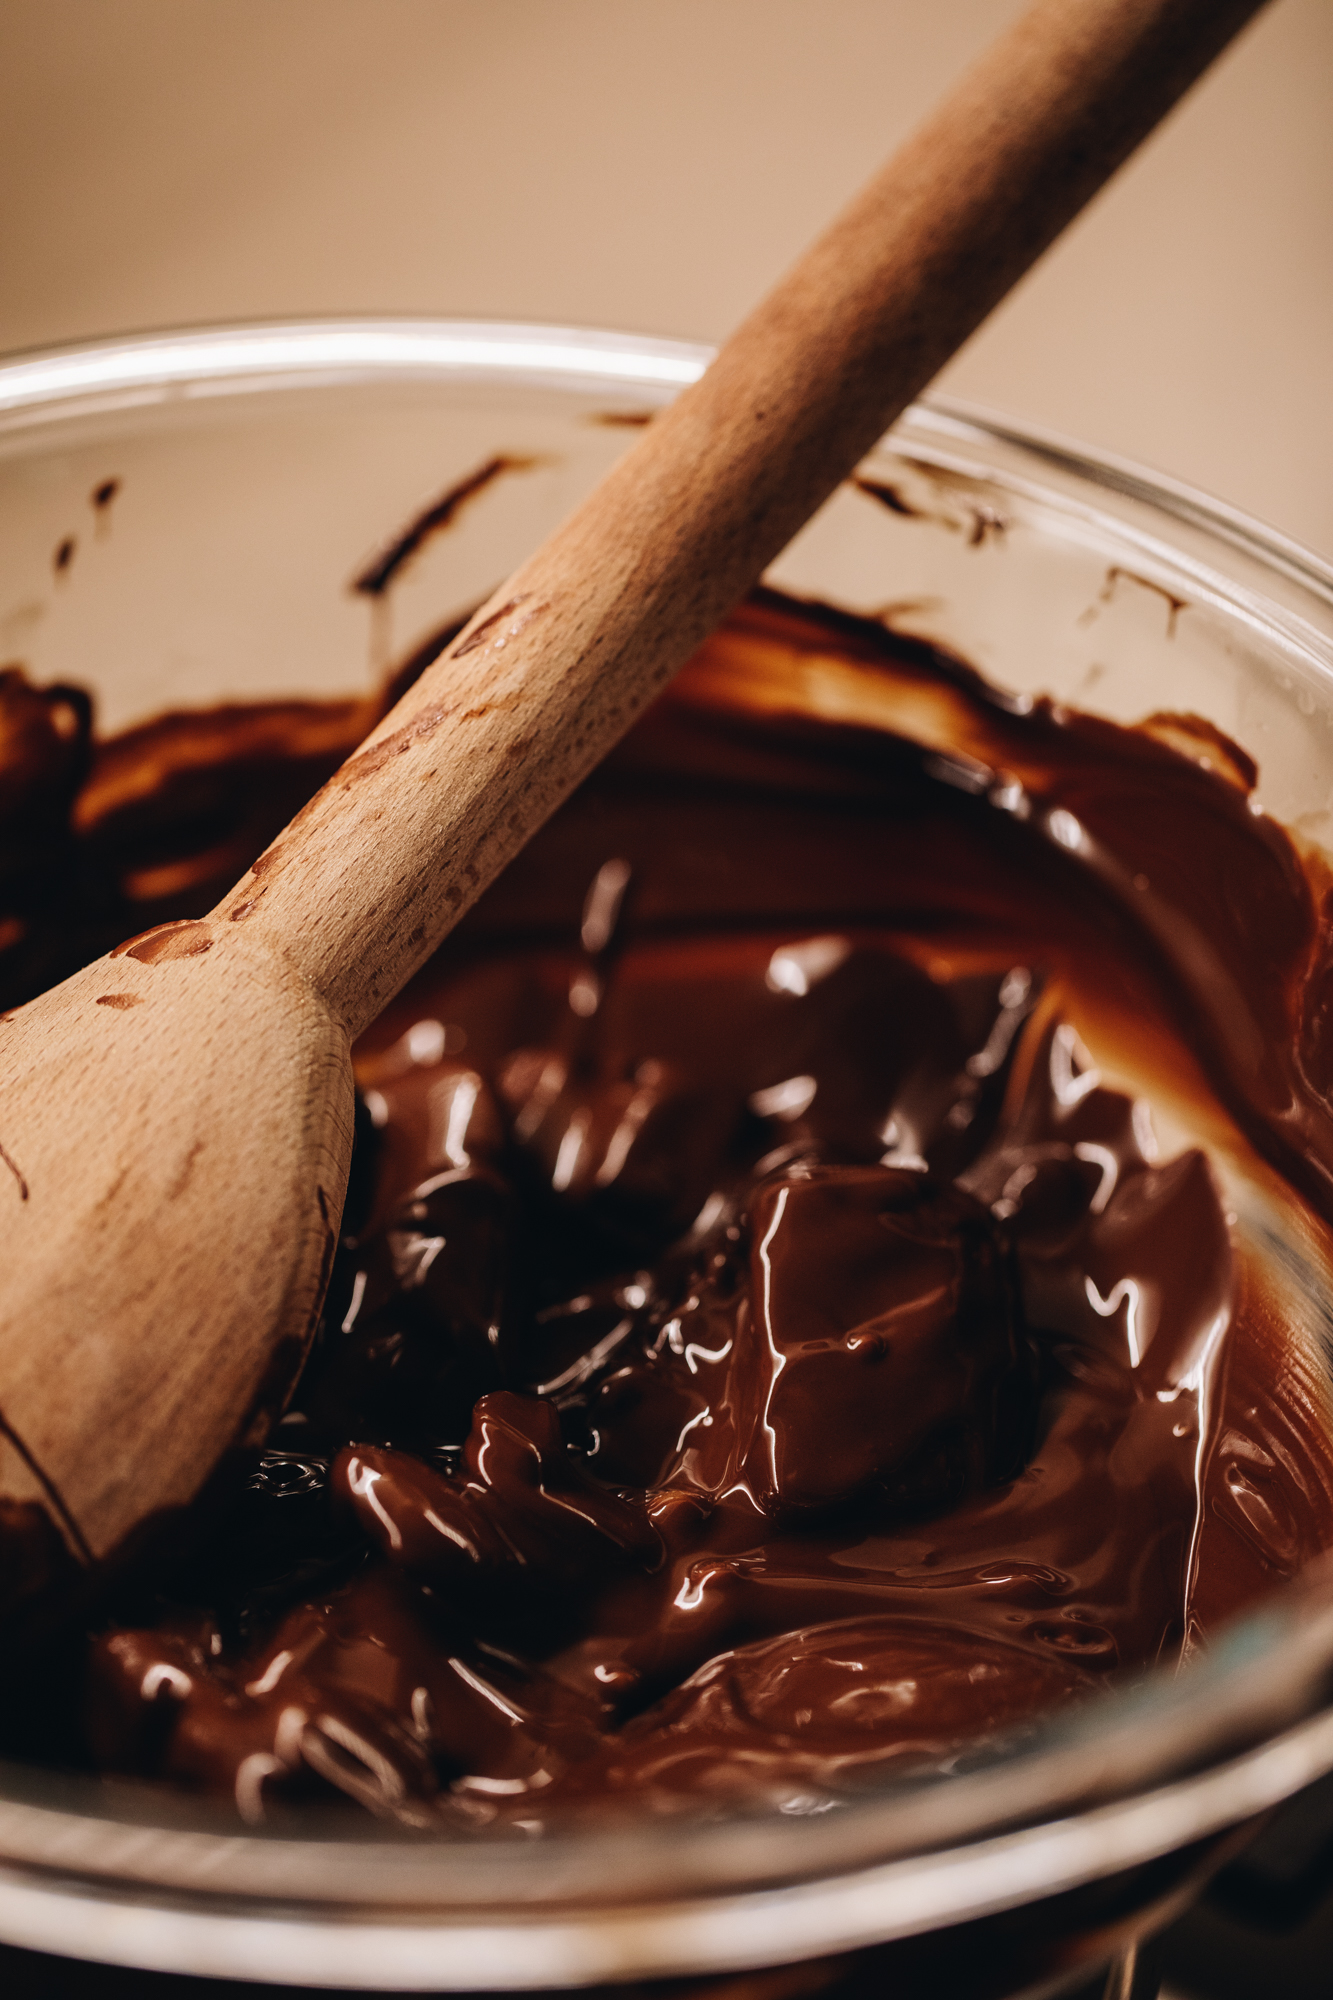
11. MELT THE CHOCOLATE FOR THE BUTTERCREAM:
Chop the tiakarete parauri (dark chocolate) roughly in to chunks. Add the tiakarete parauri (dark chocolate) and kirīmi (cream) or miraka (milk) to a bowl.
Gently melt it in the microwave in 20 second bursts, stirring well between each time. You can also melt it gently in a heat-proof bowl that is sitting over a pot of barely simmering water (around 3cm deep). Once it is smooth and melted, remove from the heat and leave the tiakarete (chocolate) to cool for 5 minutes.

12. WHIP THE BUTTER AND SUGAR:
Add the pata kūteretere (softened butter), puehu huka (icing sugar) and wanira (vanilla) to a large bowl. Tāwhiuwhiua (whip it) for around 4-5 minutes until light and fluffy in colour and texture.
Add the kōkō (cocoa) and whip it for 30 seconds, until it is all incorporated.
13. WHIP IN THE CHOCOLATE:
Add the warm chocolate mixture, a few tablespoons at a time to the butter mixture as you whip continuously.
Once it is all incorporated, refrigerate for 5 to 10 minutes to thicken slightly and then it is ready to use.

14. Decorate the First Cake with Buttercream:
Once the cakes are completely cool and the pani reka (buttercream) is ready to go, it is time to assemble.
Place the first cake on to a serving plate or cake stand.
Add around ⅓ C of the pani reka (buttercream and spread it over the top of the keke (cake).
Once it is smooth, pipe a border around the edge. If you don't have a piping bag, just add small blobs of buttercream around the edge of the cake and use a spoon to create a border. This helps keep the filling in.

15. Add the Chocolate Hazelnut Spread:
Spread the pata hānati tiakarete (chocolate hazelnut spread) to the edges of the border.

16. Add the Boysenberries:
Drain the juice off the poihanapere (boysenberries) and add the berries on to the pata hānati tiakarete (chocolate hazelnut spread). I use around ¾ C of berries.

16. Cover the Cake in Buttercream:
Add the second keke (cake) on top and press it down gently. Continue to spread the pani reka (buttercream) on top of the keke (cake) and down the sides.
Make sure to take the time to smooth it out.
Pipe around ¼ C of the buttercream on top of the cake in whatever fashion you want.

17. Decorate the Top:
Add the rahipere (raspberries) around the top of the cake.
Cut the parakipere (blackberries) in half and arrange them in between the rahipere (raspberries).
As an option, sprinkle with a handful of extra kongakonga hānati (hazelnut crumb).

Store the Cake:
Store this keke (cake) in a sealed container in a cool place. It will develop in flavour as it sits and in my opinion is even better a few days after it is baked. It will keep well for up 5 days.
In the hotter months you can store the decorated and uncut cake it in the refrigerator but bring it room temperature before eating. Once it is cut, don't keep it in the fridge as the cake will dry out.
Have a little peep at these other
Keke (Cake) Recipes
A slice of cake will always add a touch of joy to someone's day.
DID YOU ENJOY THIS RECIPE?
It would be so awesome if you could please leave a review/comment by clicking the “leave a comment” section at the top of the page.
I love seeing you all make my creations, so send a whakaahua (photo) or kiriata (video) to my Instagram and show me what you made. Let me know if you have any pātai (questions) too, I would love to help.
Gluten-free Chocolate Hazelnut Cake - Keke Hānati Tiakarete Kore-Wīti
Equipment
- 2 x 19 cm or 20 cm Springform Cake Tins.
Ingredients
Chocolate Hazelnut Cake - Keke Tiakarete me te Hānati
- ¾ C (185 ml) miraka (milk)
- 2 tablespoon winika (vinegar, any kind apart from malt vinegar, you can also use the same amount of lemon juice)
- 1 C (100 g) kōkō
- ½ C (100 g) huka hāura (brown sugar)
- ½ teaspoon tote (salt, fine)
- ½ tablespoon paura kawhe (coffee powder, instant)
- 1 C (250 ml) wai wera (hot water, from the kettle)
- 3 hēki (eggs, size 6)
- 1 C (220 g) huka one (caster sugar)
- ½ tablespoon wanira (vanilla)
- ½ C (125 ml) noni (oil, neutral oil, I use olive oil but use what you have)
- 1 C (150 g) hānati (hazelnuts, whole and raw)
- 1 ½ (210 g) gluten-free baking mix (I use the Healtheries baking mix)
- ½ teaspoon pēkana paura (baking powder)
- ½ teaspoon pēkana houra (baking soda)
Chocolate Buttercream - Pani Reka Tiakarete
- 150 g tiakarete parauri (dark chocolate, 50%)
- 3 tablespoon kirīmi, miraka rānei (cream or milk)
- 180 g pata kūteretere (softened butter)
- ⅔ C (110 g) puehu huka (icing sugar)
- 2 teaspoon wanira (vanilla)
- ¼ C (25 g) kōkō (cocoa, dutch is best)
The Decorations - Ngā Whakarākei
- ⅔ C (190 g) pata hānati tiakarete (chocolate hazelnut spread). I used a good quality one but use what you prefer.
- 425 g kēna poihanapere (can of boysenberries, in syrup)
- 10 rahipere (raspberries, fresh)
- 8 parakipere (blackberries)
- A handful of hānati nakunaku (crushed hazelnuts, optional)
Instructions
Toast the Hazelnuts (Optional):
- Note: If you want a more pronounced hānati (hazelnut) flavour in this keke (cake), toast the hānati (hazelnuts) before making the batter. Add the whole nuts in to a dry frying pan and over medium heat, toast the nuts until fragrant.
- Once they are toasted, add them to a tea towel and rub off the skins. Allow them to cool as you make the cake batter.
Preheat the Oven:
- Grease and line 2 x 19 cm or 20 cm cake tins with baking paper on the base and sides.
- Preheat the oven to 150 °C, bake setting or 140 °C fan bake setting.
Make the Buttermilk:
- Combine the miraka (milk) and winika (vinegar) in a glass. Stir to create a simple buttermilk. Leave to the side. Note: This can be swapped for the same amount of buttermilk if you want, without the vinegar added of course.
Make the Cocoa Mixture:
- To a jug or medium bowl, add the kōkō (cocoa), huka hāura (brown sugar), tote (salt) and paura kawhe (coffee powder). Whakawhenumia (combine it together).
- Boil the jug and pour the wai wera (hot water) in to the cocoa mix. Kaurorihia (stir it). Once the ranunga kōkō (cocoa mixture) is smooth and free of lumps, pour in the miraka pata (buttermilk) and stir it in. Leave to the side.
Whip the Eggs:
- In to a large bowl, add the hēki (eggs), huka one (caster sugar) and wanira (vanilla). Using a whisk, whip for a minute or so until smooth.
- Slowly drizzle in the noni (oil) as you whisk it in to a smooth batter. Continue whisking as you pour in the cocoa mixture.
Prepare the Hazelnuts:
- Add the hānati (hazelnuts) in to a blender or food processor and turn them in to a crumb. Be careful not to take them too far as they will start to turn in to hazelnut butter. Just pulse until a crumb forms. Reference the video for a visual cue.
Fold in the Dry Ingredients:
- Add the kongakonga hānati (hazelnut crumb) in to the egg and cocoa mixture along with puehu parāoa (flour), pēkana paura (baking powder) and pēkana houra (baking soda).
- Whisk it all together for a minute or so until the batter is smooth.
Bake the Cakes:
- Divide it evenly between the two prepared cake tins.
- Bake for 35 minutes or until they spring back in the centre when pressed.
- Remove the cakes from the oven. Flip them straight on to a cooling rack as this helps them stay flat so you don't have to trim the cakes. Leave the baking paper on the cakes until you are ready to decorate them.Allow them to completely cool before decorating.
Add the Boysenberry Syrup (Optional):
- Note: If you want to inject even more moisture into the keke (cake). Once the cakes are baked, remove them from the oven and poke holes all over them with a chopstick. Then drizzle 4 tablespoons of the juice from the canned poihanapere (boysenberries) on to each cake. Allow to cool in the tin to soak up the juices for 10 minutes and then flip the cakes on to a cooling rack to completely cool.
Cool the Cakes:
- If you are not using the syrup, remove the cakes from the oven and flip them straight on to a cooling rack. This helps them stay flat so you don't have to trim them.
- Leave the baking paper on the cakes until you are ready to decorate them. Allow them to completely cool before decorating.
Melt the Chocolate for the Buttercream:
- Chop the tiakarete parauri (dark chocolate) roughly in to chunks. Add the tiakarete parauri (dark chocolate) and kirīmi (cream) or miraka (milk) to a small bowl.
- Gently melt it in the microwave in 20 second bursts, stirring well between each time. This should take a minute or just over. You can also melt it gently in a heat-proof bowl that is sitting over a pot of barely simmering water (around 3cm deep). Make sure the bowl is not touching the water. Stir it occasionally until it is melted.
- Once smooth and melted, leave the tiakarete (chocolate) to cool for 5 minutes.
Whip the Butter and Sugar:
- Add the pata kūteretere (softened butter), puehu huka (icing sugar) and wanira (vanilla) to a large bowl. Tāwhiuwhiua (whip it) for around 4-5 minutes until light and fluffy in colour and texture.
- Add the kōkō (cocoa) and whip it for 30 seconds.
Whip in the Chocolate:
- Drizzle in the warm chocolate mixture, a few tablespoons at a time to the butter mixture as you whip continuously.
- Once it is all incorporated, refrigerate for 5 to 10 minutes to thicken slightly and then it is ready to use.
Decorate the First Cake with Buttercream:
- Once the cakes are completely cool and the pani reka (buttercream) is ready to go, it is time to assemble.
- Place the first cake on to a serving plate or cake stand.
- Add around ⅓ C of the pani reka (buttercream and spread it over the top of the keke (cake).
- Once it is smooth, pipe a border around the edge. If you don't have a piping bag, just add small blobs of buttercream around the edge of the cake and use a spoon to create a border. This helps keep the filling in.
Add the Chocolate Hazelnut Spread:
- Spread the pata hānati tiakarete (chocolate hazelnut spread) to the edges of the piped border.
Add the Boysenberries:
- Drain the juice off the poihanapere (boysenberries) and add the berries on to the pata hānati tiakarete (chocolate hazelnut spread). I use around ¾ C of berries.
Cover the Cake in Buttercream:
- Add the second keke (cake) on top and press it down gently. Continue to spread the pani reka (buttercream) on top of the keke (cake) and down the sides. Make sure to take the time to smooth it out.
- Pipe around ¼ C of the buttercream on top of the cake in whatever fashion you want.
Decorate the Top:
- Add the rahipere (raspberries) around the top of the cake. Cut the parakipere (blackberries) in half and arrange them in between the rahipere (raspberries).
- As an option, sprinkle with a handful of extra kongakonga hānati (hazelnut crumb).
Store the Cake:
- Store this keke (cake) in a sealed container in a cool place. It will develop in flavour as it sits and in my opinion is even better a few days after it is baked. It will keep well for up 5 days.
- In the hotter months you can store the decorated and uncut cake it in the refrigerator but bring it room temperature before eating. Once it is cut, don't keep it in the fridge as the cake will dry out.


Mary Allen
Kia ora Naomi
I’ve just discovered your insta page through a friend, our Minister at church.
I’ve received your gluten free chocolate hazelnut keke recipe & can’t wait to try baking it!
Just a minor (but significant point for celiacs): in the ingredients, first vinegar, one needs to be mindful that celiacs can’t eat malt vinegar. So any vinegar except malt.
Nga mihi,
Arohanui
Mary xx
Naomi Toilalo WhānauKai
Amazing Mary, how wonderful to hear. Thank you so much for that feedback on the malt vinegar, that is definitely news to me so is very welcomed. I hope you enjoy the recipe. I also have gluten free and dairy free orange cake on here that you might enjoy. Ngā mihi nui, Naomi