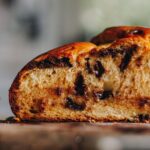
Braided Brioche Chocolate Chip Bread - Parāoa Tōpuku Me Ngā Titipi Tiakarete
A slightly sweet braided brioche bread with a hint of vanilla and pops of chocolate chips. Serve it with lightly sweetened whipped vanilla butter.
Servings 1 large loaf (16 slices)
Ingredients
The Dough - Te Pokenga
- ⅔ C (165 ml) wai wera (hot water, from the tap)
- ½ C (125 ml) miraka (milk)
- ½ C (100 g) huka hāura (brown sugar or caster sugar)
- 1 ¼ tablespoon (10g) īhi tere (instant yeast)
- 2 hēki iti (small eggs, size 6)
- 1 tablespoon wanira (vanilla)
- 4 ¼ C (635 g) puehu parāoa kounga (high grade flour)
- 2 teaspoon tote (salt, fine)
- 70 g pata kūteretere (softened butter, cut into small pieces)
- 1 C (200 g) titipi tiakarete (chocolate chips or drops, I prefer drops as they are a bit bigger)
The Glaze - Te Mōhinuhinu
- 1 tablespoon huka hāura (brown sugar)
- 1 hēki (egg)
The Final Glaze - Te Mōhinuhinu Whakamutunga
- 30 g pata (butter)
- 2 tbsp marahihi māpere (maple syrup, honey will also work here)
Instructions
Activate the Yeast:
- Add the wai wera (hot water), miraka (milk) and huka hāura (brown sugar) in to a large bowl. Stir it all together until the sugar is dissolved.
- Stir in the īhi tere (instant yeast) and allow it to activate for five minutes until foamy. The īhi (yeast) has activated when it has floated to the top.
Add in the Remaining Ingredients:
- Add the hēki (eggs), puehu parāoa (flour) and tote (salt) in to the yeast mixture. Using a bread and butter knife, mix it all together until a dough forms.
- Once the dough is roughly incorporated, it is time to knead the dough.
Knead the Dough:
- If you are using a mixer, place the dough in the mixing bowl. Using a dough hook, knead for 9 – 10 minutes on low - medium speed.
- If you are kneading by hand, add the dough to a lightly floured bench or table. Knead the dough with the palms of your hands (not with your fingers), for 10 - 12 minutes.
Kneading Tip:
- Whether you are hand or machine kneading this dough it is quite sticky but try not to add extra flour just trust the process.
- Remember, a slightly sticky dough is better than a stiff dough.
Add the Chocolate Chips:
- Once the dough is lovely and stretchy, stretch it on to the bench and sprinkle over the titipi tiakarete (chocolate chips/drops). Fold in the corners and gently knead them in until they are evenly distributed.
First Rise:
- Mould the pokenga (dough) in to a ball and add it in to a clean bowl. Cover with a tea towel or bowl cover.
- Leave it on the bench for 1 ½ - 2 hours or until it has doubled in size.
Instructions for a Three Strand Plait:
- Once it has risen, tip the pokenga (dough) on to the table and cut it in to three equal portions.
- Then roll each piece in to a 35 cm rope and arrange the pieces side by side. Pinch the three ends together at the top.
- Take the strand from the left and place it over the middle strand. Take the strand from the right and place it over the middle strand.
- Repeat this process until all the dough is braided.
- Tuck both of the ends in so you have a nice shape and place it on to a well oiled 30 cm x 40 cm tray.Skip to the 'Second Rise' step.
Instructions for a Four Strand Braid:
- Once the dough has risen, cut the dough into four equal portions. I weigh mine for accuracy but you can just eye ball it if you want to.
- Roll each portion into a 30 cm rope.
Create the Four Strand Braid:
- Arrange the the pieces side by side. Pinch the four ends together at the top.
- Take the fourth strand (on the right) and weave it over and under the other strands until it lands on the other side.
- Repeat this process until all the dough is braided, always taking the strand from the right hand side and weaving it under and over all the other pieces.
- Tuck both of the ends in so you have a nice shape and place it on to a well oiled 30 cm x 40 cm tray.
Second Rise:
- Regardless of what braid you made, cover the tray with a tea towel and rise it for 50-60 minutes.
Preheat the Oven:
- 10 minutes before the bread has finished rising, 180 °C bake setting or 170 °C fan bake setting.
Glaze the Bread:
- Add the hēki (egg) or the miraka (milk) and huka hāura (brown sugar) in to a small bowl and whisk it until smooth.
- Then baste it all over the parāoa (bread) with a pastry brush. This helps the bread become golden when baking.
Bake the Bread:
- Place the parāoa (bread) in the oven and bake for 10 minutes at 180 °C bake setting or 170 °C fan bake setting.
- Then, turn the oven down to 160 °C bake setting or 150 °C fan bake setting and bake for a further 35 minutes.
Make the Final Glaze:
- Just before the parāoa (bread) has baked, melt the pata (butter) and marahihi māpere (maple syrup or honey) in a pot or in the microwave.
Glaze the Bread again:
- Remove the delicious parāoa (bread) from the oven and brush on the mōhinuhinu (glaze).
Serve the Bread:
- Allow the parāoa (bread) to cool for five minutes before slicing it. Serve it warm with my fresh with my whipped vanilla butter.
Store the Braided Chocolate Chip Bread:
- This loaf will be at its best on the day but will also make great toast the next day.
- In general, I keep homemade bread in a plastic bag for a day on the bench.
- Beyond that I slice it and store it in the freezer and remove a piece at a time for toasting.